


Preface🌟
Disclaimer: This was just for fun. In a real-world setting, there are more appropriate options that address modern data warehousing challenges for different businesses depending on the problem statement at hand, so consider your company's (or client's) unique challenges before replicating any techniques used in this blog.
Why build this in the first place...?🤨
This is a quick-fire project to demonstrate an event-driven Postgres data warehouse can be built using vanilla Python and SQL code while remaining performant and highly available for analytical use cases.
Here's why I used each language:
Python - for creating the pipelines connecting the different layers
SQL - for creating and querying the Postgres tables
Although cloud data warehouses are growing increasingly popular in the analytics world, there are still scenarios where traditional data warehouses would serve an enterprise better than a cloud data warehouse. More on this will be shared in a future blog post.
Configuration⚙️
GitHub repo
I create a GitHub repo called postgres-dwh and set up the remote repository on my local machine.
Once I enter the folder of my choice, I clone the remote repo to the folder:
git clone <https://github.com/sdw-online/postgres-dwh.git>
…then I re-direct myself into the new local repo:
cd postgres-dwh
…and then create a branch:
git checkout -b config-branch
… then finally create the files to start with (via Windows terminal):
type NUL > .gitignore & type NUL > environment.yaml & type NUL > requirements.txt & type NUL >README.md & type NUL > .env
…and now I’m in!
Environment.yaml
Although I'm using conda as my primary package manager, I pull most of my Python modules from conda-forge because some of my preferred modules may not be available in the default Anaconda channel.
Here's what my environment.yaml file looks like:
name: postgres_dwh
channels:
- conda-forge
dependencies:
- python=3.10
- pandas
- faker
- path
- psycopg2
- configparser
Then I create my environment with this command in the terminal (once I’m in the directory of my choice):
conda env create -f environment.yaml
…and then I activate my environment with this:
conda activate postgres_dwh
...and then add my other modules to the requirements.txt file and install them using:
pip install -r requirements.txt
Architecture📉
Layers🌰
The DWH architecture will consist of:
Raw layer - for extracting data from source systems
Staging layer - for cleaning and pre-processing raw data
Semantic layer - for consolidating and integrating clean data
Data warehouse layer - for exposing SVOT to the target end users and (downstream teams, external stakeholders etc)
Presentation layer - for creating data stories with the SVOT data
Governance layer - for setting policies and practices to keep enterprise data accurate, consistent and high quality
Orchestration layer - for managing the execution of workflows via event-based triggers or time intervals
From the raw to data warehouse layer I include data profiling metrics that display the properties and statistics involved in each stage to the console so that I can monitor the quality of the data moving between stages.
Here's what they look like for generating travel data for this project:
If there are any unusual behaviours between processes I can point that out from the data profile metrics and troubleshoot them accordingly.
Raw layer1️⃣
Load source tables into raw tables
Highlight sensitive fields
Add event logging
Run data profiling checks
The main objective here is to get the source data pulled (or copied) into this section. This means no transformations will be applied at this stage because the data needs to be as close to its original state as possible in a tabular format.
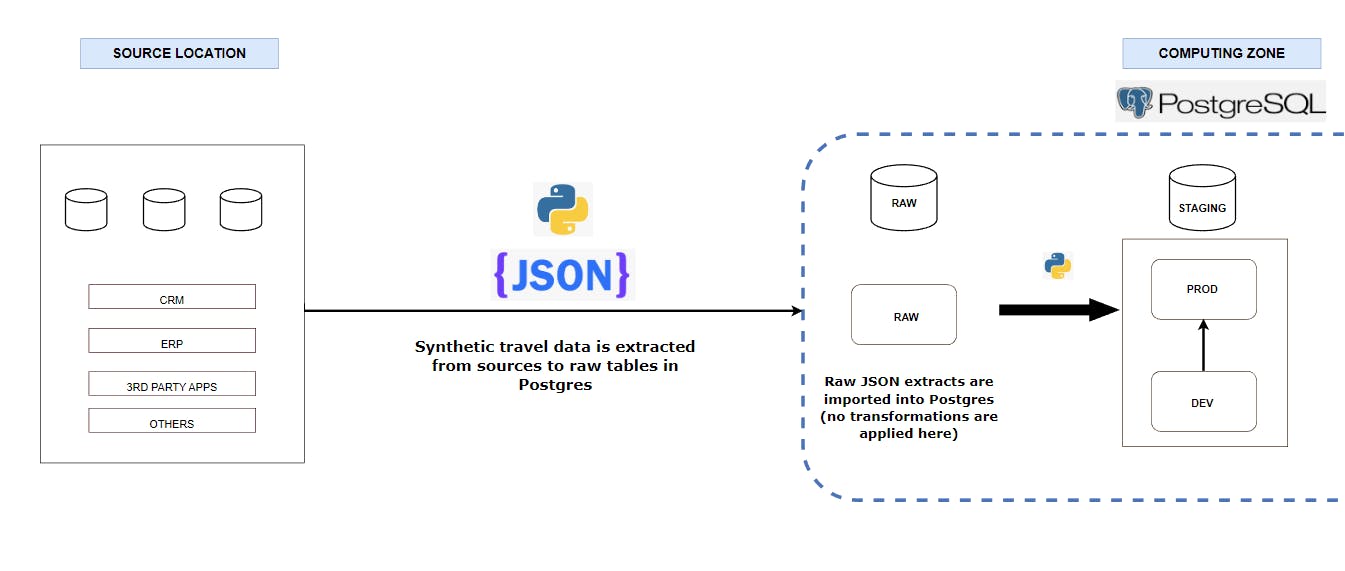
This stage is also useful for assessing the tables, columns and rows that contain any sensitive data that could compromise the privacy of any person or entity connected to the business if not treated appropriately, so I've pointed them out for all tables and laid out the treatment I've adopted in the DWH at the data governance section.
Staging layer2️⃣
My focus at this layer is to clean the data and shape it into a format suitable for adding business rules. This is done by first outlining the transformation specifications for each table and then setting up their data quality checks to test the constraints placed on the data.
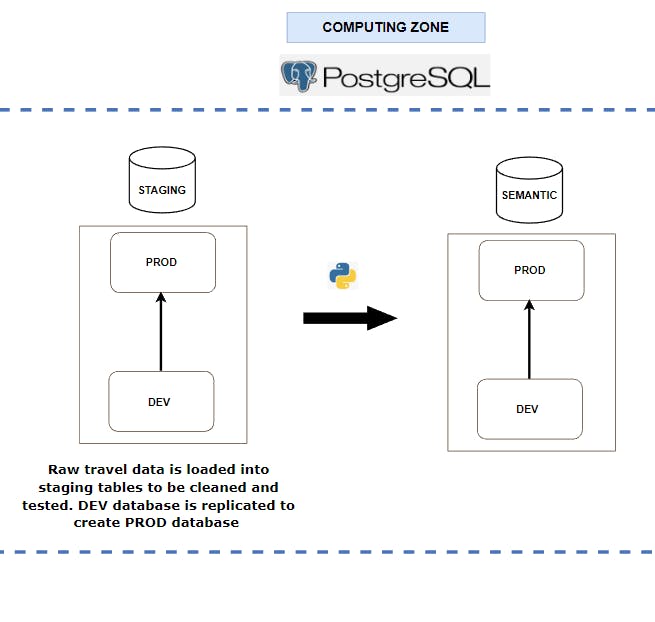
Once I've specified the transformation strategy, I convert my transformation intents into Python logic, which will carry the heavy-lifting transformations for this project. SQL will simply be used for creating tables and inserting data from the raw tables into staging tables.
After the DQ tests are complete, the main database used will serve as the development environment (or DEV environment for short). The orchestration tool will spin up a production environment (or PROD environment for short) by replicating the tested DEV environment.
Here is what the DQ tests and report look like in real-time:
The PROD environment will be the ideal environment used for any reporting and analysis, while the DEV will be used for data scientists and analysts to run their tests and experiments.
Semantic layer3️⃣
At this layer, the cleaned data is framed and tested to form the single version of truth. This is done by using the staging tables to create the MDM tables that will be used for dimensional modelling.
To kick-start this section a DEV database is created. Then I create empty semantic tables in the database. After that, the staging data is loaded into the semantic tables using foreign data wrappers, and then the business rules are added to the semantic tables. Then a date dimension table is created to add granularity down to the day level.
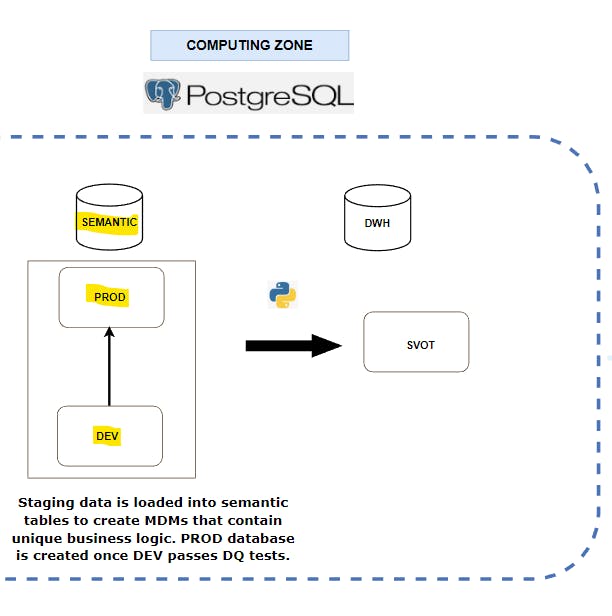
The DEV database is replicated after the DQ tests are completed, where the replica will serve as the production database, for similar reasons stated in the last layer.
The PROD database will contain the enriched data that forms the single version of truth (SVOT).
The MDM tables in the PROD database will serve as the single version of truth (SVOT).
Data warehouse layer4️⃣
Here is where the data from the SVOT is available for the target users to perform their intended operations, such as reporting, analysis, investigations and audits, among others.
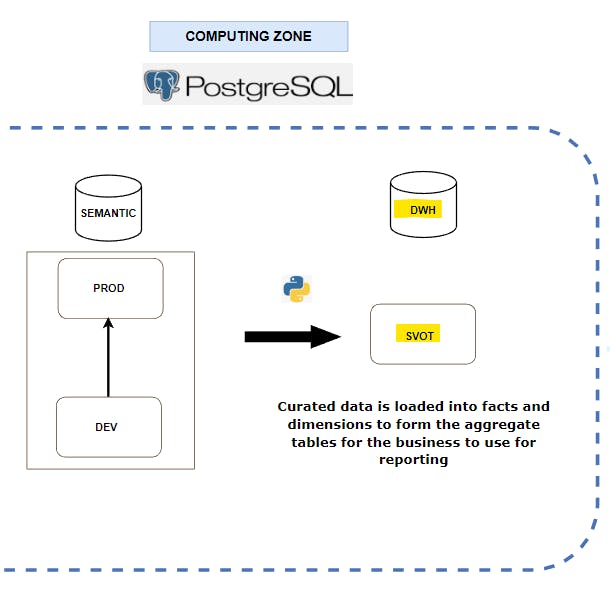
The first step is to apply dimensional modelling to the data available. This is done by outlining the relationships between different tables (or entities) and then joining the entities together to form facts and dimensions.
Then I join the appropriate fact and dimensions to create aggregated tables that answer specific business questions raised by the target audience.
For example, if the sales team wanted to find out how many flight tickets were sold for a specific destination spot, we can create a table from the DWH that groups the sales records by destination, filter the results by date ranges and apply the relevant governance policies to grant the right users access to querying the table.
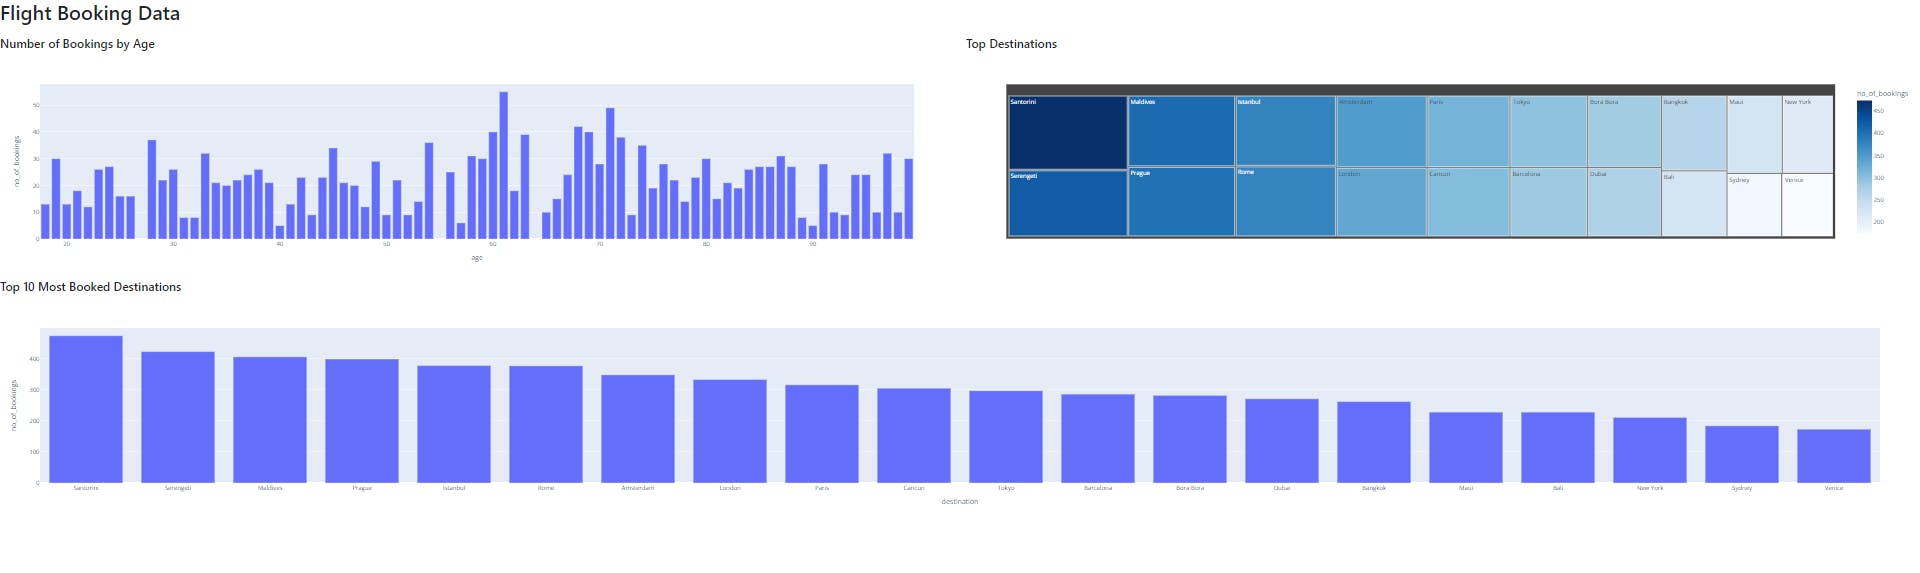
Presentation layer📊
This stage is for visualizing the data from the previous stage.
I plug the aggregate tables into the visualization modules to create the visuals that answer the relevant questions the stakeholders may have. I use Plotly-Dash to create a simple interactive dashboard to demonstrate how a BI tool can easily plug into Postgres:
Governance layer👮♂️
I set up the following governance policies:
Role-based access control - for creating custom roles and assigning privileges based on each team's distinct responsibilities
Row security policies - for restricting what can be seen in each table for custom roles
Table ownership - for allocating table ownership privileges to the appropriate roles
Role-based access control
Here is where I create custom roles that possess a distinct set of privileges shaped around how each team will access the data warehouse.
The steps for this stage are as followed:
Create custom roles using the
CREATEcommandGrant roles access to use the appropriate databases and schemas using the
GRANTcommandGrant appropriate privileges to custom roles (options from
SELECT,UPDATE,INSERT,DELETEetc) using theGRANTcommandRestrict roles from accessing certain databases, schemas and tables using the
REVOKEcommand
For simplicity’s sake, I've created the following custom roles in this project...:
junior_data_analyst
senior_data_analyst
junior_data_engineer
senior_data_engineer
junior_data_scientist
senior_data_scientist
...and supplied general constraints required for the following roles:
Junior data analyst
Can select tables and views in the DWH layer
Cannot create or modify tables and views
Cannot delete any objects
Cannot execute stored procedures
Cannot access the raw, staging and semantic layers
Senior data analyst
Same privileges as
junior_data_analystroleCannot access the raw, staging and semantic layers
Orchestration layer🎭
An orchestration section is needed for managing how each DWH task will be executed and under what conditions too. Among Airflow, Prefect, Argo to pick from, I went with Prefect because the UI displays the workflows in an elegant, clean and easy-to-flow manner, plus configuration is relatively the quickest out of the available options.
I use prefect orion start command in the terminal to access the tasks and flow runs for each DWH activity in the UI, which displays the workflows like this:
Conclusion😴
Contrary to popular belief, PostgreSQL can serve as a great data warehouse option, but this solely depends on the design decisions that go into it. As long as there is an awareness of the computing resource limitations it carries compared to many cloud data warehousing options like Snowflake, Amazon Redshift, and Google BigQuery, the RDMS system can serve as a high-performant data warehouse that meets business reporting needs in many use cases.
In one of my next posts, I will be walking you through how I migrated this same on-premise travel data into the AWS cloud, and how I built a cloud data warehouse with it using Amazon Redshift that includes more robust technologies like Spark, AWS Athena, AWS Glue and so on.
You can find the full source code for this project on my GitHub here.
Feel free to reach out via my handles: LinkedIn| Email | Twitter