

Photo by Roman Synkevych on Unsplash
Git commands I wish I knew earlier as a developer
Here's the Git playbook I needed YEARS ago🤯😳


Table of contents
- What is Git?
- List of git commands
- Table of Git Commands
- 1. Starting your project
- 2. Managing branches
- 3. Tracking and committing changes
- 4. Synchronizing your project
- 5. Reviewing and debugging changes
- git log
- git reflog
- View the change history of your repo
- View the change history of a specific branch
- Limit the changes shown by a specific number
- View the change log for all references
- View each change & commit entry on a single line
- View each change entry in a short format
- View each change entry in a medium format
- View each change entry in full detail
- git diff
- git reset
- git revert
- git grep
- Search for a text string in your repo
- Search for a text string within a subdirectory
- Search for a text string within a specific branch
- Search for a text string within the staging area
- Search for a text string within an untracked file
- Search for a term with its line number
- Search for the number of matches for a term
What is Git?
Git is an open-source tool that allows you to version control your code repositories and collaborate with other developers. This means you can
save and track different versions of your repositories
coordinate changes across different teams without impacting the work of other collaborators
share local copies of the same codebases as other developers when working offline
isolate new fixes and features in development without impacting production
List of git commands
Git commands can be used for
Starting your project
Managing branches
Tracking and committing changes
Synchronizing your project
Reviewing and debugging changes
Let’s walk through some of these using the terminal. I will be using Git Bash for the code walkthroughs which you can install from here.
Just a heads up: Not all the code examples used in this article follow a chronological order, so at times you may need to navigate between the different sub-topics for context!
Table of Git Commands
Use this as the TLDR table for the git commands:
| Command Category | Command | Description | Real-World Example |
| Starting Your Project | |||
| git init | Initializes a new Git repository | git init | |
| git config user.name "{username}" | Sets username | git config user.name "John Doe" | |
| git config user.email "{email}" | Sets user email | git config user.email "john@example.com" | |
| git clone {repository_url} | Clones a remote repository locally | git clone https://github.com/user/repo.git | |
| Managing Branches | |||
| git branch {new_branch_name} | Creates a new branch | git branch feature_x | |
| git checkout {branch_name} | Switches to a specified branch | git checkout feature_x | |
| git checkout -b {new_branch_name} | Creates and switches to a new branch | git checkout -b feature_y | |
| git merge {branch_name} | Merges a branch into the current branch | git merge feature_x | |
| git rebase {branch_name} | Moves or combines commits to a new base commit | git rebase master | |
| git rebase --continue | Continues the rebase process | git rebase --continue | |
| Tracking & Committing Changes | |||
| git add {file_name} | Adds a file to the staging area | git add README.md | |
| git add {file_name_1} {file_name_2} | Adds multiple files to staging | git add file1.md file2.md | |
| git add *.json | Adds all JSON files to staging | git add *.json | |
| git add . | Adds all changed files to staging | git add . | |
| git add -p | Adds changes in chunks | git add -p | |
| git add -A | Adds all changes, including deletions | git add -A | |
| git rm {file_name} | Removes a file from Git and the filesystem | git rm file_name | |
| git rm --cached {file_name} | Untracks a file without deleting it | git rm --cached file_name | |
| git restore {file_name} | Unstages or restores file changes | git restore file_name | |
| git commit -m "Message" | Commits staged changes with a message | git commit -m "Initial commit" | |
| git commit --amend -m "New message" | Amends the last commit message | git commit --amend -m "Fixed typo" | |
| Synchronizing Project | |||
| git push {remote} {branch} | Pushes local commits to a remote branch | git push origin master | |
| git pull {remote} {branch} | Fetches and merges changes from a remote branch | git pull origin master | |
| git fetch {remote} | Retrieves changes without merging | git fetch origin | |
| git remote -v | Lists remote repositories | git remote -v | |
| Reviewing & Debugging | |||
| git log | Displays commit history | git log | |
| git log --oneline | Displays commit history in a short format | git log --oneline | |
| git diff | Shows differences between commits or branches | git diff branch1..branch2 | |
| git diff --name-only | Shows only filenames that changed | git diff --name-only | |
| git reflog | Shows history of Git commands | git reflog | |
| Advanced Commands | |||
| git cherry-pick {commit_hash} | Applies changes from specific commits | git cherry-pick abc123 | |
| git stash | Stashes changes for later use | git stash | |
| git stash apply {stash_id} | Applies stashed changes | git stash apply stash@{0} |
1. Starting your project
Before you can track changes, it’s crucial to set up (or initialize) your Git environment correctly
git init
Starts a new project by creating a new Git repository
To use this,
- navigate to your project’s directory like so:
cd {your-directory-path}
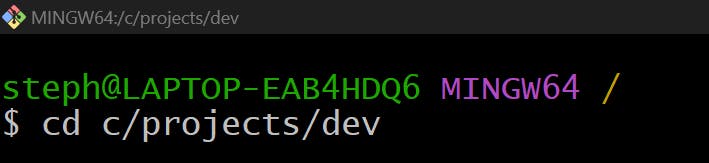
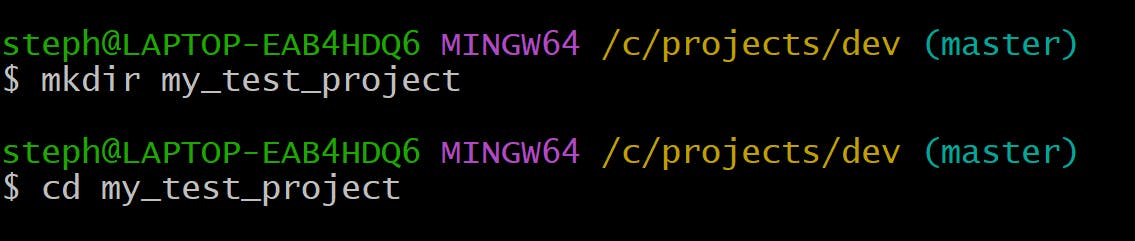
- create a new folder and navigate into it:
mkdir {new-folder-name}
cd {new-folder-name}
- Initialize a new repository by typing:
git init

git config
Sets up information related to a user e.g. username, email, file format etc
Use this code in the terminal and replace the placeholders with the relevant details:
git config user.name "{your-username}"
git config user.email "{your-email@example.com}"
git clone
Copies a remote repository from a remote server (usually a GitHub repository) into the local repository.
This allows you to clone a repository into your local environment so that you can freely add, edit or remove features without affecting the live repository.
Let’s clone a repository from GitHub. Before we do that, let’s see what the my_test_project directory looks like:

At the moment only the .git folder resides, which means the directory is empty. We will clone a repository into this location.
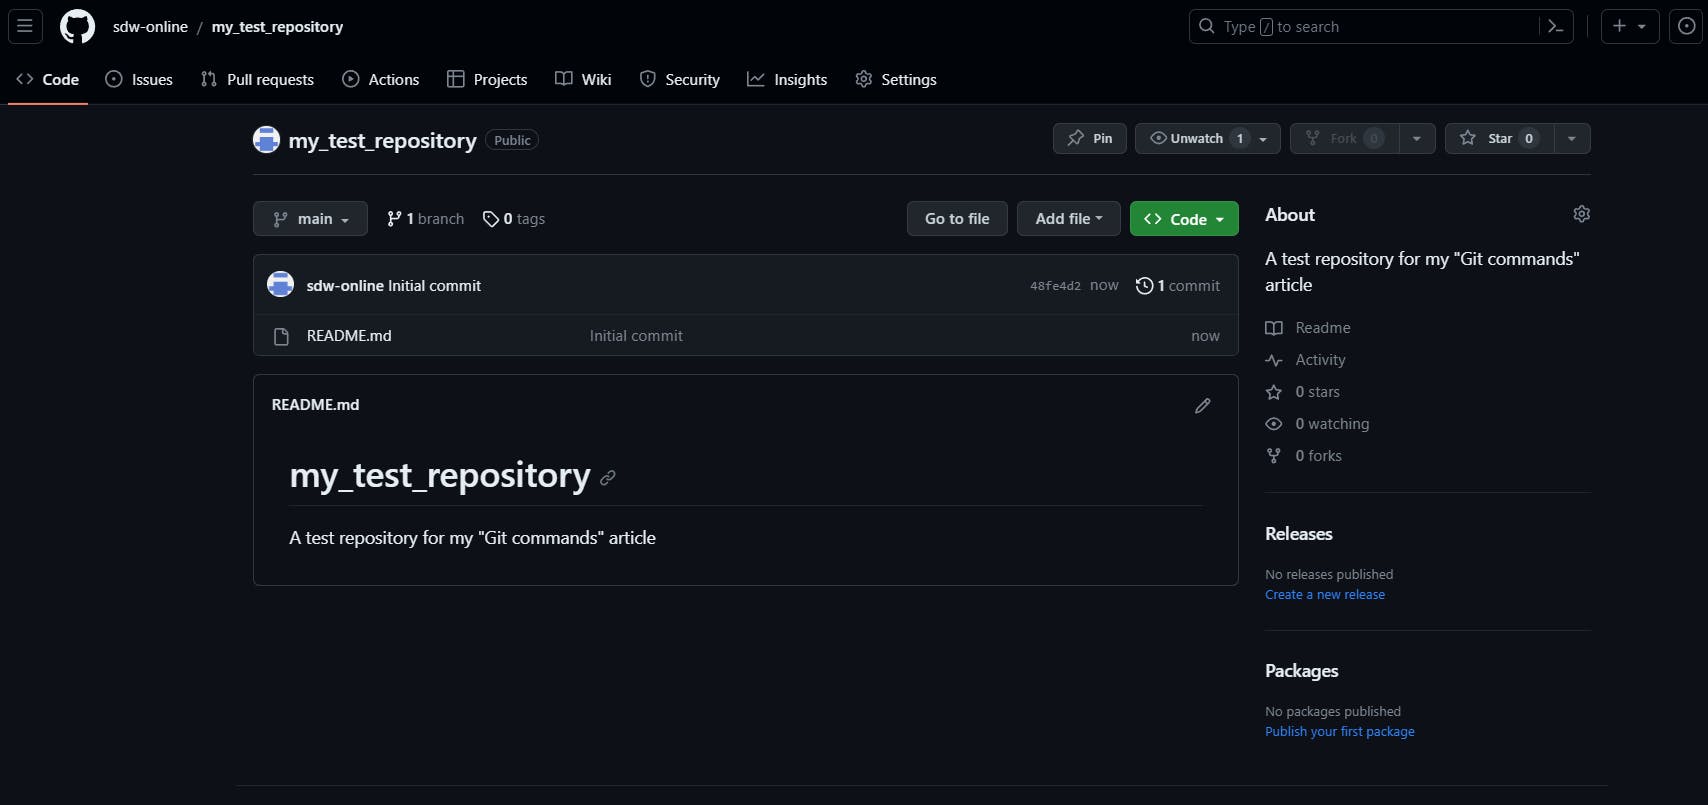
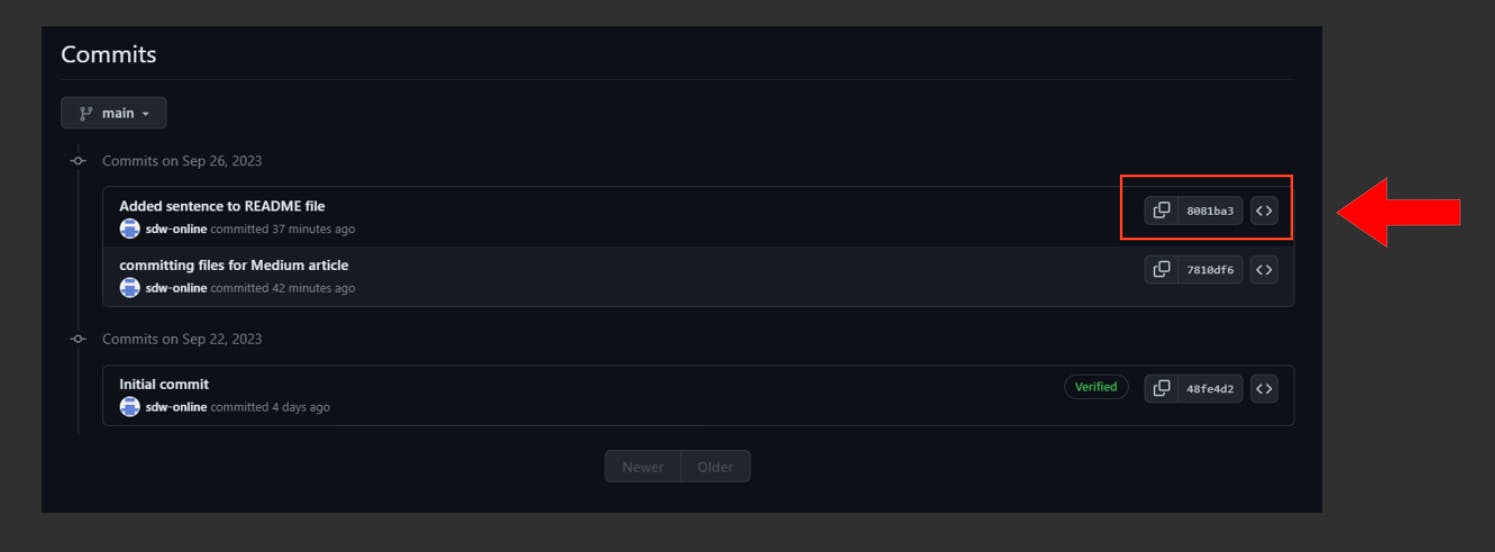
I’ve created a dummy repository in GitHub for this example called my_test_repository:
To clone this into our local machine,
copy the URL of the repo (which can be found by clicking the green
<> Codebutton )Add the URL to the
git clonecommand, like so:
git clone {repository-url}
Here are the results:
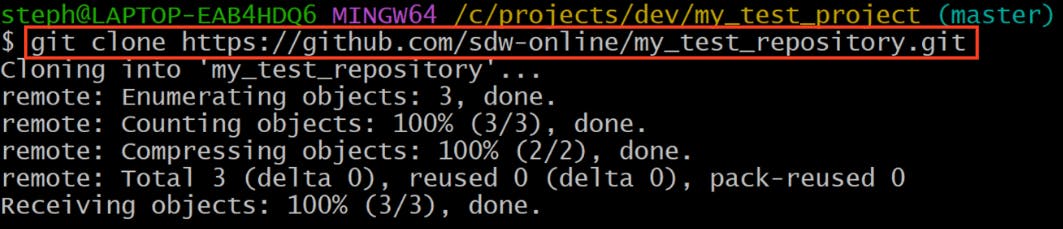

The my_test_repository repository has been successfully copied into the local repository!
2. Managing branches
A branch is a personal workspace for a specific project. Within a team, each programmer would have their branch (or feature branch), where they build their features, edits, and other changes to contribute their creative efforts to the tool they’re building. Here’s how to handle multiple branches in Git:
git branch
Used for displaying, creating and deleting branches.
When collaborating on the same project, this command allows each developer to separate their work from others to avoid accidentally changing, mixing and overwriting the work of others.
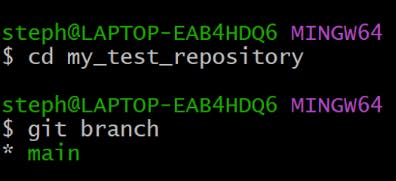
To check the branches in your repository, simply navigate into the repo and type git branch, like so:
cd my_test_repository
git branch
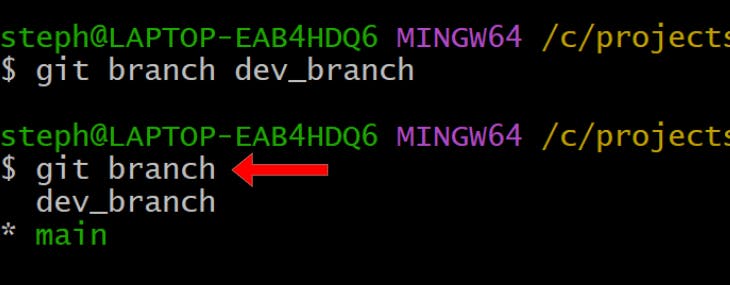
To create a new branch, type git branch followed by the new branch’s name:
git branch {new-repo-name}
In our case, we created a new branch called dev_branch in the my_test_repository repo (from the previous example) because it only had one branch named main:
git checkout
Switches branches and/or restores working files
Switch from one branch to another existing branch
git checkout {branch-name}

In Git Bash, the branch names will also change once you switch to different branches, like the example above
Create and switch to a new branch
You can also create a new feature branch and switch to it immediately using:
git checkout -b {new-branch-name}

Here we create a new branch called staging_branch and switch to it. Each of these branches is still within the local repository so we would need to send any changes made locally to the remote repository to ensure they’re reflected in GitHub too.
git merge
For merging one or more branches in your current branch
In Git, merging branches is combining the changes made across different branches into one branch. This approach stores the commit history of both branches.
Merge a branch to your current branch
git merge {branch_name}

Reverse a merge operation by rewriting the change history
git reset --hard {merge_commit_hash}
This will undo the merge by rolling back the previous commit before the merge operation, therefore deleting commits in the process. It is usually recommended to use the git revert approach over this one to avoid data loss or impacting the work of other collaborators.
Let's reverse a merge operation by performing a hard reset. Pay attention to the commit hash, which serves as the latest commit displayed in both screenshots:

Once we apply the git reset —hard command, the systems look like this now:
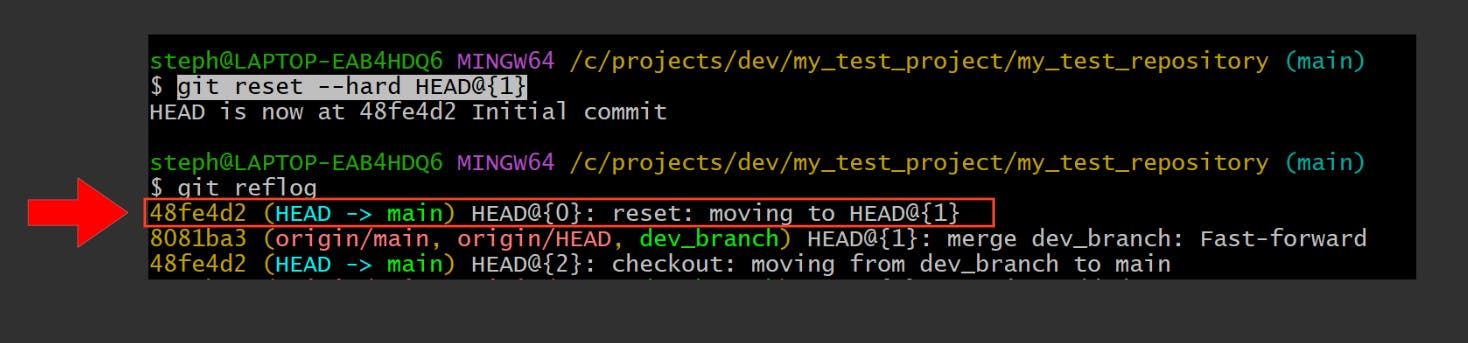
The command managed to reverse the merge operation while deleting the commits responsible for it in the first place.
Reverse a merge operation by creating a new commit
git revert -m {parent_number} {merge_commit_hash}
This will undo the merge by creating a new commit that rolls back to the branches to the previous state before the merge operation, without modifying the commit history in the process.
The parent_number is the number of the branch you want to merge into (i.e. the main branch), which is usually a 1, and 2 for the merge operation’s target branch.
Let’s undo the merge operation safely, observe the commit hash in both screenshots which serves as the change responsible for merging the branches together:

Using the git revert command by typing git revert -m 1 HEAD@{0} into the terminal opens up an interactive session via Vim like so:
The custom message provided by the system should suffice so we can advance by typing Esc + :wq and then hit Enter, which creates the new commit that reverses these changes.
Here are the results:

Instead of deleting the previous merge commit, Git has created a new one to roll back to the previous state before the commit, which safely preserves the commit history and avoids impacting the work of other collaborators on the same repository as us.
git rebase
Moves or combines a sequence of commits to a new base commit
In Git, rebasing means integrating the changes made on one branch into another, similar to merging. But instead of maintaining the commit history of the two branches, rebasing rewrites the commit history to produce a cleaner, linear progression of changes.
So rebasing is appending all the commits of one branch to the commits of another one. This makes the commit history of the principal branch a single, clean line of commits but may be difficult to debug if conflicts occur.
⚠️Warning: Use with caution as other developers may be working on the branches you’re rebasing with. Resolving conflicts caused by rebasing can be a painful experience (trust me…I know what I’m talking about)😖
Perform a basic rebase
git rebase {branch_name}
Continue rebasing after resolving conflicts
git rebase --continue
Let’s try to rebase the dev_branch branch onto the main one:
We had a few conflicts that required resolving:

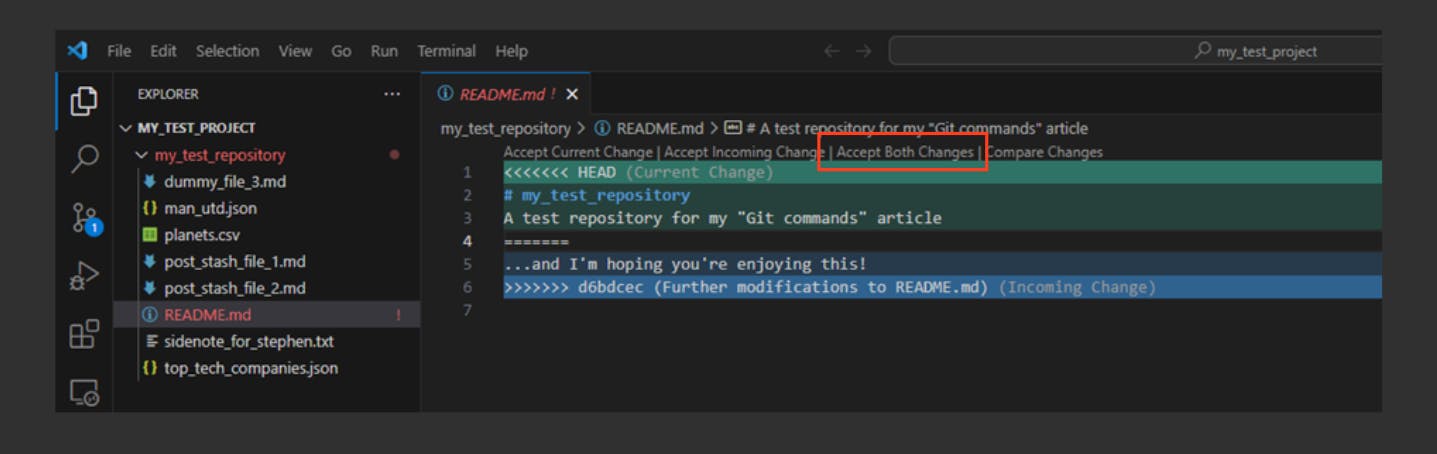
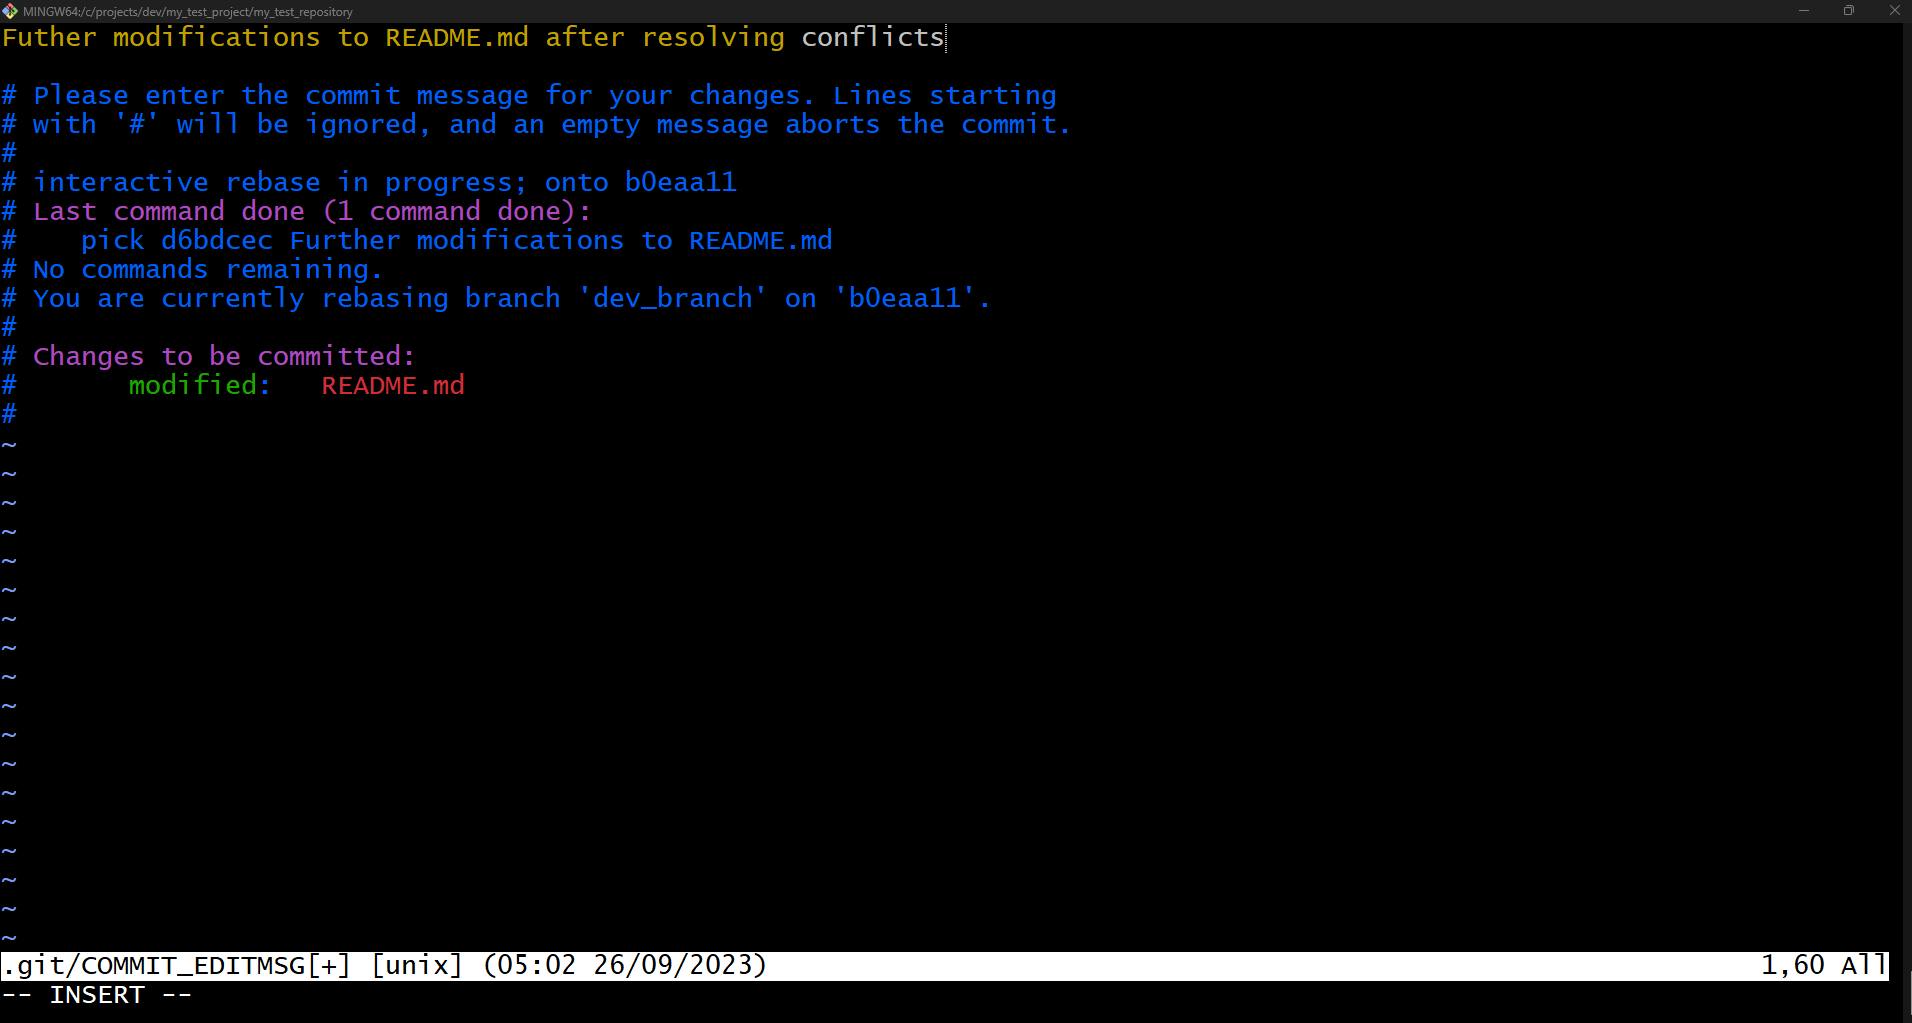
In our case, we accept both changes and continue with the rebasing operation by entering git rebase —continue in the terminal, which results in the Vim editor opening up, like so:
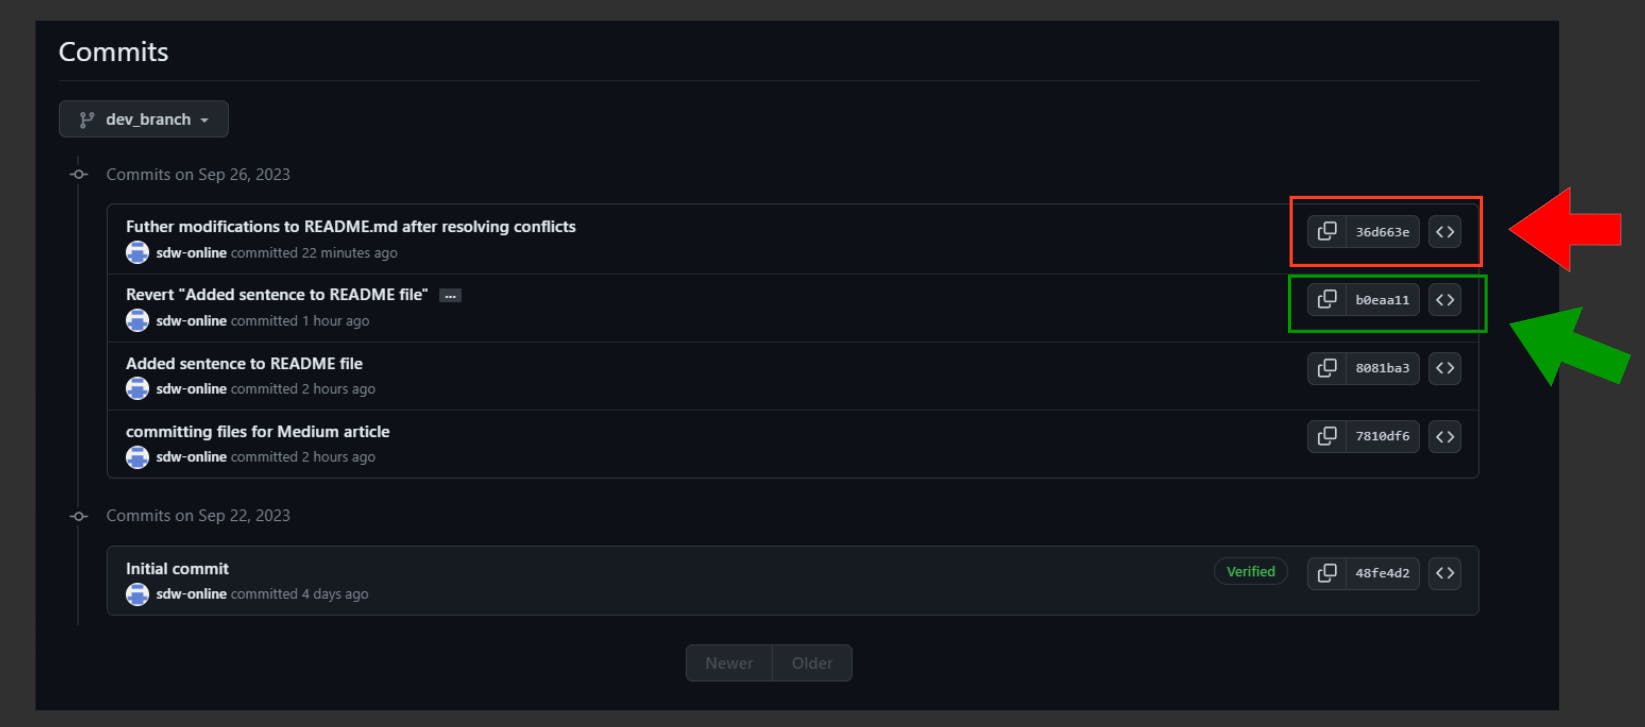
Doing this successfully rebases the dev_branch branch - compare the commit hashes in the screenshot to observe how the rebase has integrated the branches to create a clean, linear commit history:


3. Tracking and committing changes
This is where you can monitor and save changes made in your Git repositories
git add
For adding changes made to files and folders in a repository to the staging area
If I opened up my_test_project folder in VS Code, here’s what it looks like after cloning to the local machine:
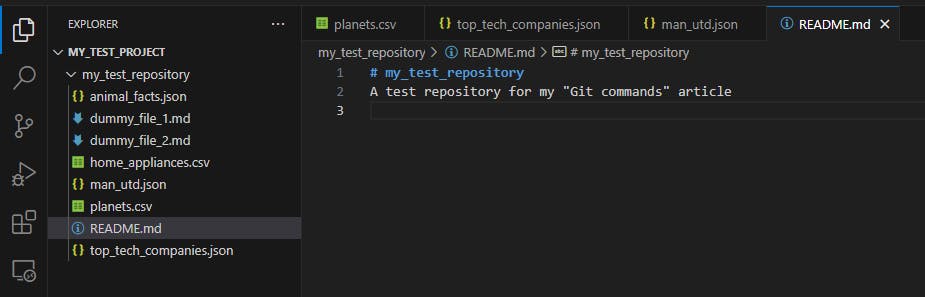
The README.md file is the only file in the repository at the moment. Let’s change that.
We will add a new file called dummy_file_1.md with some placeholder text:
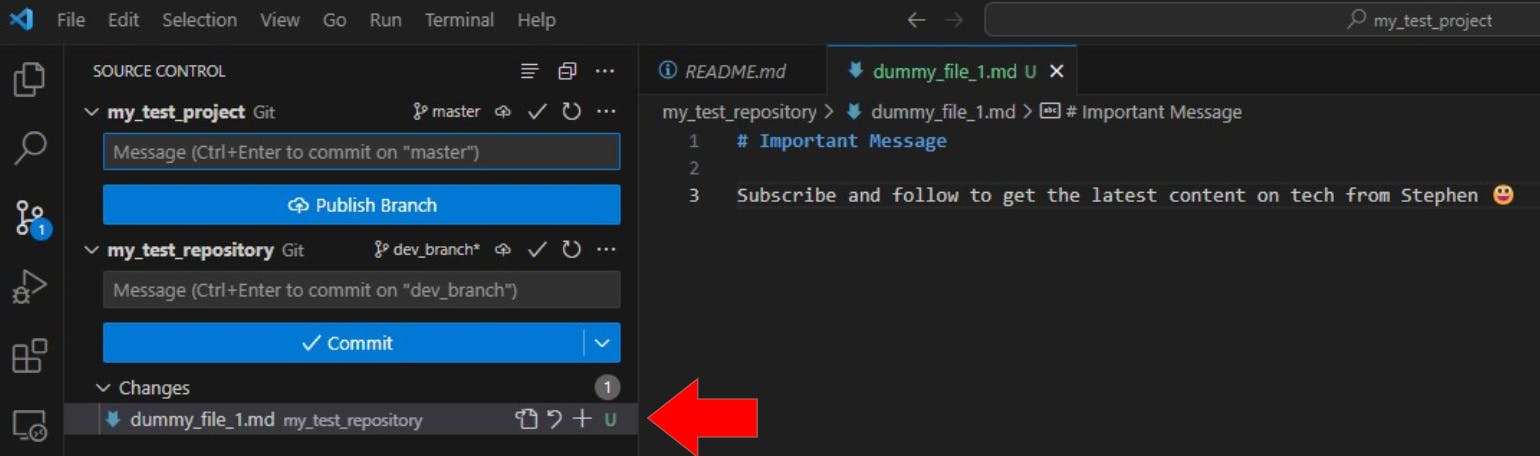
Once we enter the Source Control tab on VS Code we notice two things:
the file name has turned into green text
there is a letter U in green text labelled next to the file name under Changes
This indicates that the file has not been added to the staging area, and therefore is untracked.
Stage a single file
git add {file-name}
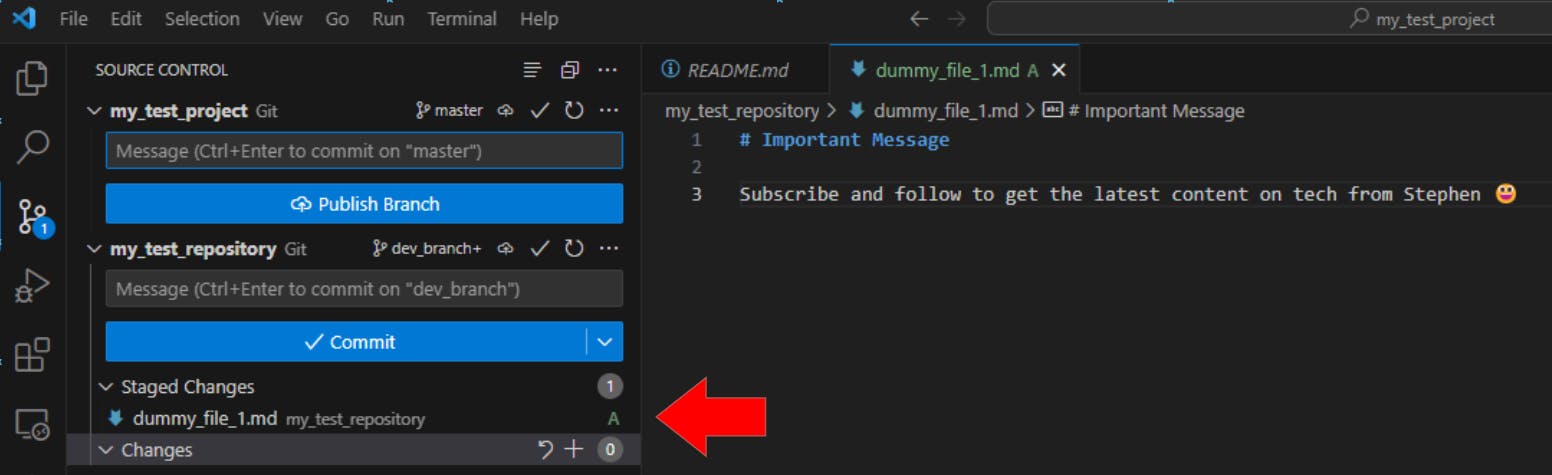
To track the changes made to the dummy_file_1.md file, we type this command in the terminal:
git add dummy_file_1.md
This changes the U to an A, which stands for added because the dummy_file_1.md has officially been added to the local repository:
Stage multiple files
git add {file-name-1} {file-name-2}
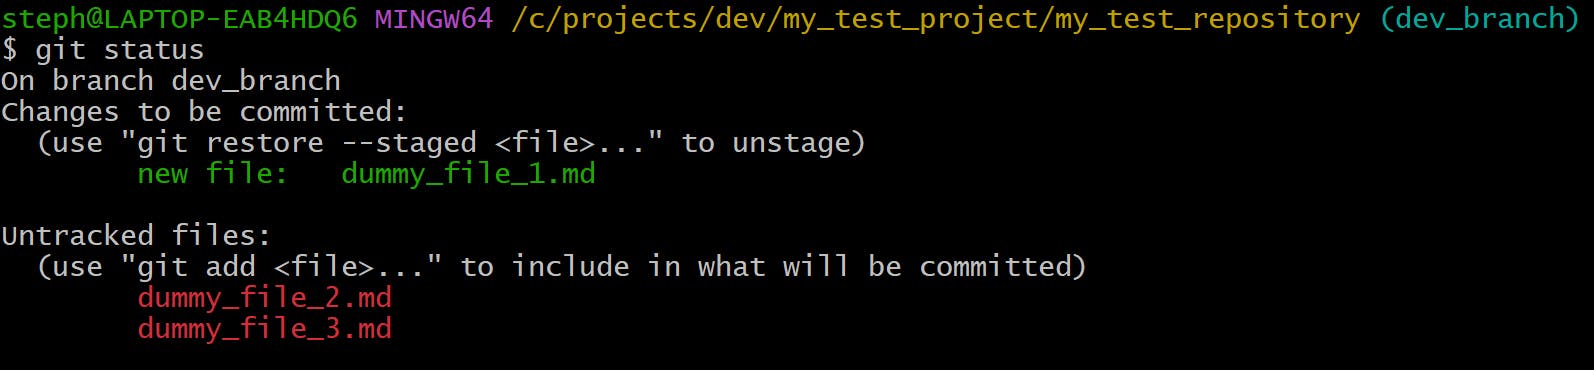
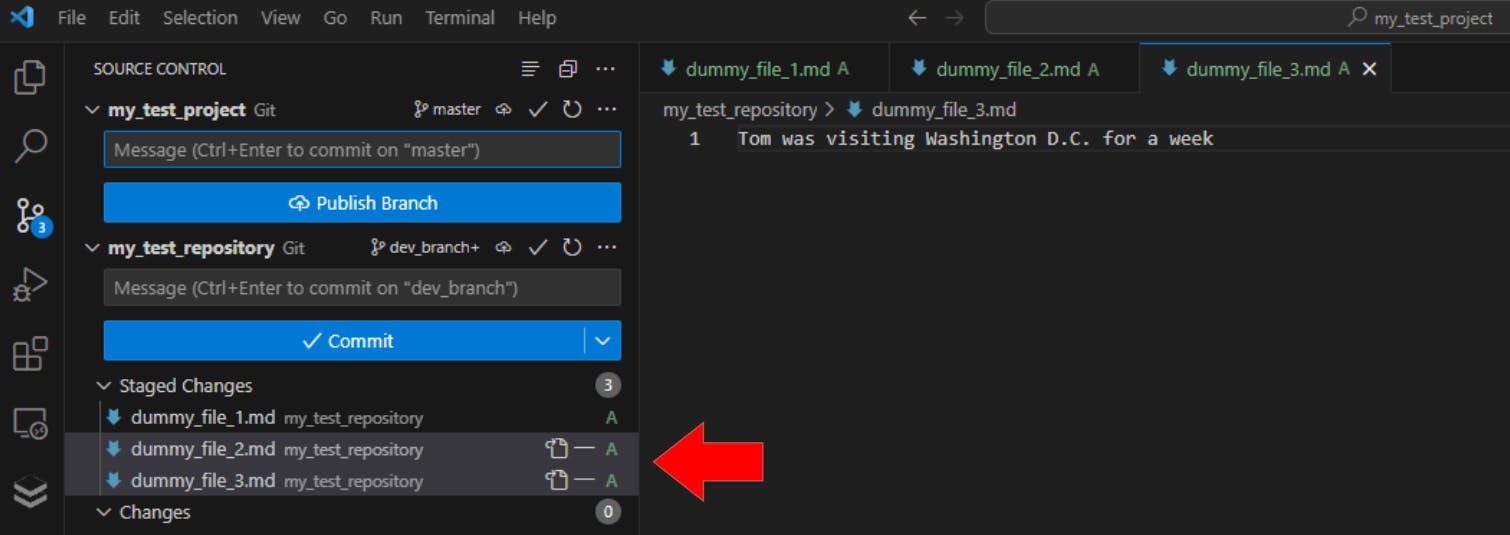
Two more files have been added to the my_test_repository repo:
Here’s what they look like in VS Code:
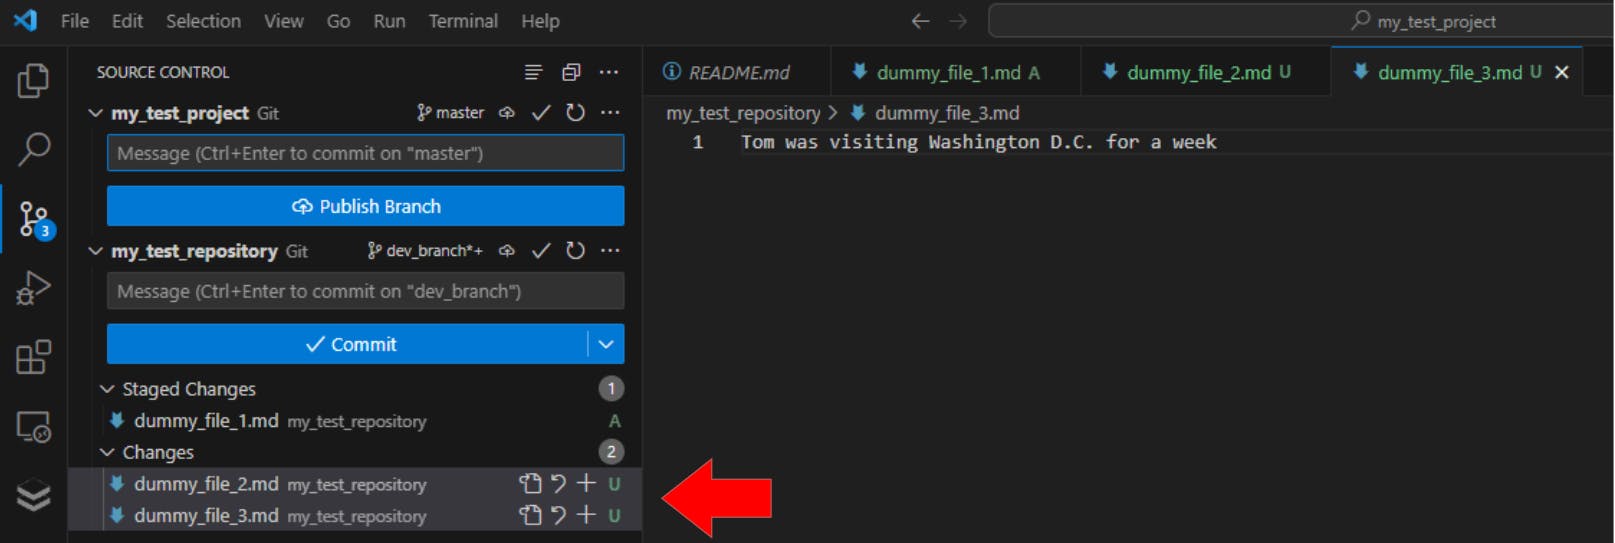
Both files are now labelled as untracked, while the dummy_file_1.md is sitting safely in the staging area. This is what the same information looks like in the terminal when we use git status:
To add the files to to the staging area, we type:
git add dummy_file_2.md dummy_file_3.md
…which should make the staging area look like this:
Stage all files with the same format
You can stage multiple files with the same file format within the local repo using:
git add *.{file_extension}
In our my_test_repository repository, we create 3 JSON files and 2 text files:
animal_facts.json
shopping_list.json
to_do_list.json
poem.txt
recipe.txt
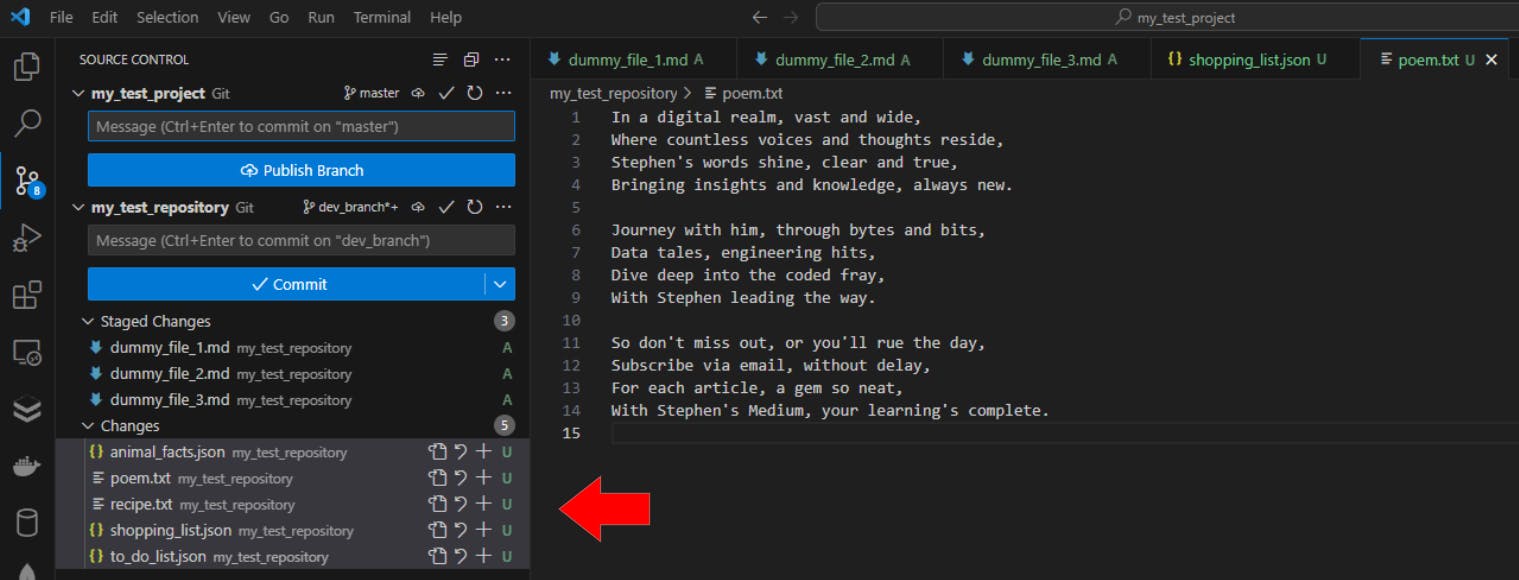
Let’s only add the JSON files to the staging area:
git add *.json
Here are the results:
The files underlined in green are the JSON files that were successfully added to the staging area, while the files underlined in red show the text files that were not included in the process.
Stage all new and modified file, but NOT deleted files
Here’s how to add every newly created and modified file from the local repository (excluding all deleted files):
git add .
Note: This will not stage files found in the .gitignore file, plus it won’t stage deleted files
Let’s do 3 things:
create a new file (called planets.csv)
modify an existing file (dummy_file_2.md)
delete one staged file (shopping_list.json) and one untracked file (poem.txt)
Results:

We notice a few things:
the new planets.csv file created is marked as untracked (U)
the existing file dummy_file_2.md is marked as modified (M)
the previously staged file shopping_list.json is marked as deleted (D)
there is no record of the poem.txt file on this list even though it was deleted the same moment as the shopping_list.json file
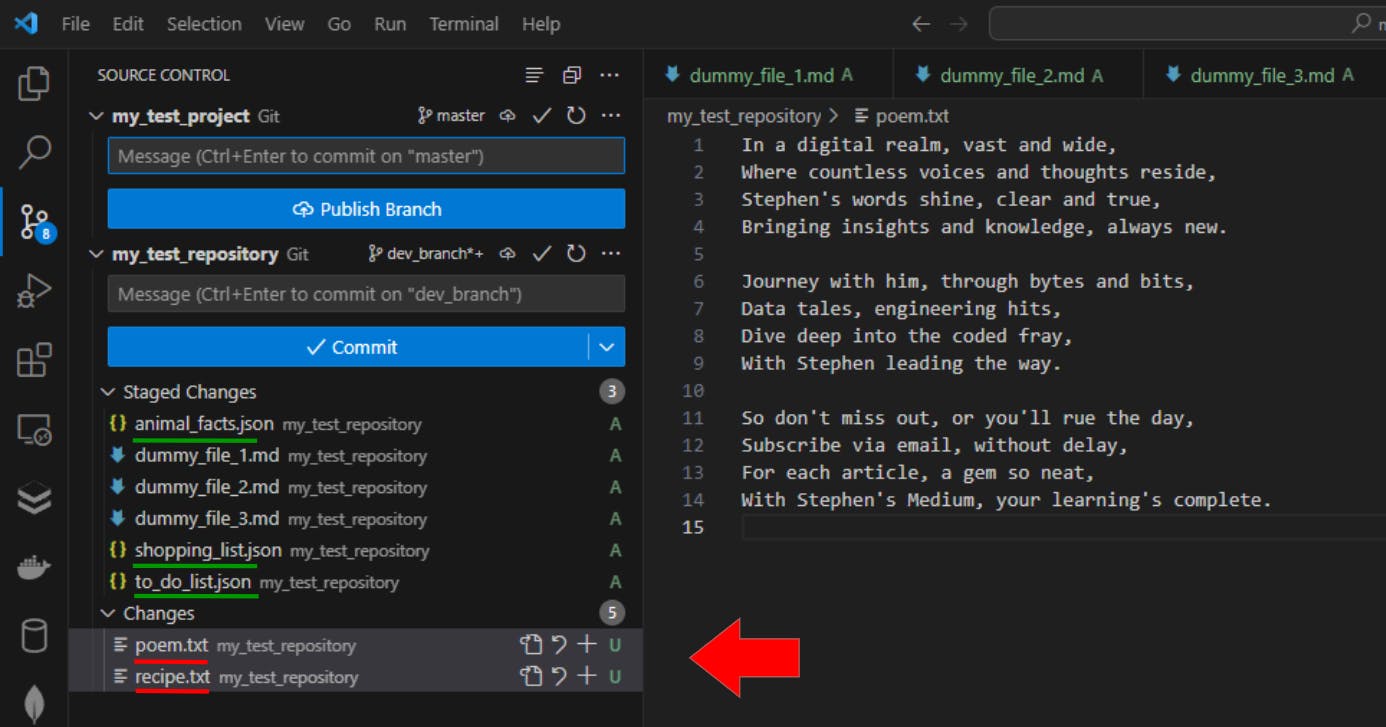
By running git add . in the terminal, the new results are:
Now we see that the:
new planets.csv file created is now marked as added (A)
modified dummy_file_2.md file is now marked as added (A)
shopping_list.json file is no longer found on this list because it was deleted in the previous step and therefore not included in the staging process
poem.txt file is still nowhere on the list, as it is also a deleted file (on top of it previously marked as untracked)
Stage one change at a time
In Git, patching allows you to review each change made one at a time. This approach allows you to accept, reject or modify each change before staging them.
git add -p
or
git add --patch
Let’s do the following:
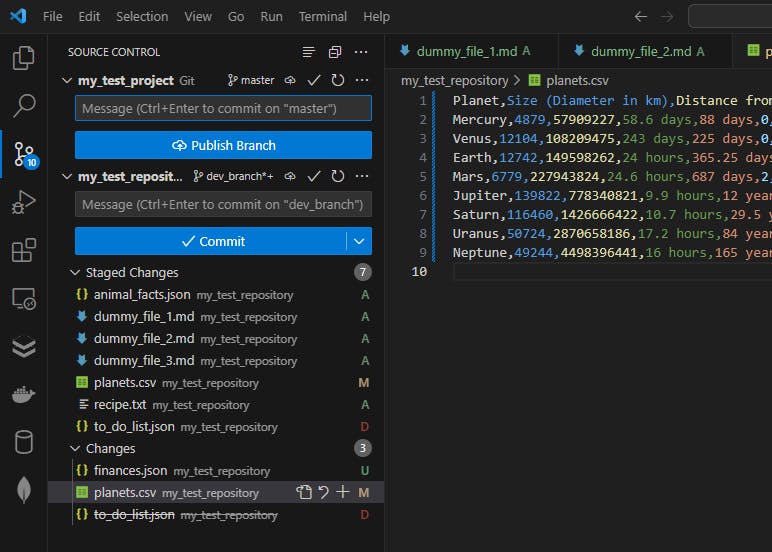
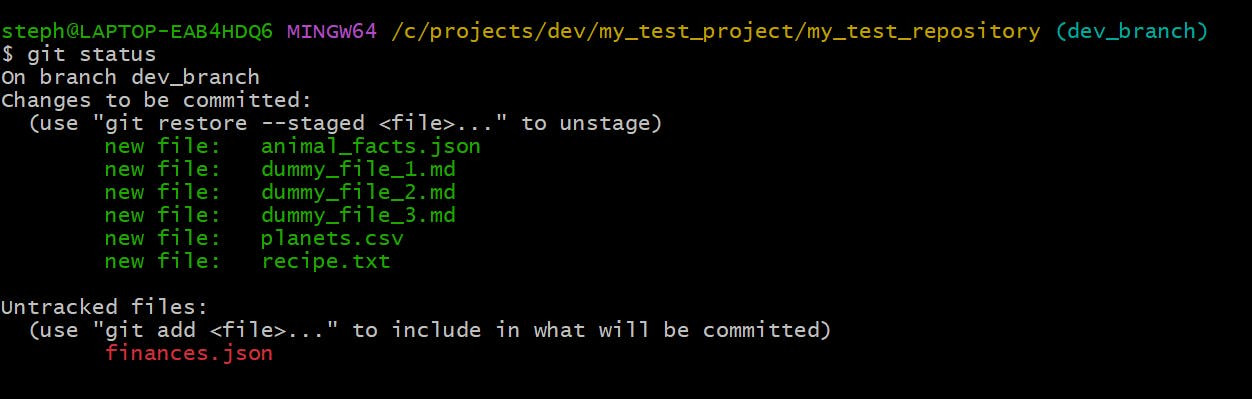
create a new file called finances.json
modify the planets.csv file by adding a column that includes interesting fun facts for each planet on the list
delete the to_do_list.json file
Once done, the Source Control tab looks like this:
…and the terminal version of this looks like this:
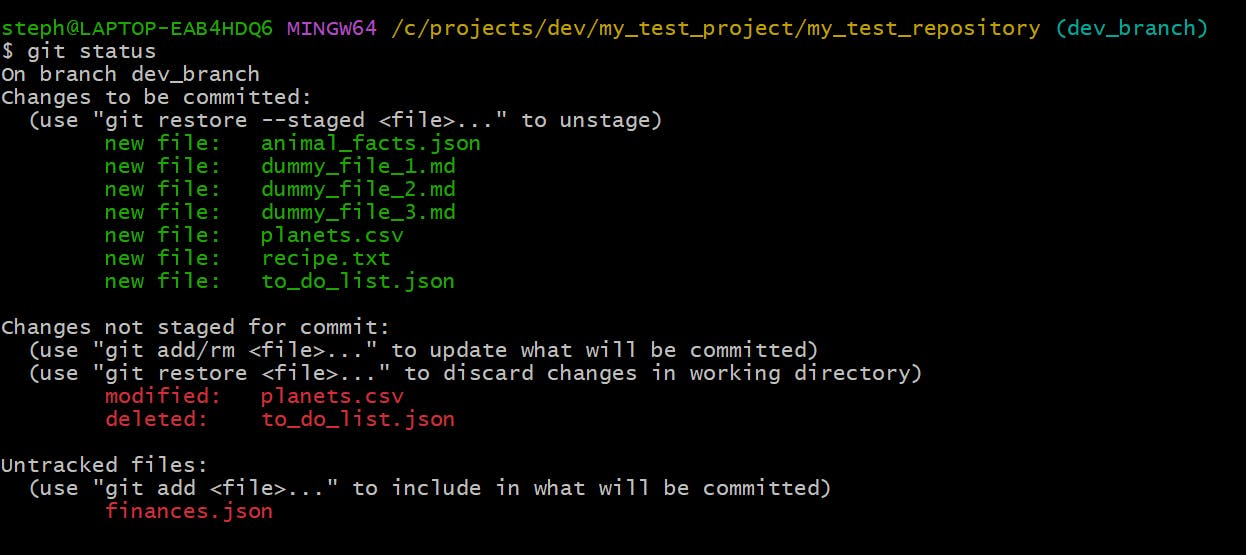
We can see that the:
new finances.json file is marked as untracked (U)
existing planets.csv file is marked as modified (M)
previously existing to_do_list.json file is now marked as deleted (D)
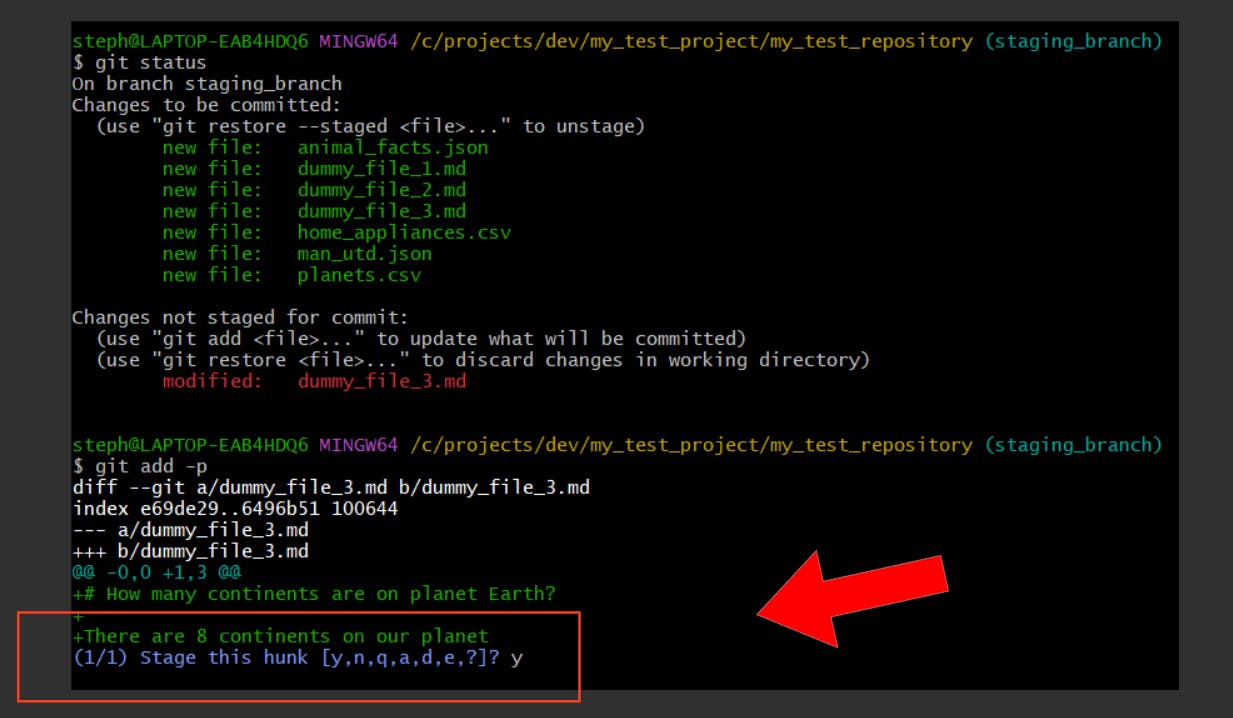
Let’s run the git add -p command in the terminal:
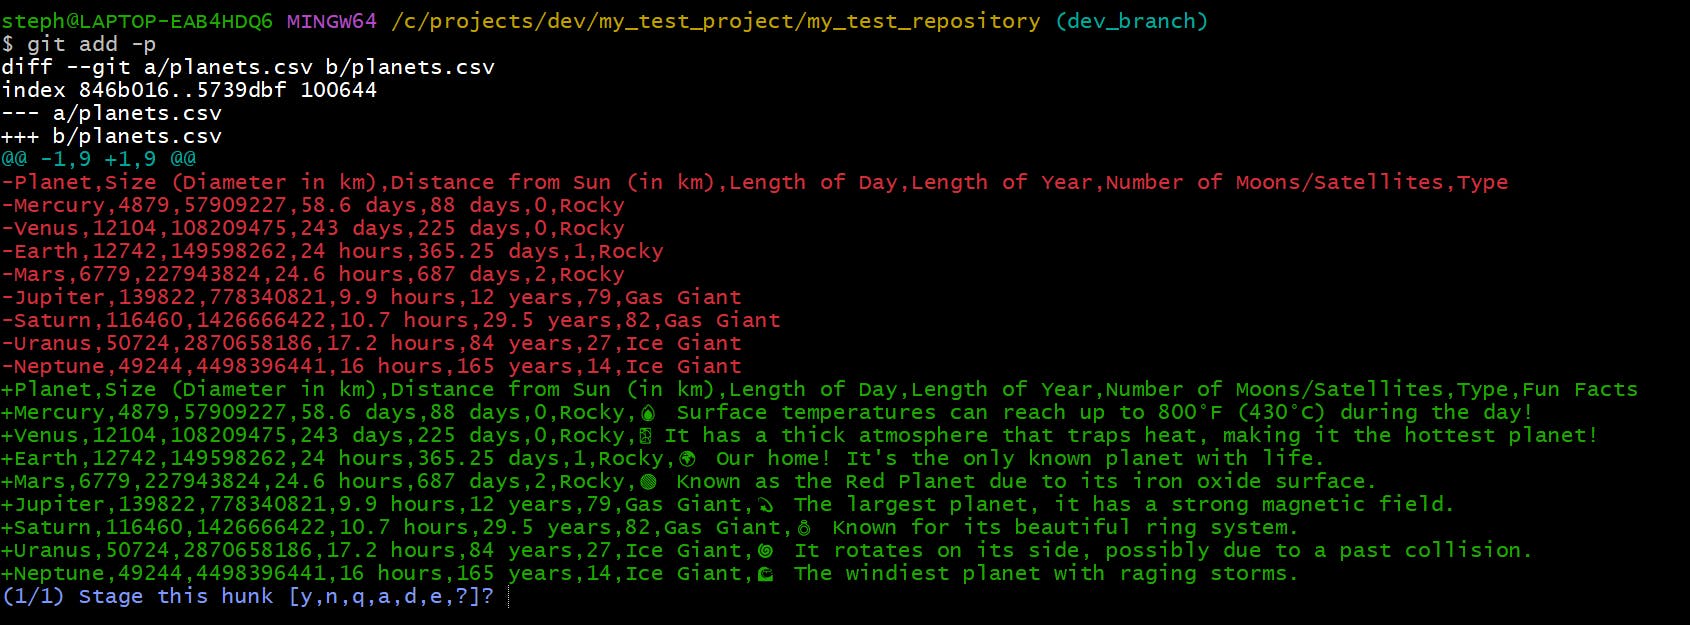
Before we advance, let’s break down the output quickly:
diff --git a/planets.csv b/planets.csv- this means there are changes between two files; a) the original file, and b) the modified oneindex 846b016..5739dbf 100644- this uniquely identifies this specific change (basically an ID)-- a/planets.csv- this is the original file of the planets.csv file+++ b/planets.csv- this is the modified version of the planets.csv file@@ -1,9 +1,9 @@- this is the “hunk” of changes. A hunk is a portion of code that has been added or modified. So the hunk in this example would be the 9 lines in the CSV file (1 header, 8 rows). In the-1,9section, the 1 means the hunk starts at line 1 in the original version, and the 9 means the file contains 9 lines. The same principle applies to the+1,9for the modified version.
We can decide to advance with this patch by typing y into the terminal, or we can reject the changes by typing n. There are other options included but that will be for a future article, so stay tuned for that!
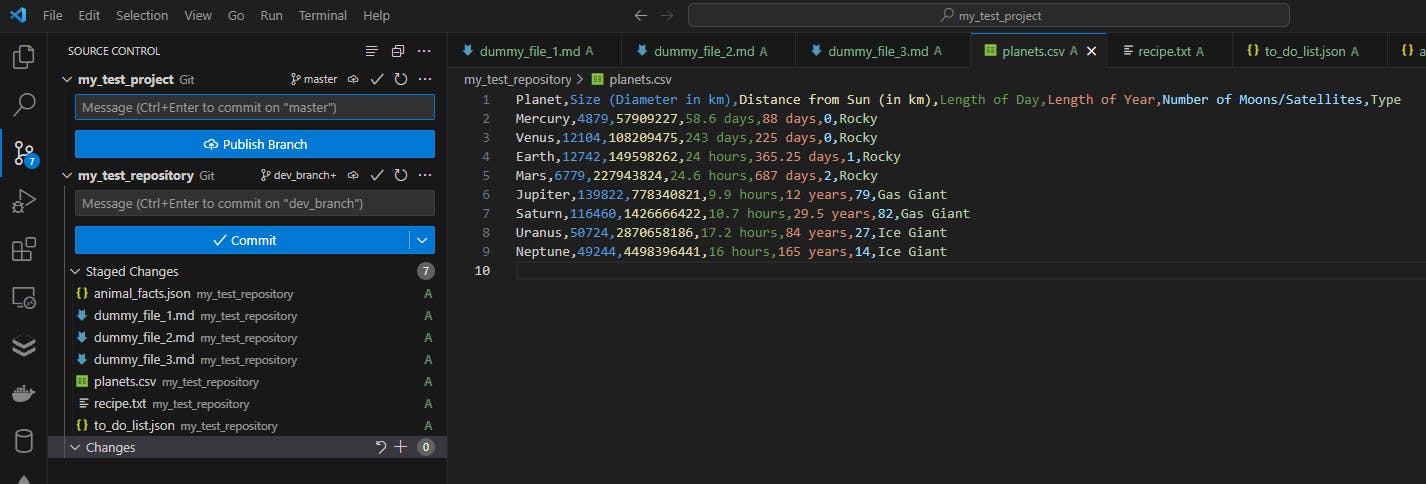
By typing y, we advance to the next change that needs reviewing:
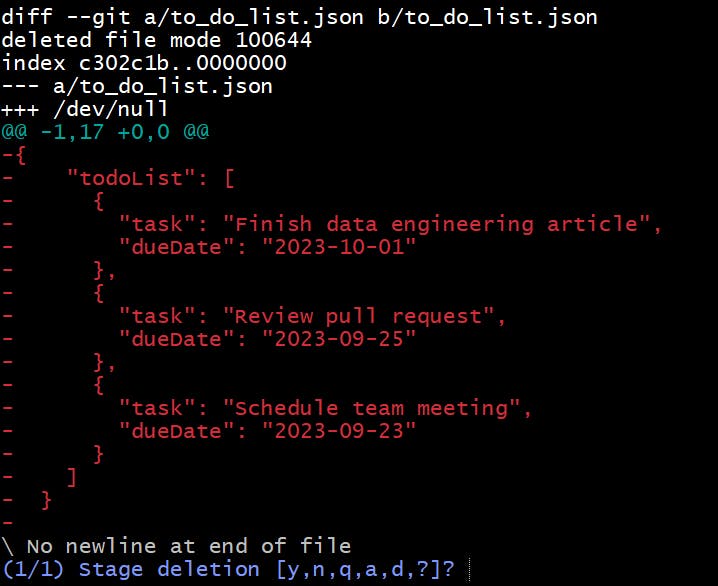
We stage this deletion too, and then we can check what the staging area looks like:
Here we see that the:
planets.csv file is now marked as added (A)
to_do_list.json file is now marked as added (A)
finances.json file is still marked as untracked (U) because this approach does NOT stage new or untracked files
Stage all new, modified AND deleted files in the local repository
This will add every file in the local repo to the staging area, including the ones dropped from staging, the ones with changes and the ones recently created:
git add -A
Let’s shake up the repository a little by:
creating a new file (called home_appliances.csv)
modifying an existing file (animal_facts.json)
deleting a tracked file (dummy_file_3.md)
Let’s look at the current state of our repo:
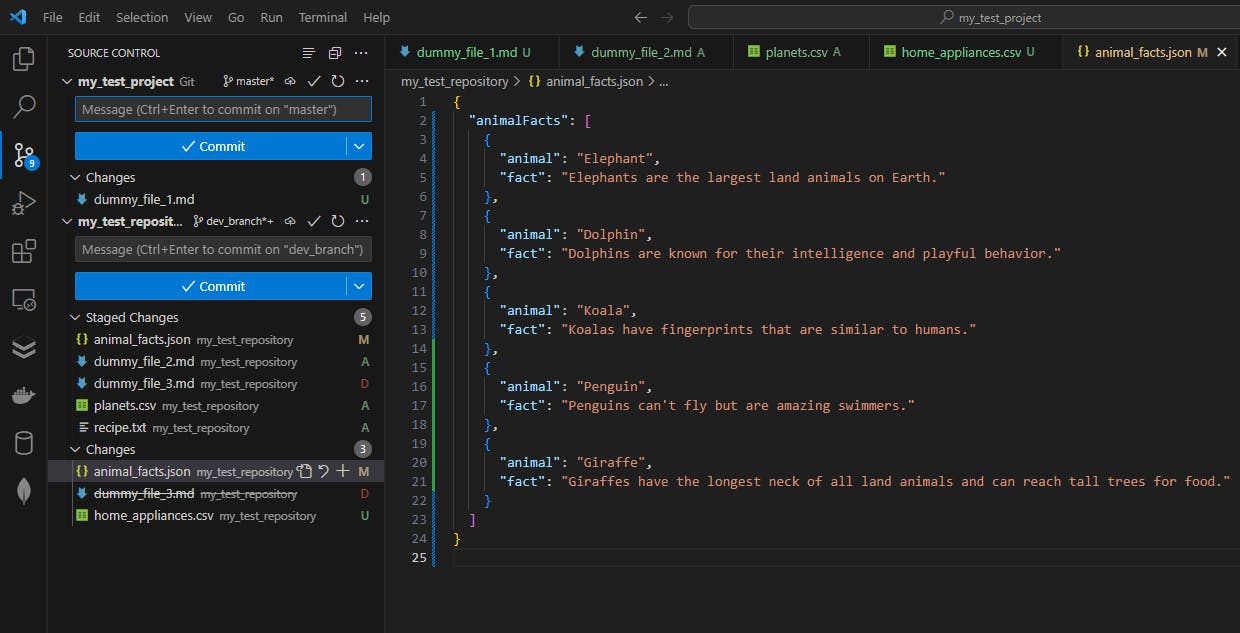
…and here’s the terminal version too:
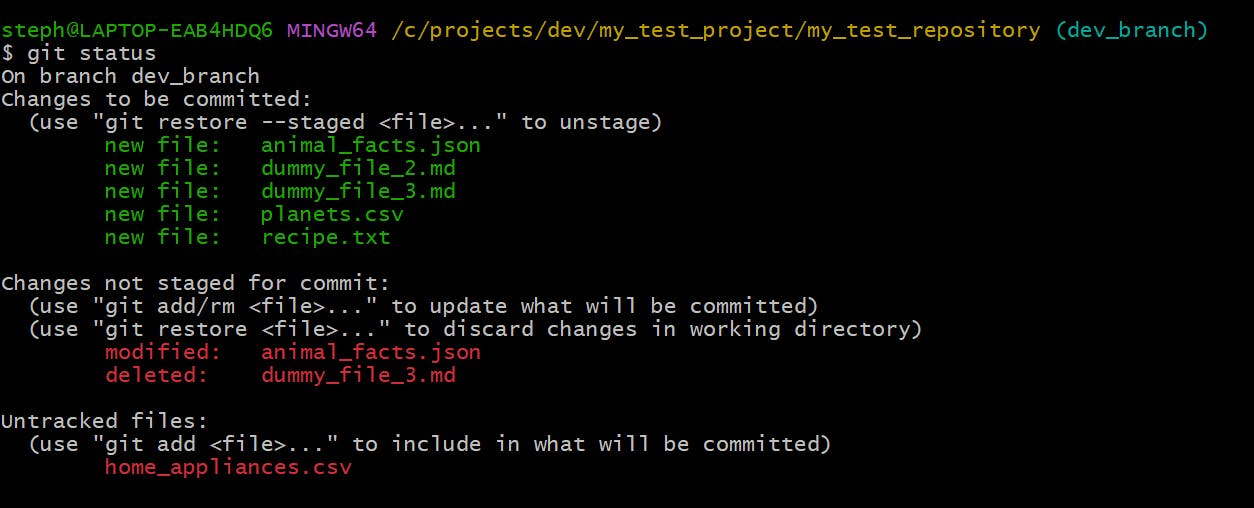
We’ve
modified the animal_facts.json file
deleted the dummy_file_3.md file
created a home_appliances.csv file
Now let’s run the git add -A command and see the results:
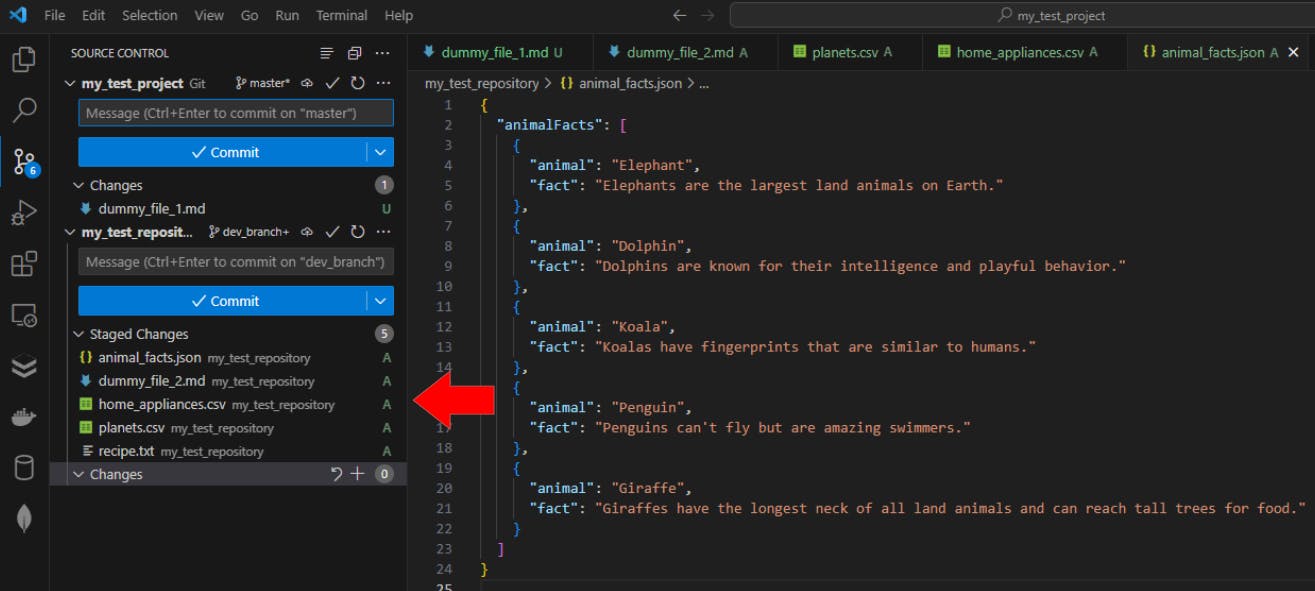
This command has added the:
new home_appliances.csv file we just created
modified animal_facts.json file
But if you notice, the dummy_file_3.md file was not included in the staging process. This is because we deleted it from our local machine first and then we ran the git add -A staging command, meaning the process wasn’t able to find the file on the machine to stage in the first place.
If we wanted it part of the staging, we would
stage the file, then
delete it from the local machine
But if we want it permanently deleted from Git, we would use git rm {file-name} to accomplish this.
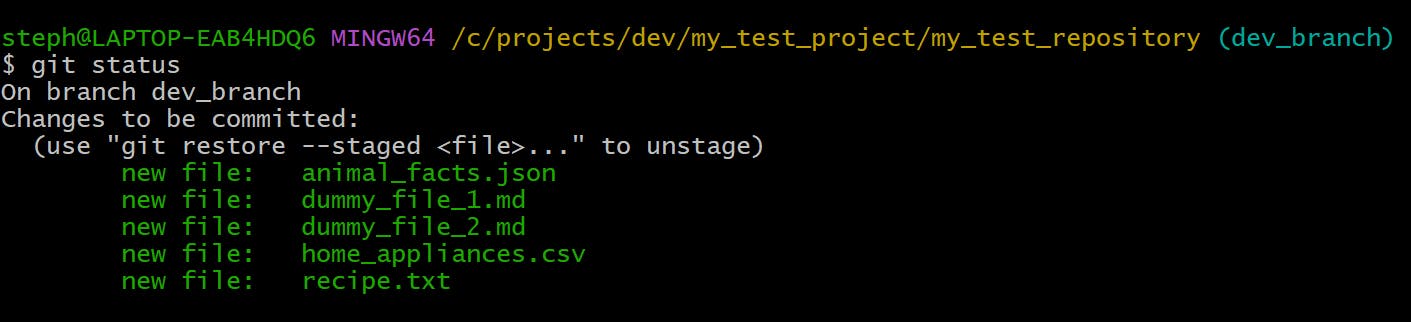
git status
Displays the status of changes as untracked, modified or staged
What does git status do?
With git status you can
view the current feature branch you’re on
see the list any changes made to the files within the repo and whether they’re staged for the next commit
points out the files that are not tracked by Git in the working directory (usually new files created that are not added to the repository)
Different types of files in git status
Here are the different types of files you can find when you run git status:
Untracked (U)
Added (A)
Modified (M)
Deleted (D)
→ Untracked (U)
Any file that is not traced by Git is marked as an untracked file (U). Here’s how they appear in VS Code and the terminal:
- VS Code:
- CLI (Git Bash)
→ Added (A)
A file that has been staged (i.e. added to the staging area) is marked as added (A) in VS Code and new file in the CLI:
- VS Code:

- CLI
→ Modified (M)
A file is marked as modified (M) if any changes have been made inside it. Here’s what this would look like:
- VS Code:
- **CLI **
→ Deleted (D)
Any file that has been removed from the working directory or repository is considered a deleted file (D):
- VS Code:
- **CLI **

git commit
Records the changes made to the repository
Here are some of the ways to use git commit:
Save changes with a simple message
git commit -m "Add a message about the commit here"
This will add and commit files that are already tracked
Save all the changes
git commit -a -m "Add a message about the commit here"

Commit specific files only
git commit {file-name-1} {file-name-2} -m "Add commit message here"
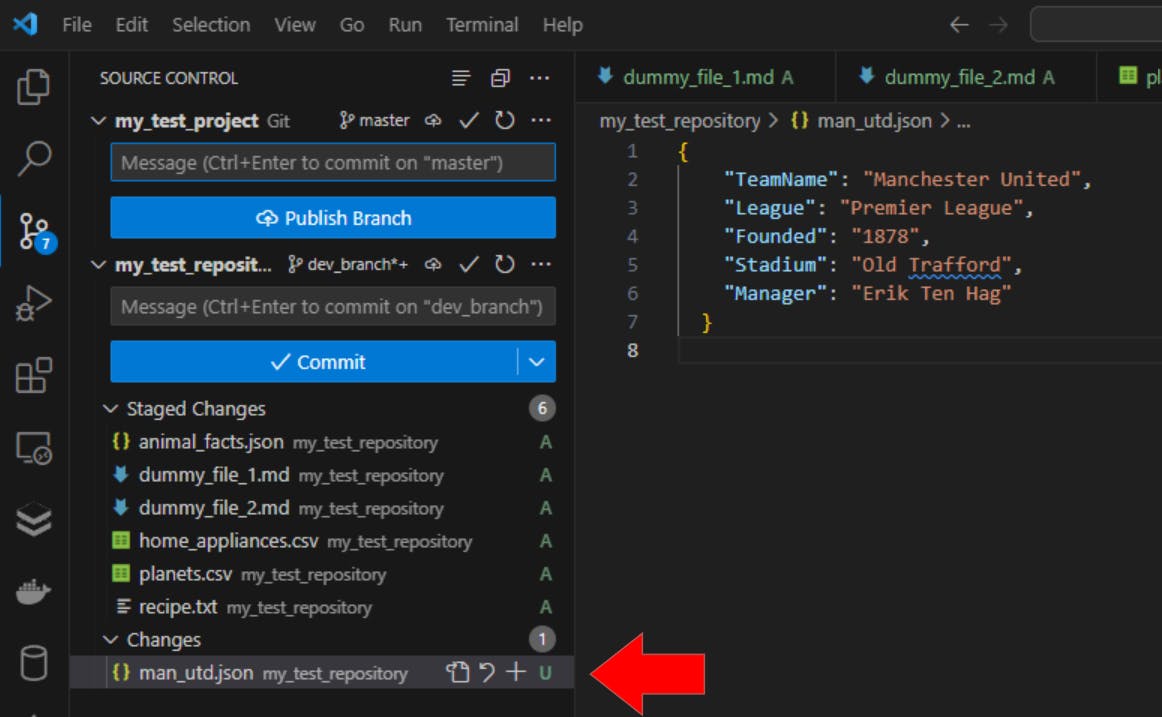
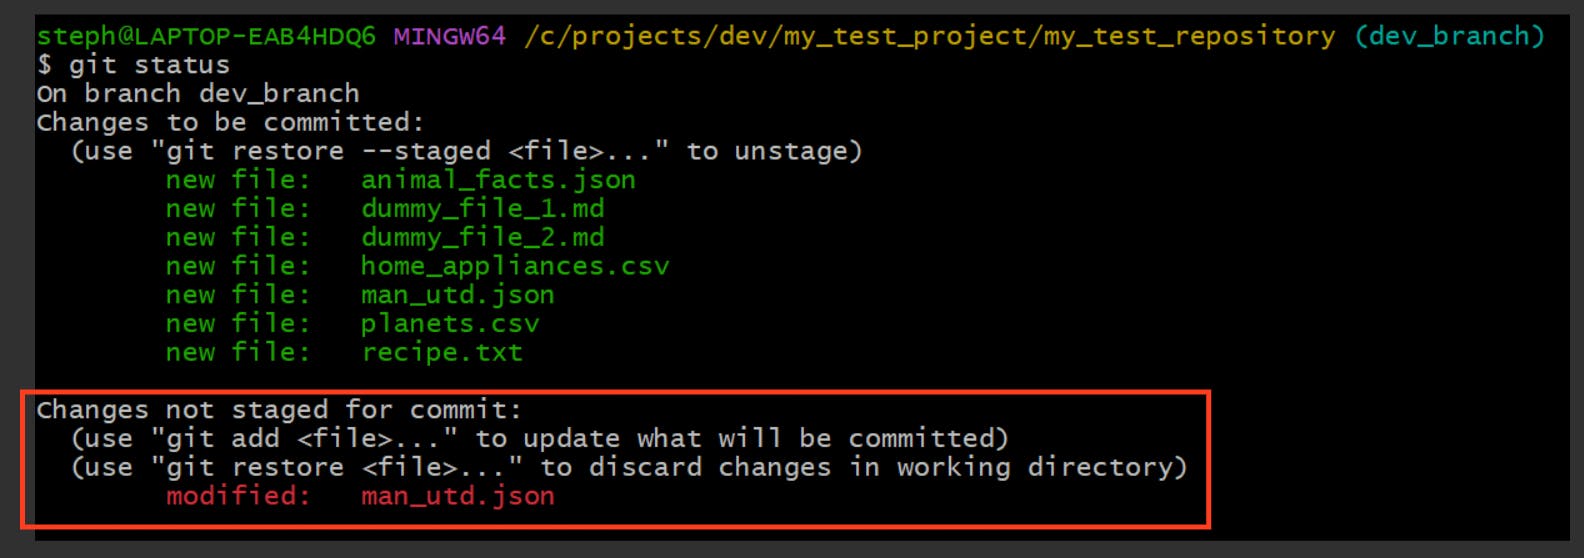
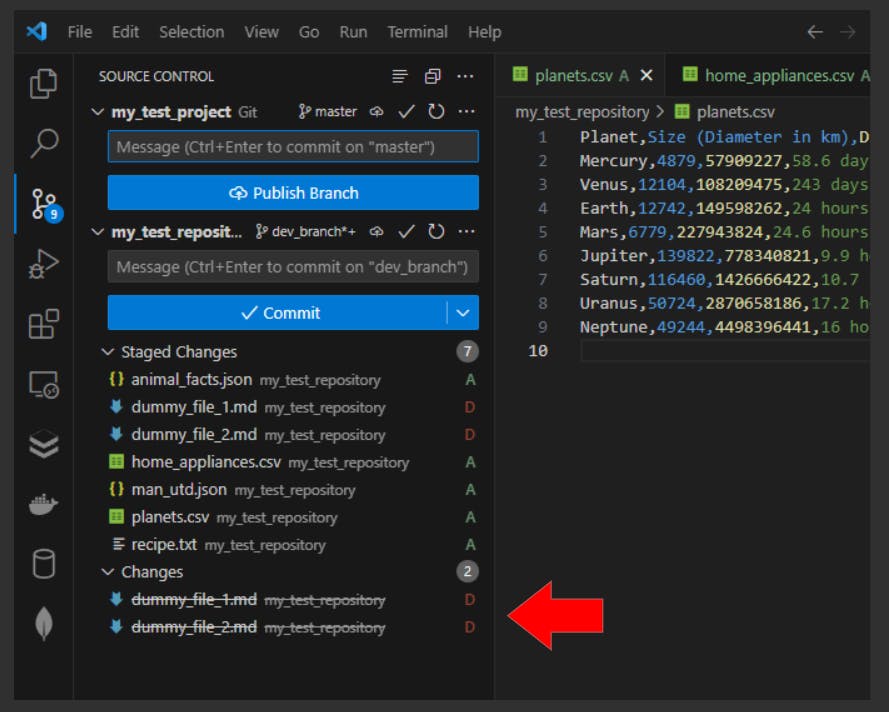
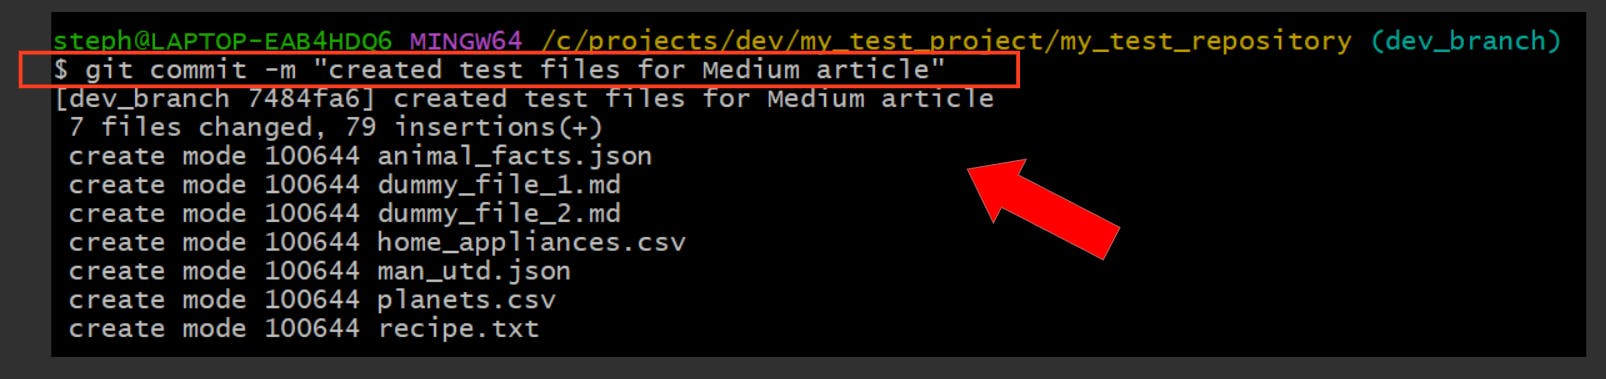
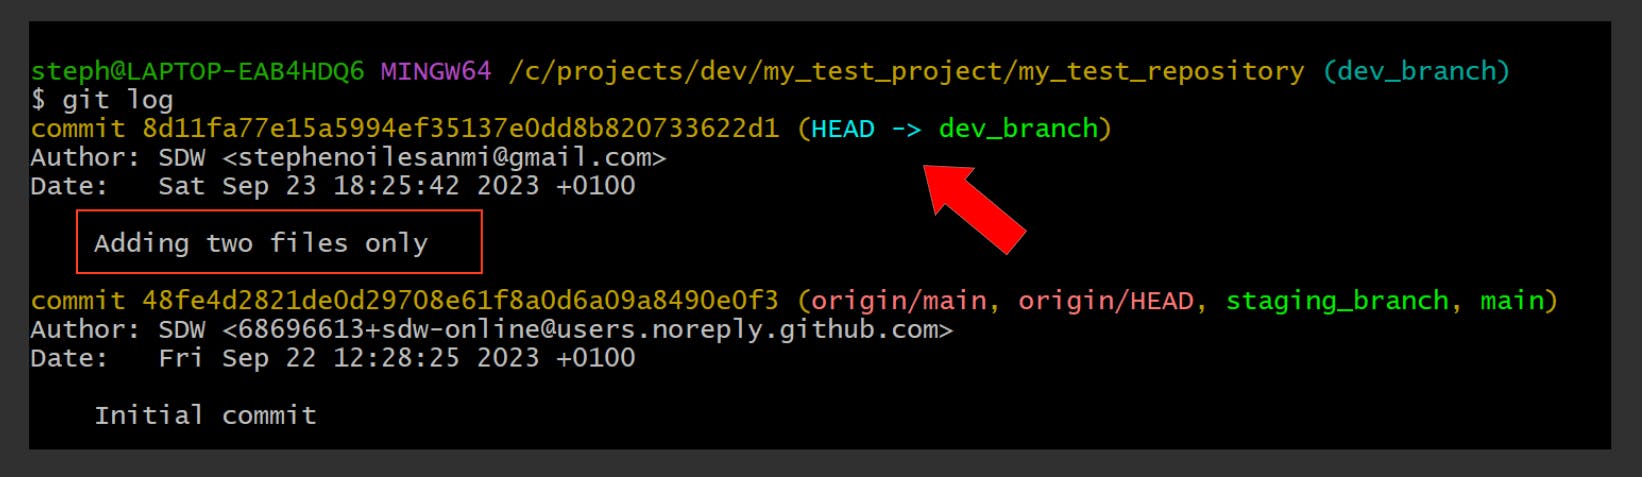
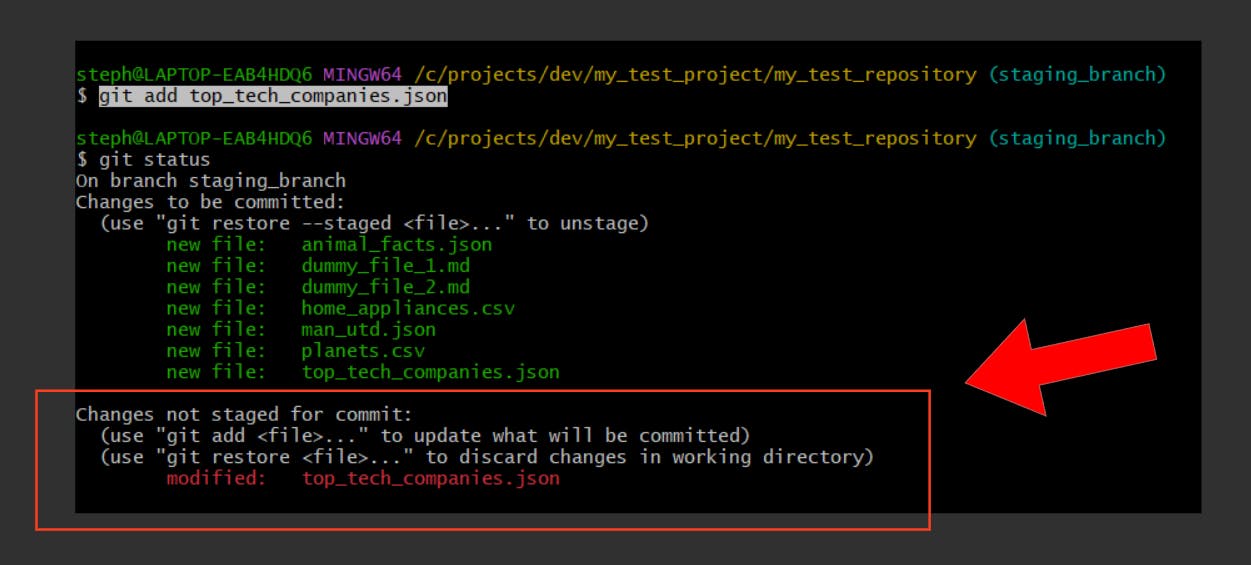
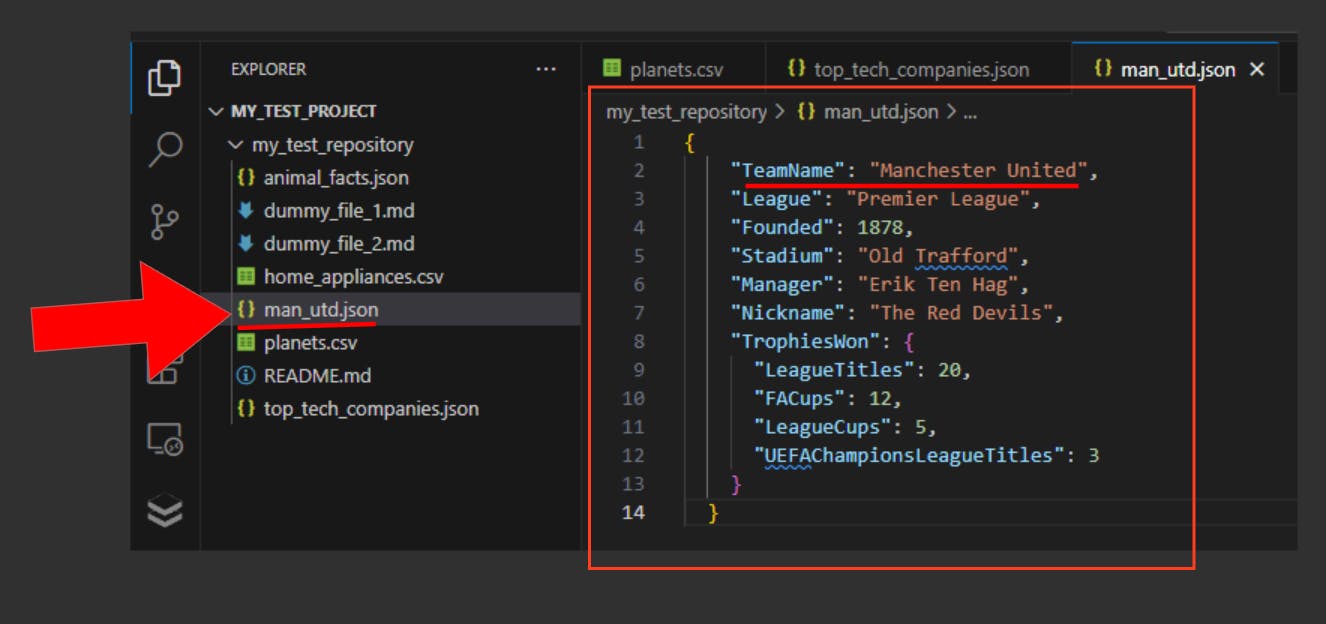
Let’s commit only two files from the staging area:
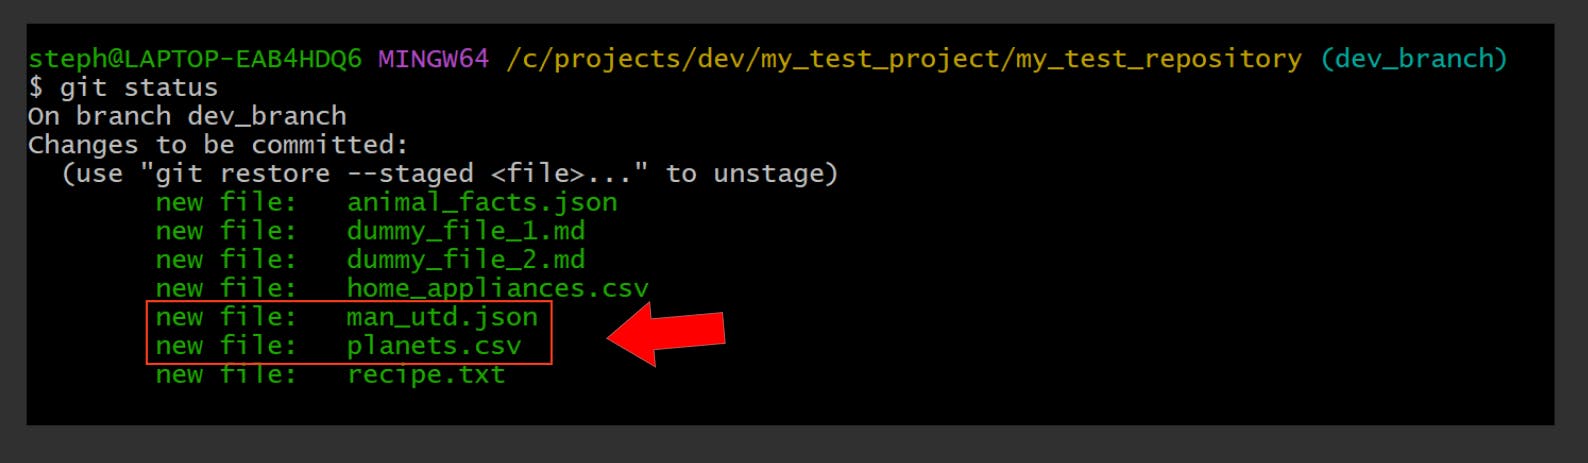

Here’s what the staging area now looks like:
The man_utd.json and planets.csv files are no longer found in the staging area, and are now in fact committed, as you can see in the commit log:
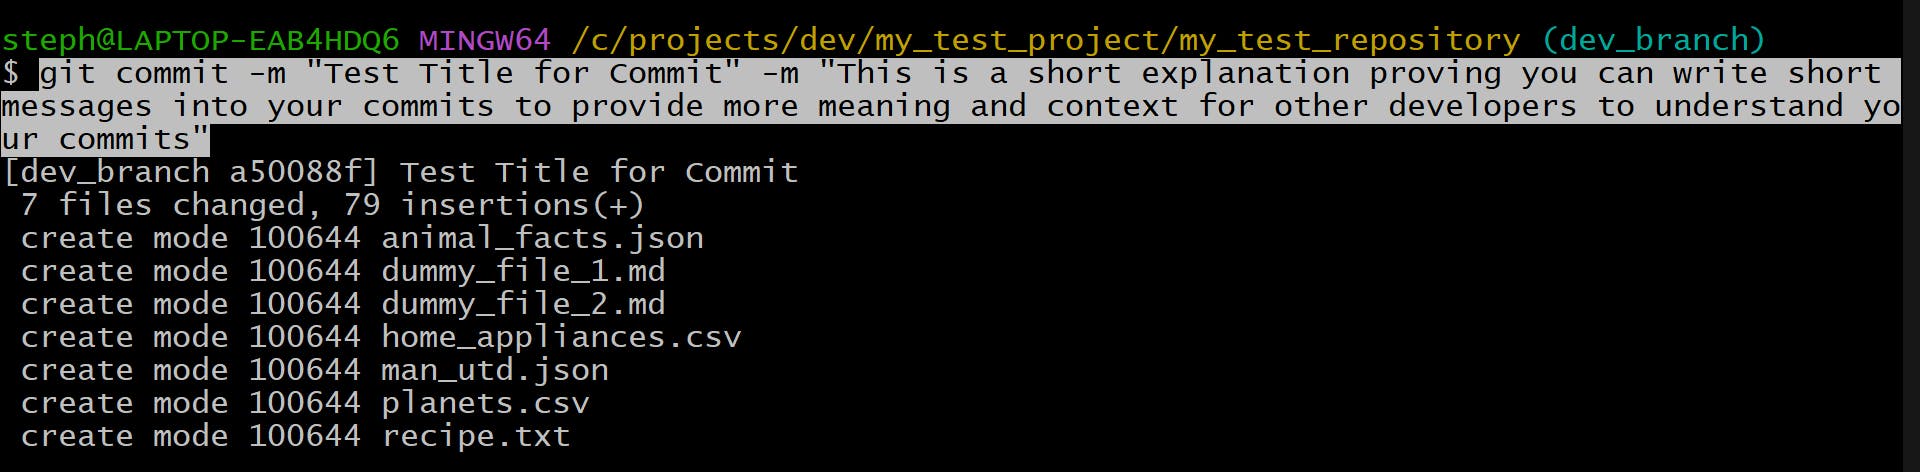
Save the commit with a title and a message
git commit -m "Add title or short headline here" -m "Add a detailed explanation here"
Let’s put this to the test:
git commit -m "Test Title for Commit" -m "This is a short explanation proving you can write short messages into your commits to provide more meaning and context for other developers to understand your commits"
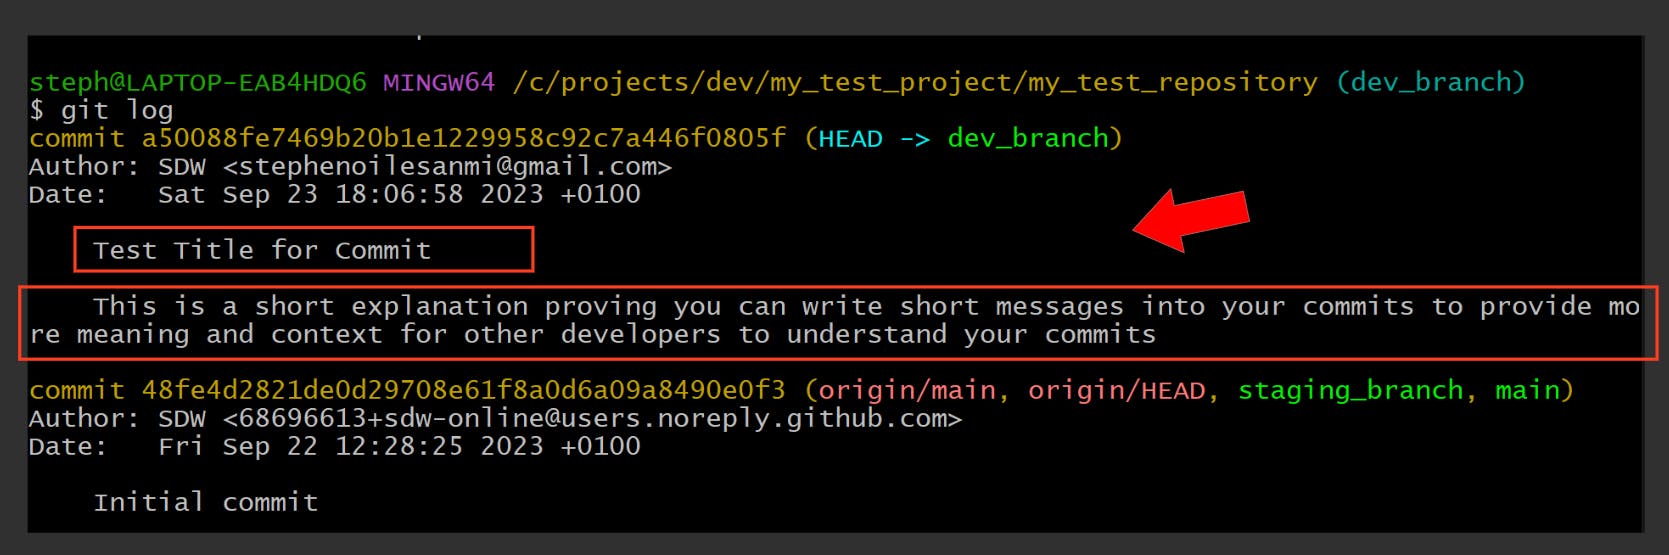
This is what it looks like in the commit log:
Use editor to add a commit message
git commit
This will open your default editor. Because I’m using Git Bash, my default editor is Vim, as presented below, but you can change the default editor to your preference:
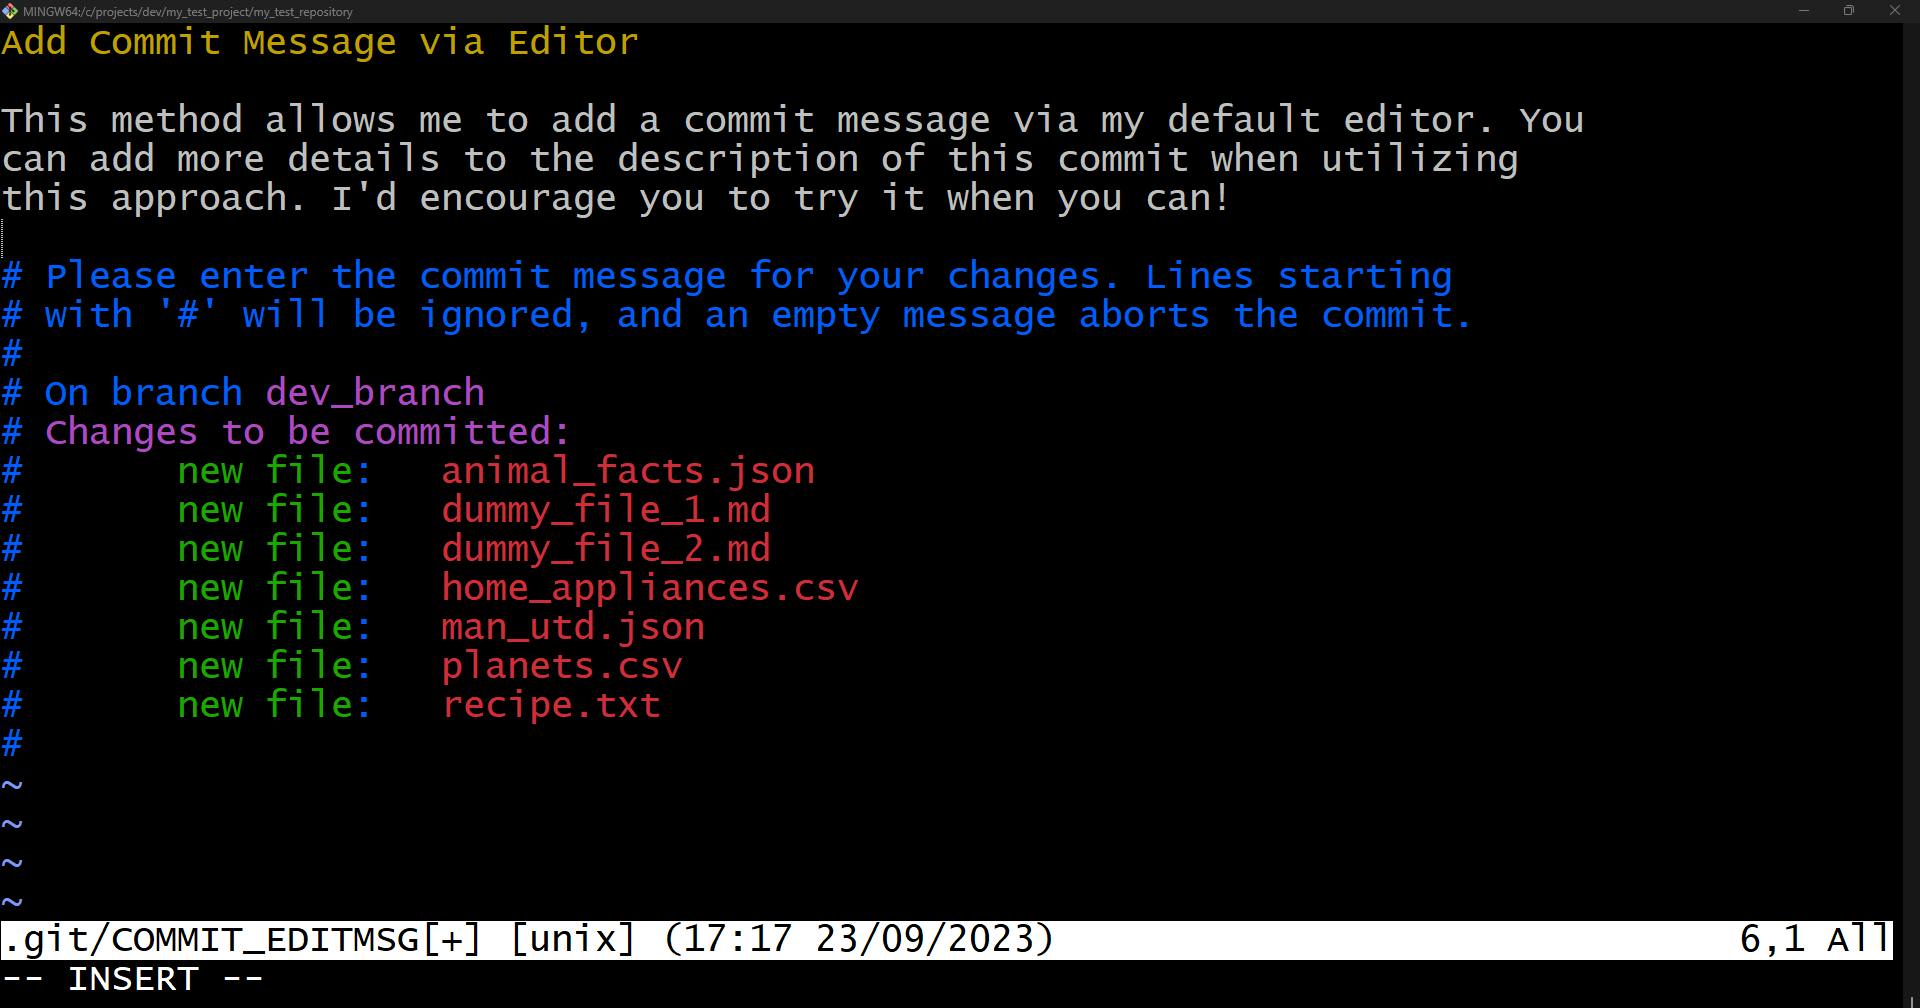
To save this commit,
Enter
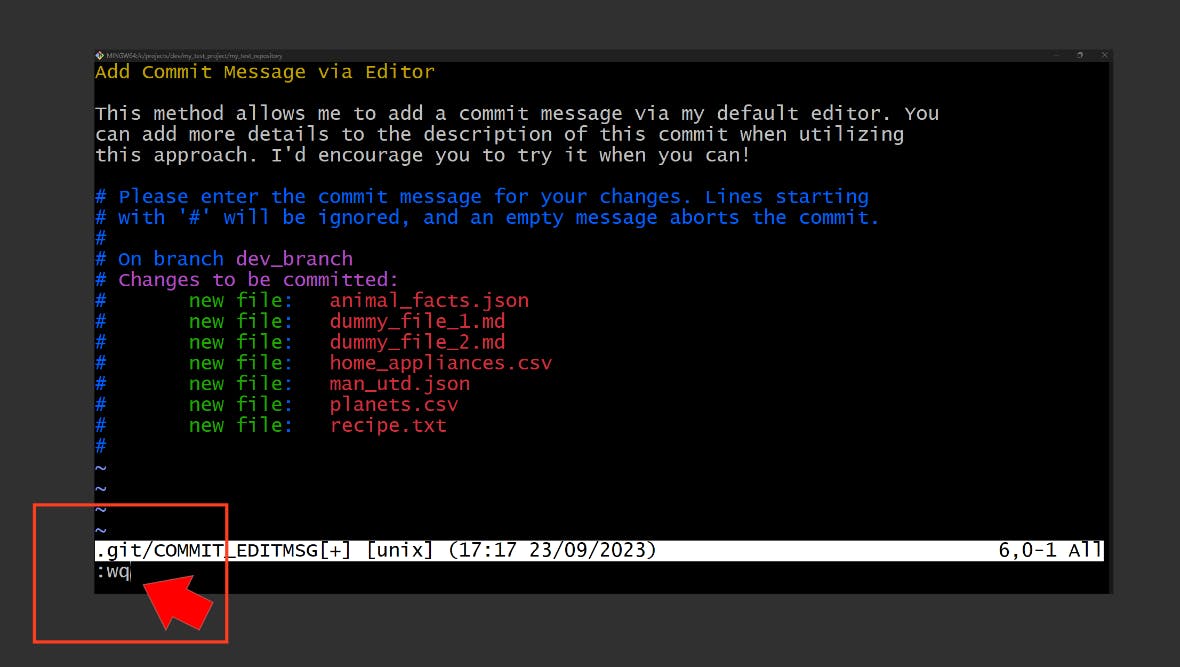
Escbutton on the keyboardType
:wq(like below)Hit
Enter
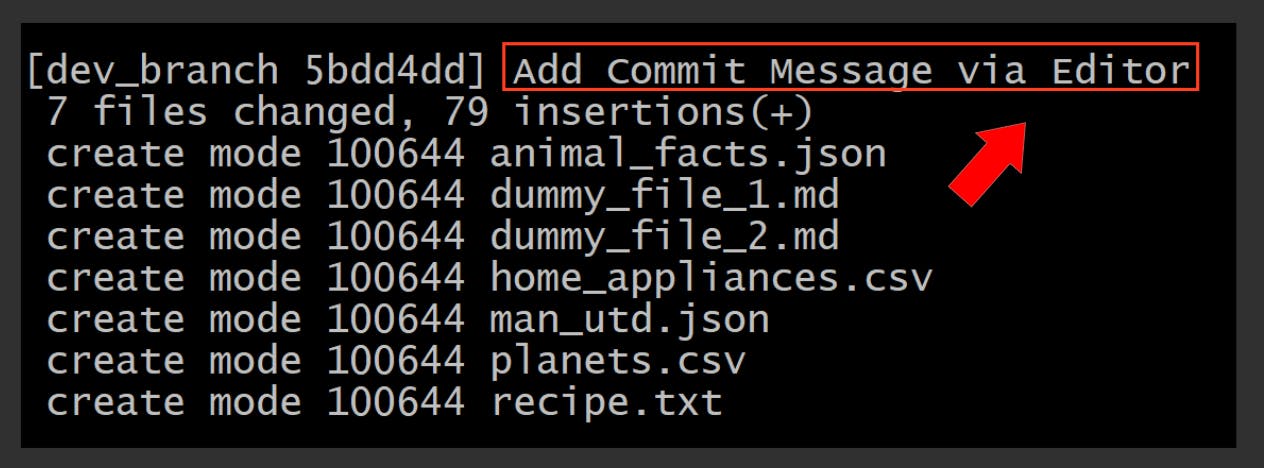
This should then display this:
Amend the previous commit
git commit --amend -m "Add the improved message here"
This is what the previous example’s commit looks like when we view the commit log (via git log):
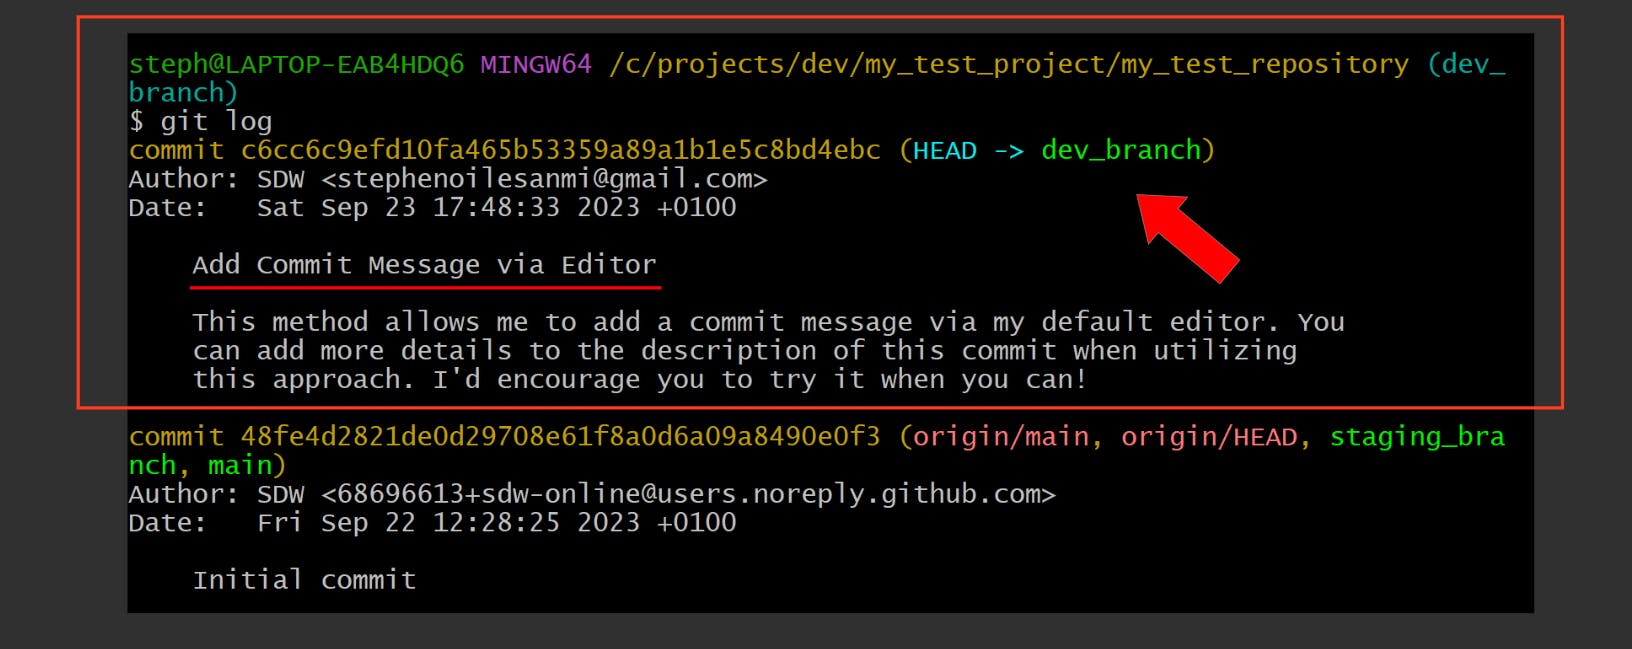
The commit title is currently “Add Commit Message via Editor”. Let’s change it:
git commit --amend -m "Change the Commit Message"
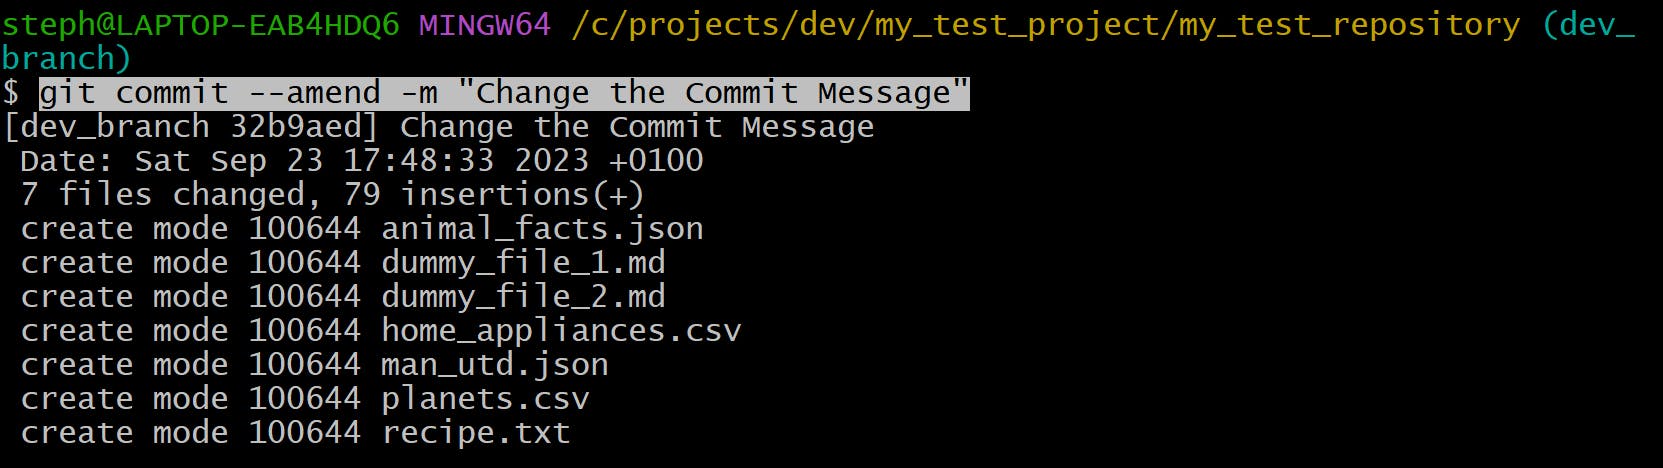
Here’s what it looks like now:

Stage and commit a change in one line
git commit -am "Add message here"
This works for files that are already being tracked
git stash
Save a change in a temporary location
In Git, stashing allows you to save changes in a temporary location and then resume when you’re ready to continue from where you left off with them.
This is used mainly when you have changes that are staged, modified or even untracked that you’re not ready to commit yet even though you need to make other changes elsewhere e.g. in another branch. Stashing will make your working directory clean enough for you to work on different changes while you have others stored elsewhere.
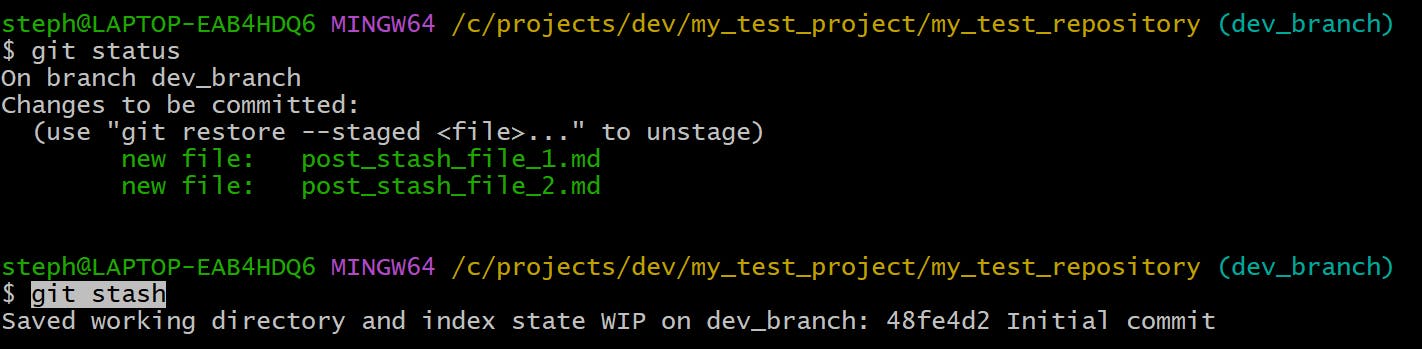
Save changes in a temporary location
git stash
Here are the changes in my staging area I want to stash away temporarily:
All I need to do is apply git stash, and here are the results:

The staging area is officially empty, providing us with a clean, working directory to make other changes.
We can even create new files and stash these away too:
Save a stash with a specific name
git stash save {custom_name_for_stash}
You can provide a custom name to a stash instead of using the default ones provided using the command above
List the stashes
git stash list
Let’s list all the stashes we’ve made:

These are the two stashes made from the previous example
Apply a stash
To apply the most recent stash to the current branch, use:
git stash apply
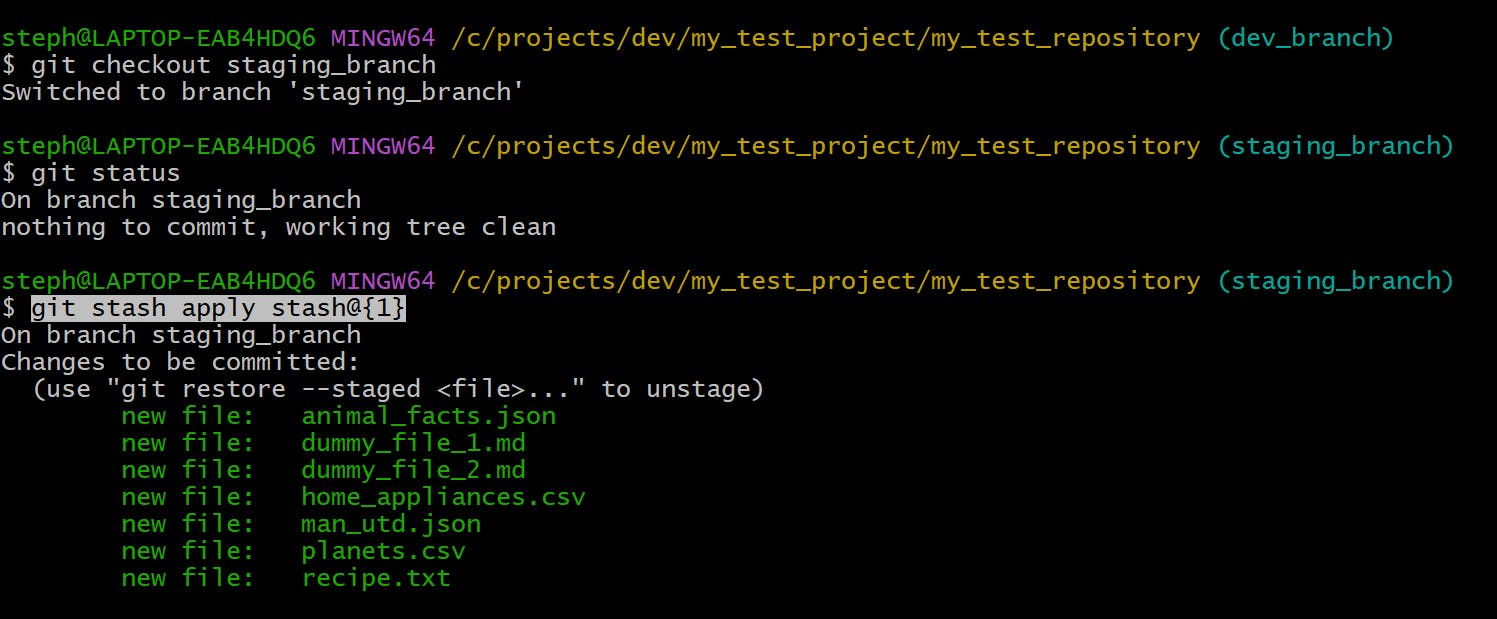
Apply a specific stash
To apply a specific stash to the current branch, use:
git stash apply {stash-id}
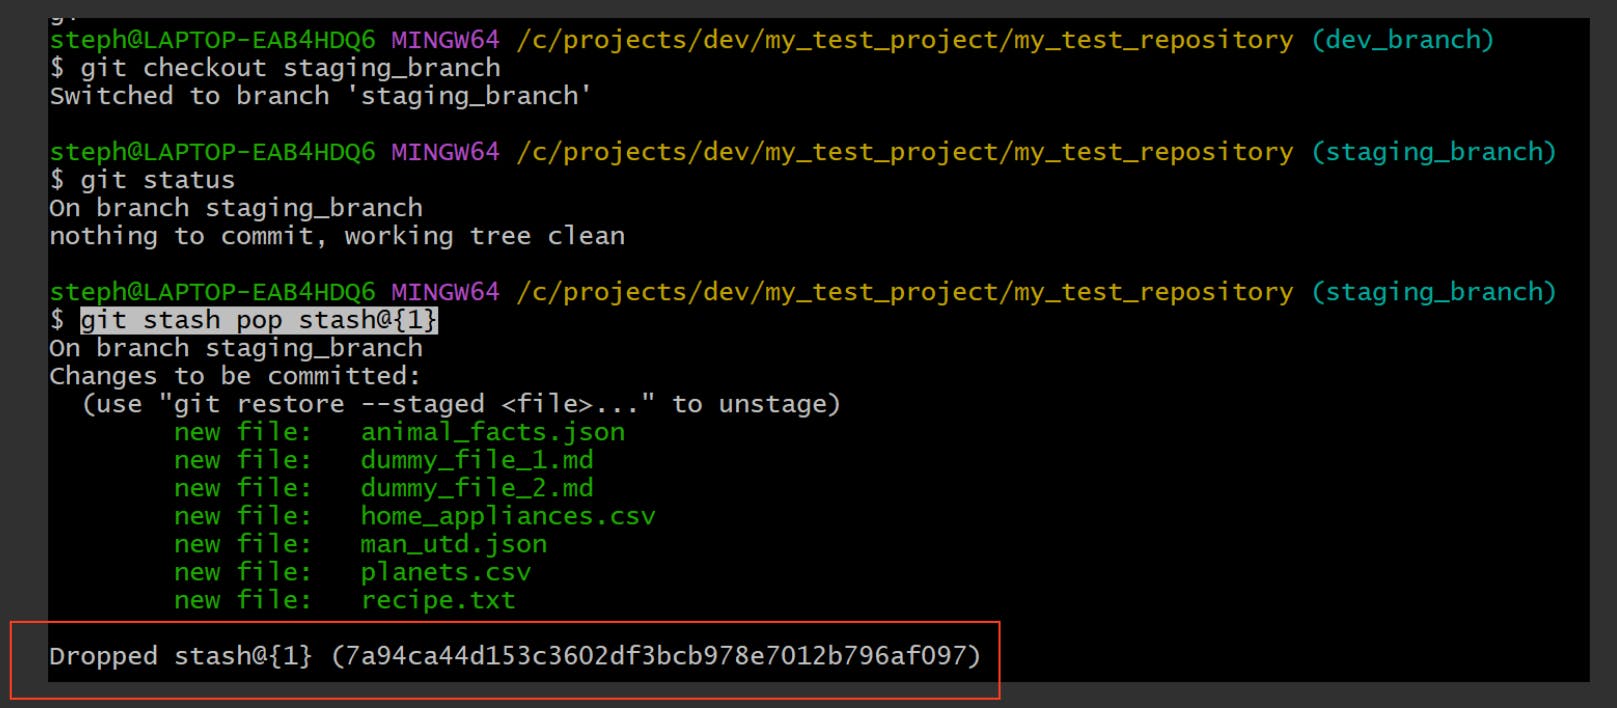
If we switch to another branch, like staging_branch, we can apply one of the stashes from the List the stashes example:
Delete a stash
git stash drop
or
git stash drop {stash-id}

Apply and then delete a stash
This is referred to as popping, where you can apply a stash to the current branch and then drop it immediately:
git stash pop
Here’s an example of how this works:
Git rm
Removes the specified file from the working repository and the staging area (a.k.a. the index).
Here’s how it works:
Remove a single file
git rm {file-name-1}
Remove multiple files
git rm {file-name-1} {file-name-2}
Remove a directory
git rm -r {directory-path}/
Remove staged files with the same format from the index
git rm --cached *.log
Let’s drop all of the CSV files from the staging area:
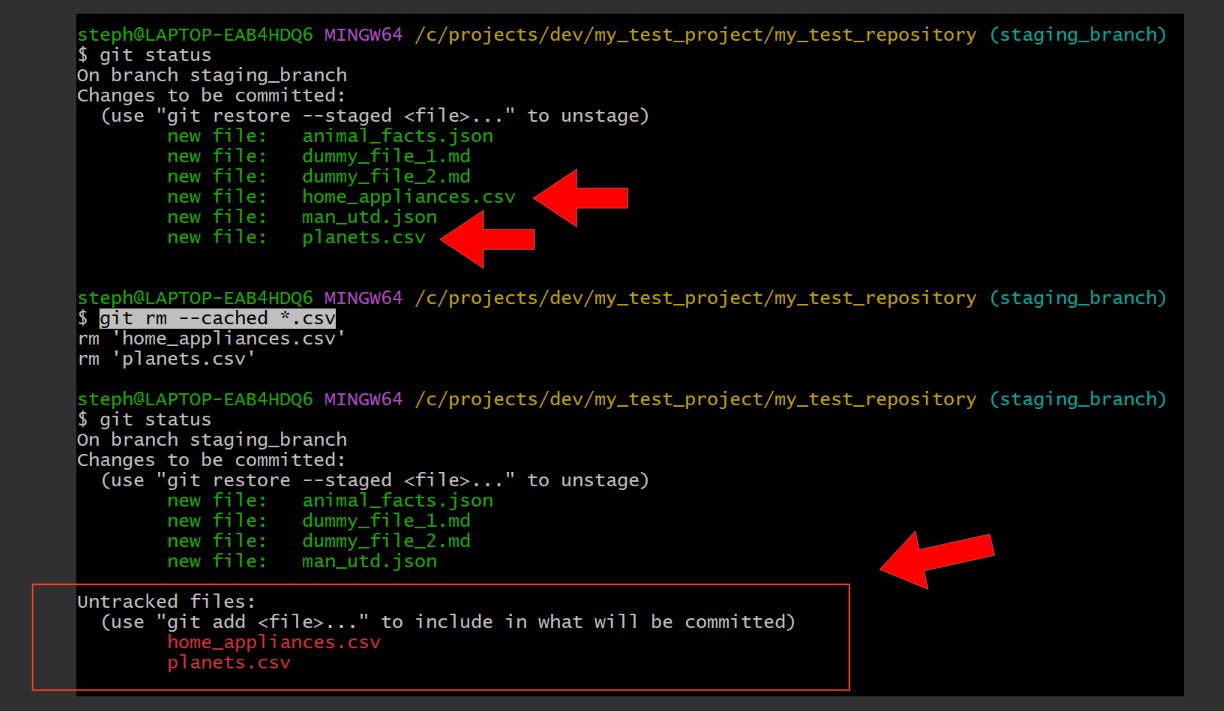
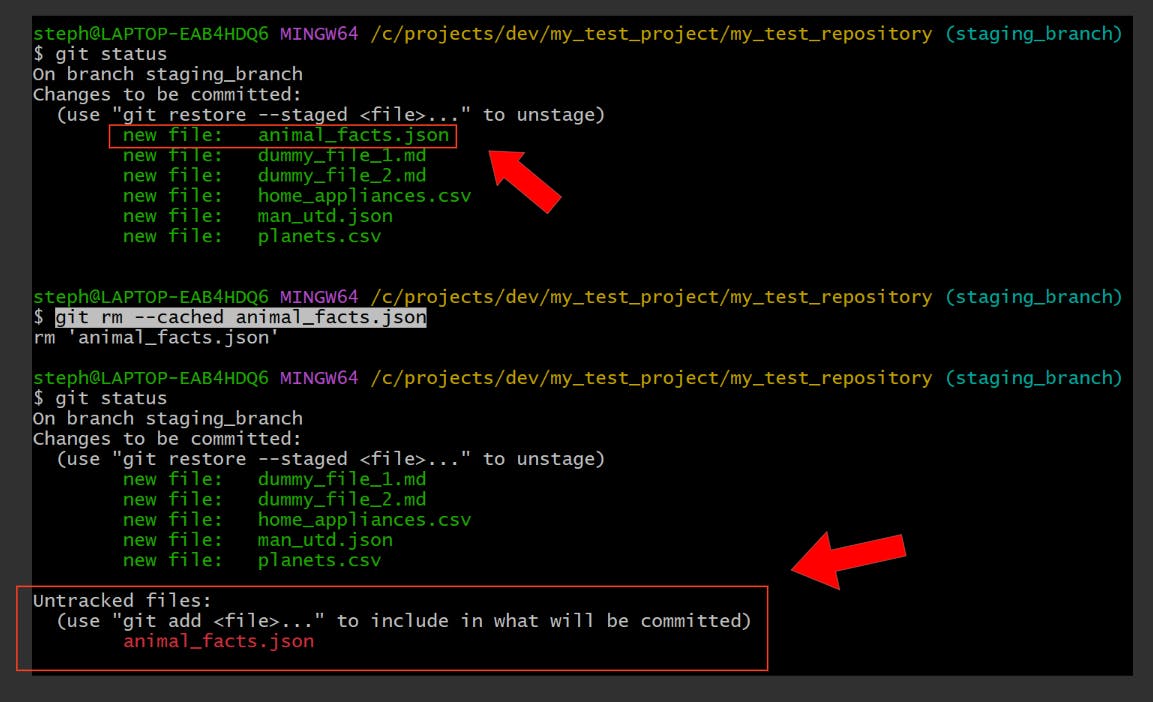
Remove a file from the staging area only
git rm --cached {file_name}
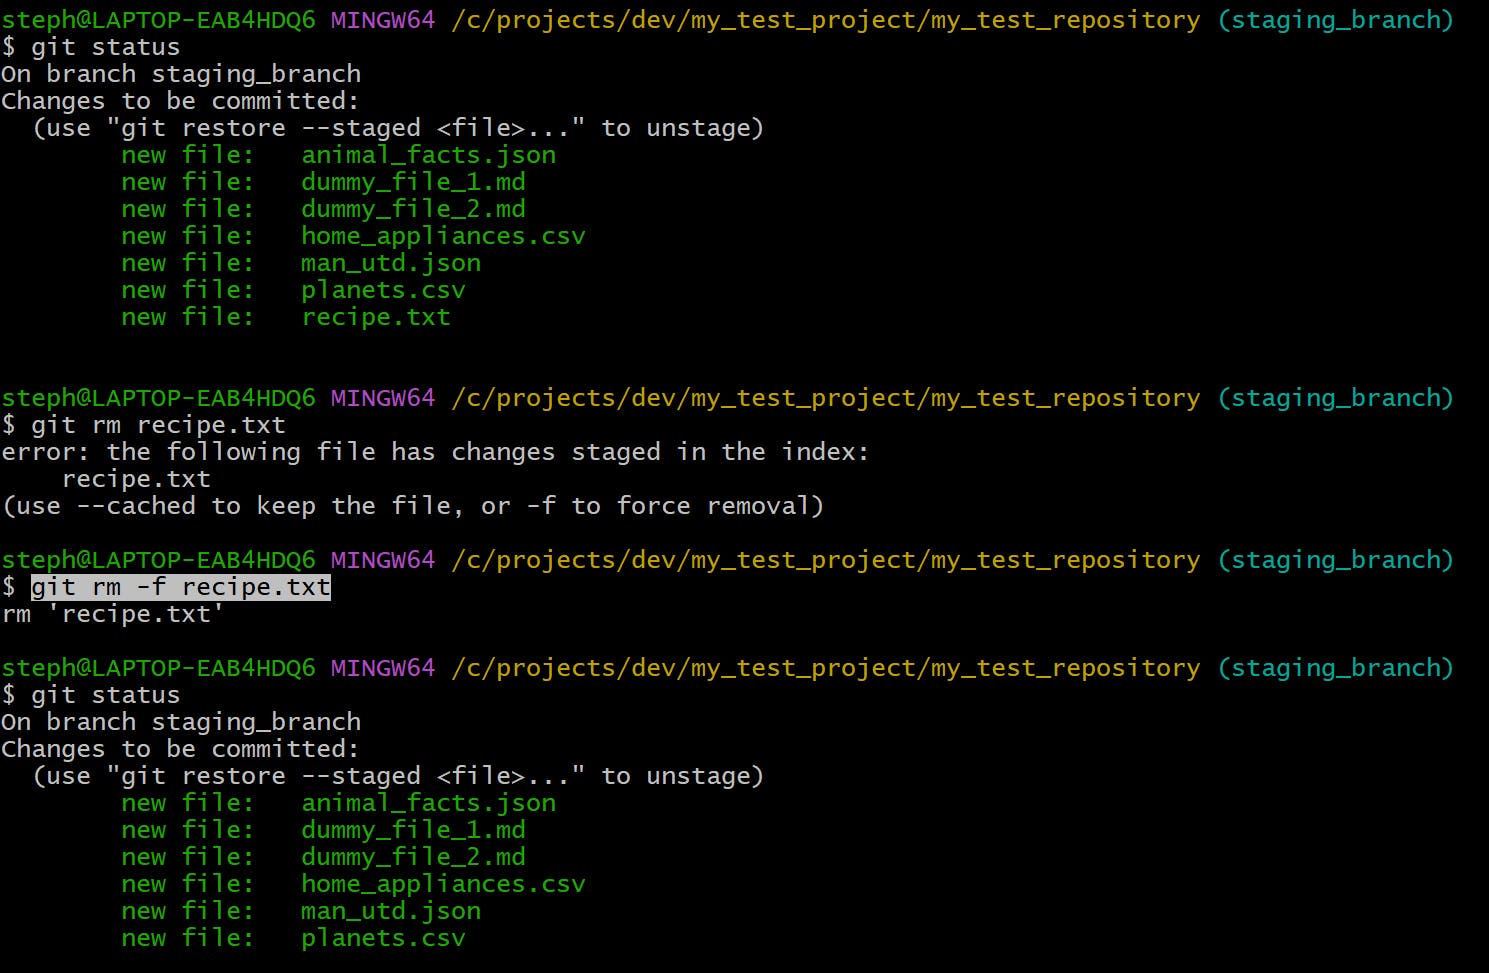
Remove a file with force
git rm -f {file_name}
git restore
Restores an existing file in the working directory to its previous state.
It reverts all unstaged and uncommitted files in the working directory to the version they had in the last commit. This is useful for reversing accidental modifications made to files, similar to how Ctrl + Z is used.
It's also important to note that this does not affect the staging area or the commit history, so it is generally recommended to discard staged changes using git reset HEAD if you need to record the changes made in the commit history too.
Restore a single file
git restore {file_name}
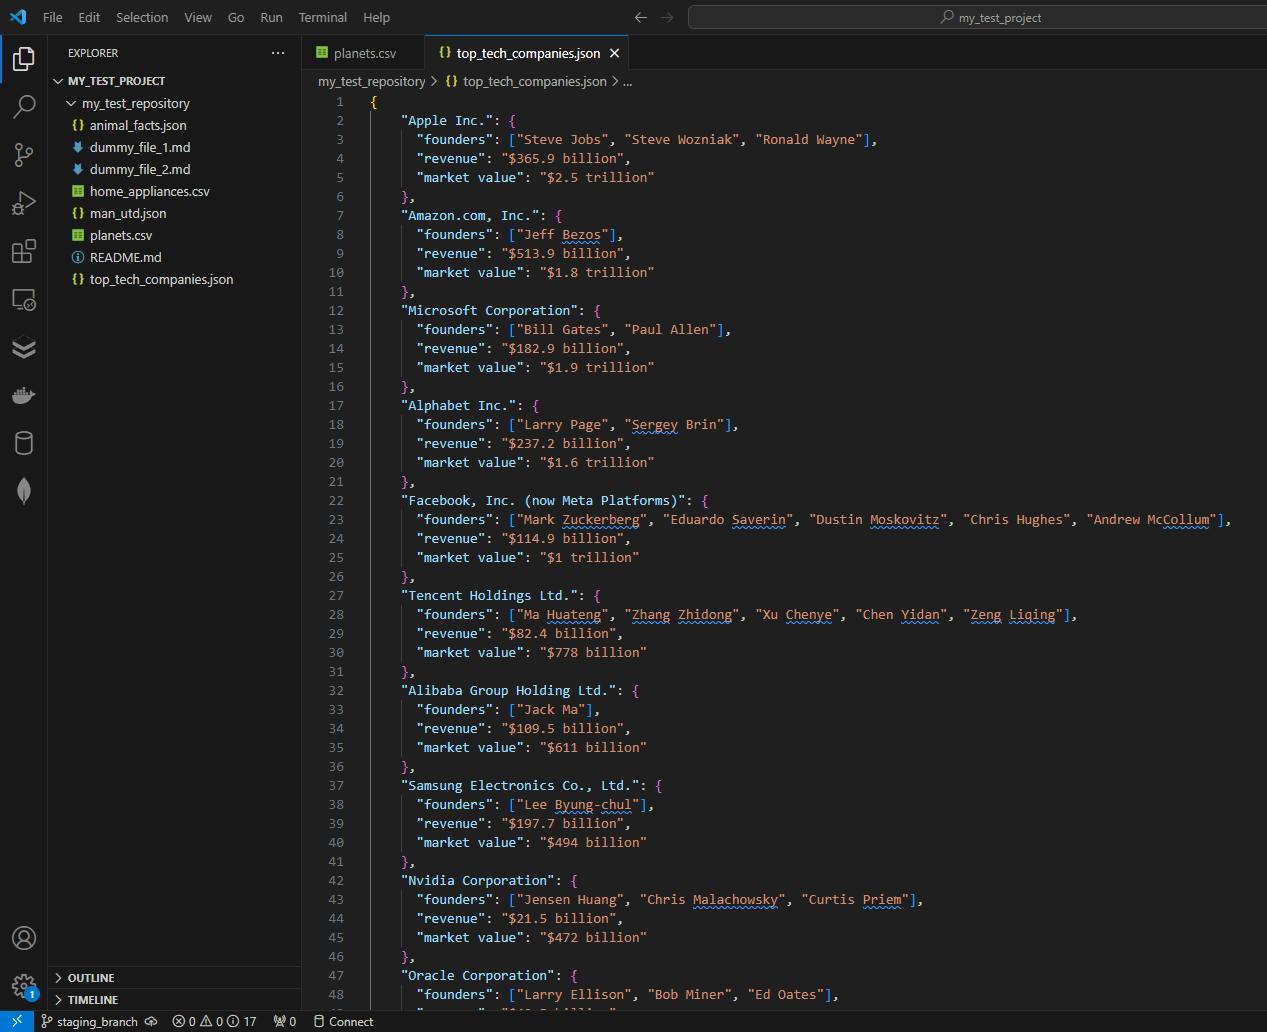
Let’s create a new file called top_tech_companies:

Once we add this to the index and add data to the file, the terminal should look like this:
Unfortunately, a developer has accidentally overwritten the data in the file with some random characters, and it wasn’t staged or committed at the time…

Thankfully, we can restore the file to its previous state, when it did have all the data:

Here is the results:
It’s almost like the mistake never happened in the first place!
Restore multiple files
git restore {file_name_1} {file_name_2}
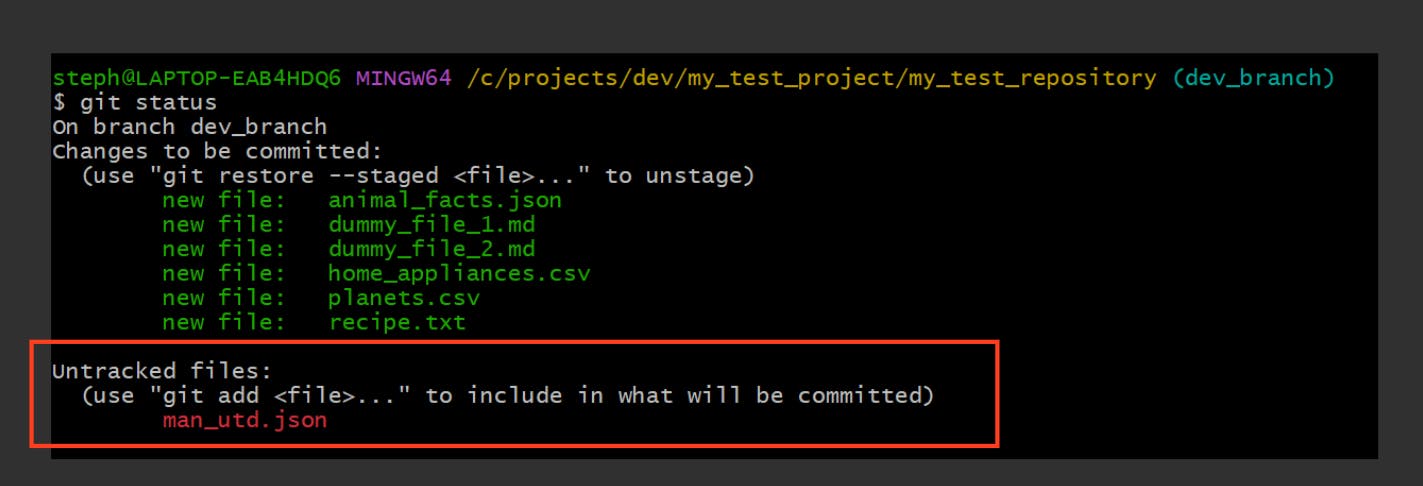
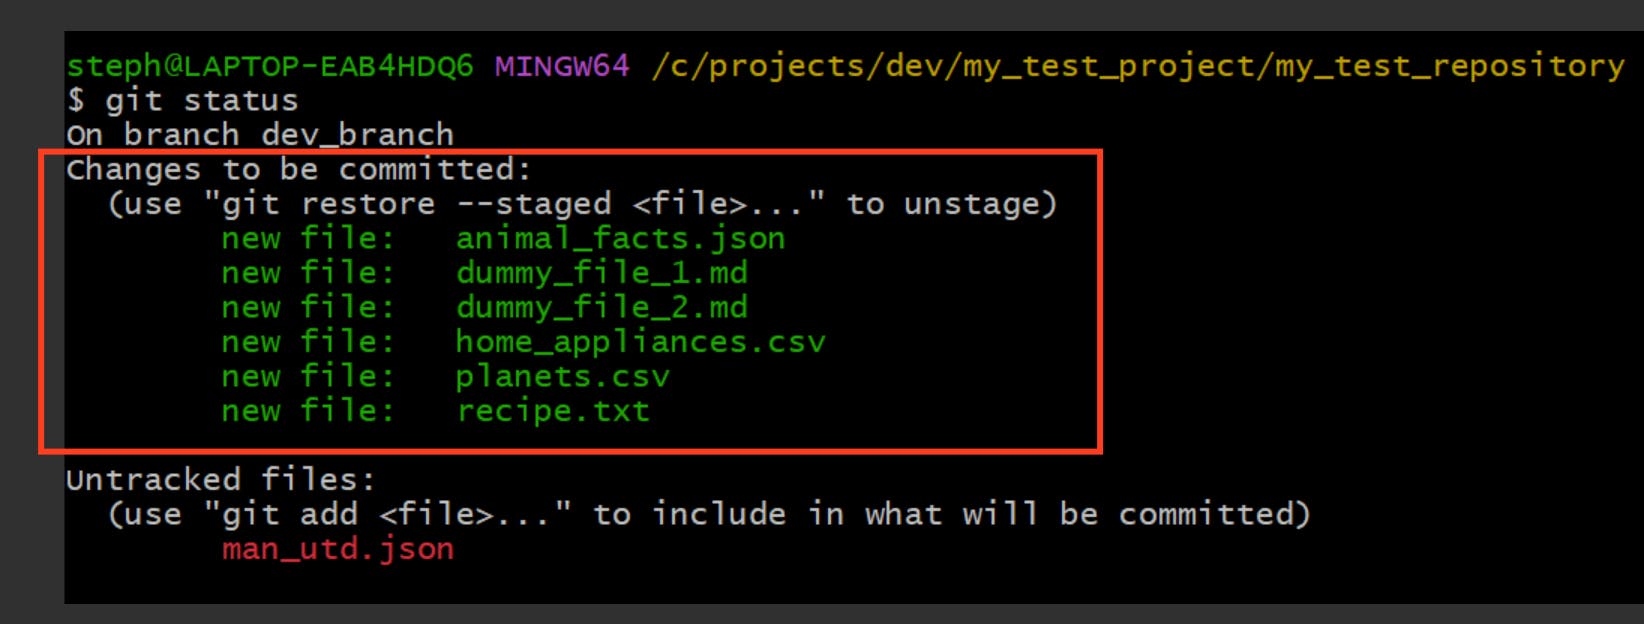
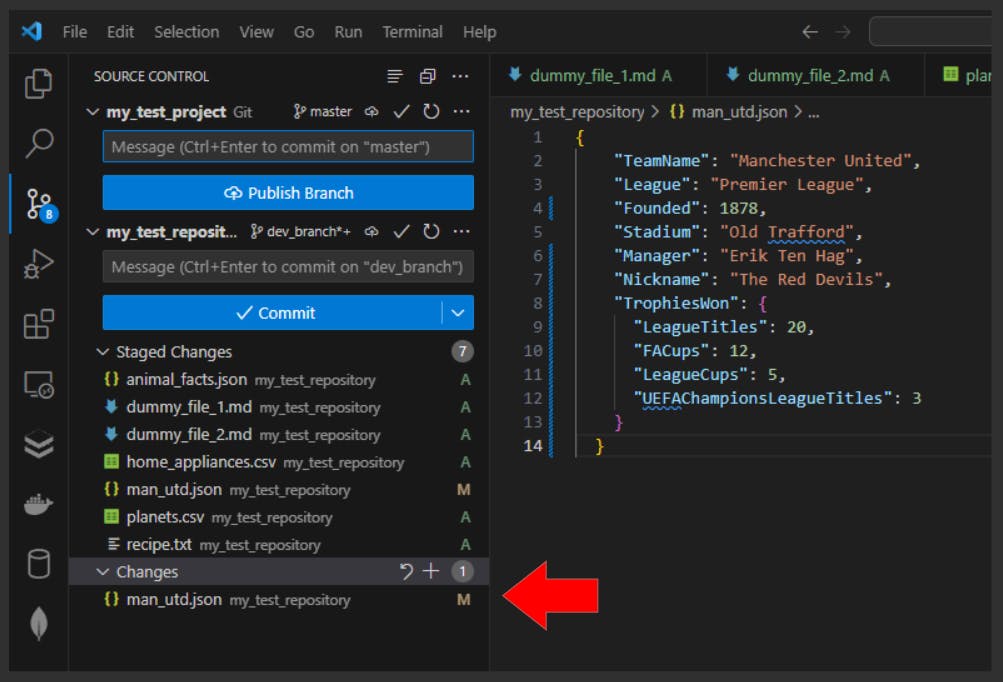
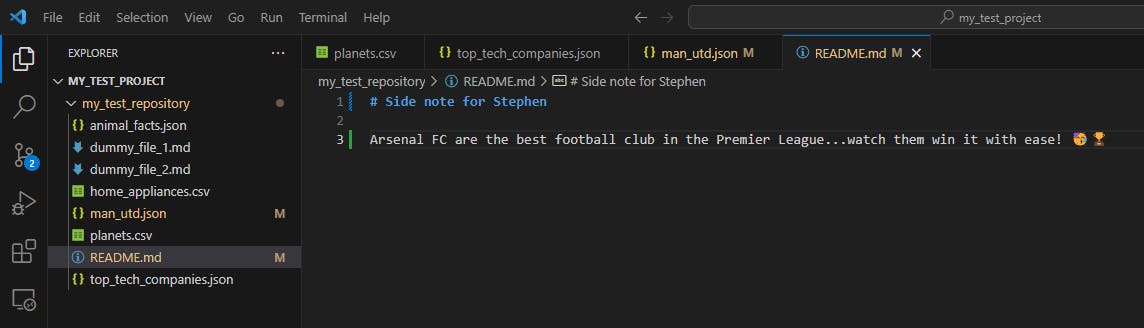
There appears to be a joker within the team that felt the need to change some of the information within some of the files in our repository. They appear to have modified the following files:
Here’s what each says respectively:

Let’s correct these corrupted unstaged files by restoring them to their previous version since the last commit:
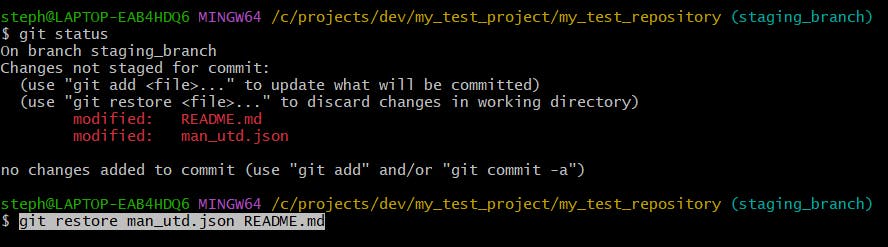
And the results:
Excellent! We wouldn’t want to spread that kind of misinformation across our repos now, would we?
Restore files from the index
git restore --staged {file_name}
We created a new file called dummy_file_3.md, but discovered there was an error made in the file:
The total number of continents provided was incorrect…we can’t commit this until we correct it, so let’s offload it from the index:
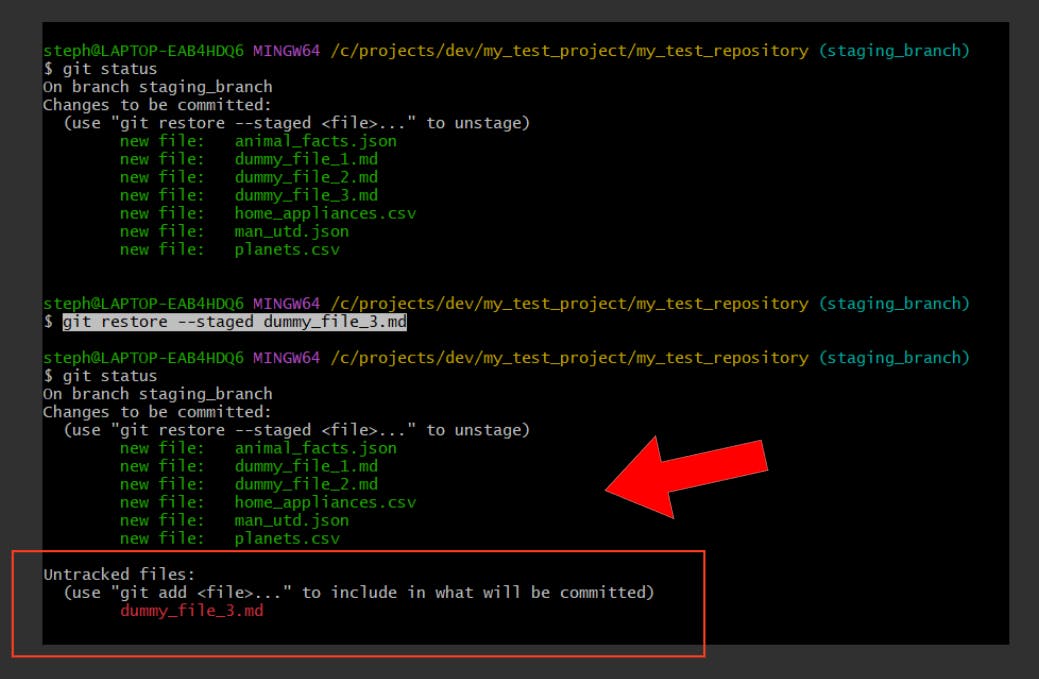
It’s successfully returned the file to its original state since the last commit
Restore all files from the working directory
git restore .
4. Synchronizing your project
Keeping your local repository in sync with your remote repository is vital for version controlling your changes and enhancing good collaboration with other teams and developers
git push
For uploading changes to the remote repository
Send commits to the default remote branch
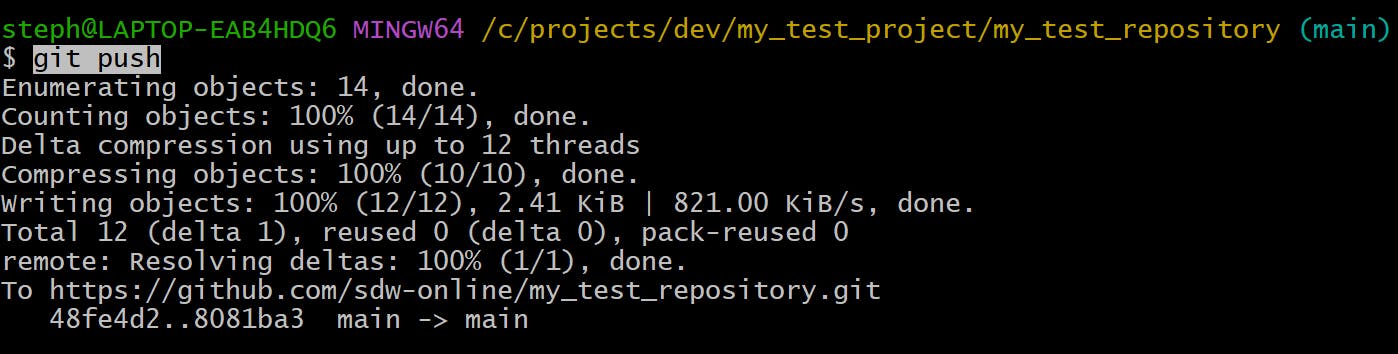
git push
Send commits to a specific branch
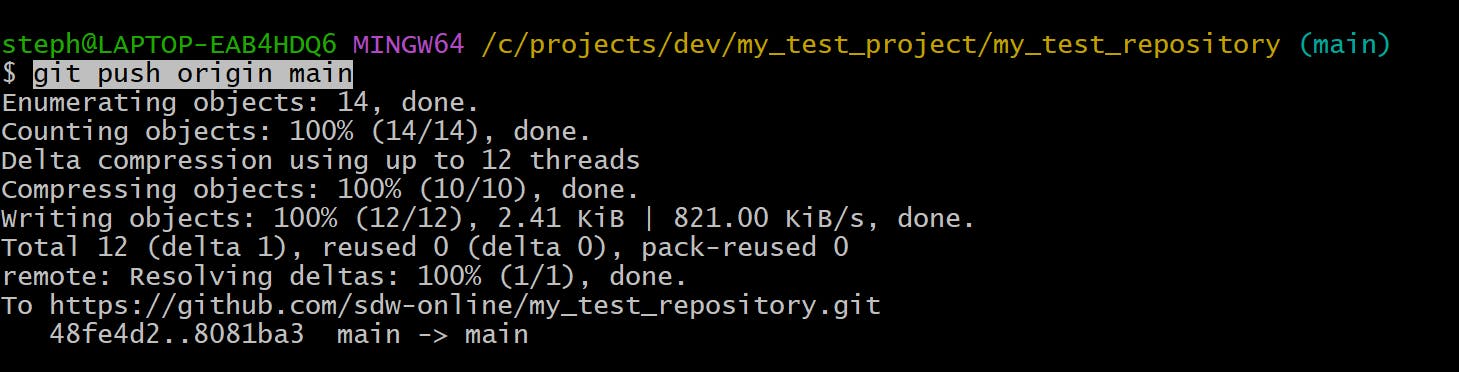
git push {remote} {branch}
Send commits to a branch with force (unsafe)❌
git push --f {remote} {branch}
or
git push --force {remote} {branch}
This sends the local changes made to the remote server specified, even if there are commits in the remote server that are not included in the local repository.
⚠️Warning: This operation overwrites the entire commit history on the remote branch, which means the commits made on the repository since you last pulled will be permanently deleted.
Some of the dangers with this approach include:
Deleting the commits of team members working on the same remote repository, causing data loss or conflicts
Breaking the build process on the remote repo, which makes it difficult for other team members to push their respective changes
Overwriting commits that have already been deployed to production may cause unexpected issues for your users
Remember to use this command cautiously, otherwise strongly consider the alternatives mentioned in this article.
If you do need to force push, consider the next example instead.
Safely send commits to a branch with force✅
git push --force-with-lease {remote} {branch}
If you do need to force push, you can use this option instead. This approach is less dangerous than using git push -f because it prevents you from overwriting the commit history on the remote server if there is a commit on the remote branch that isn’t included in the local changes.
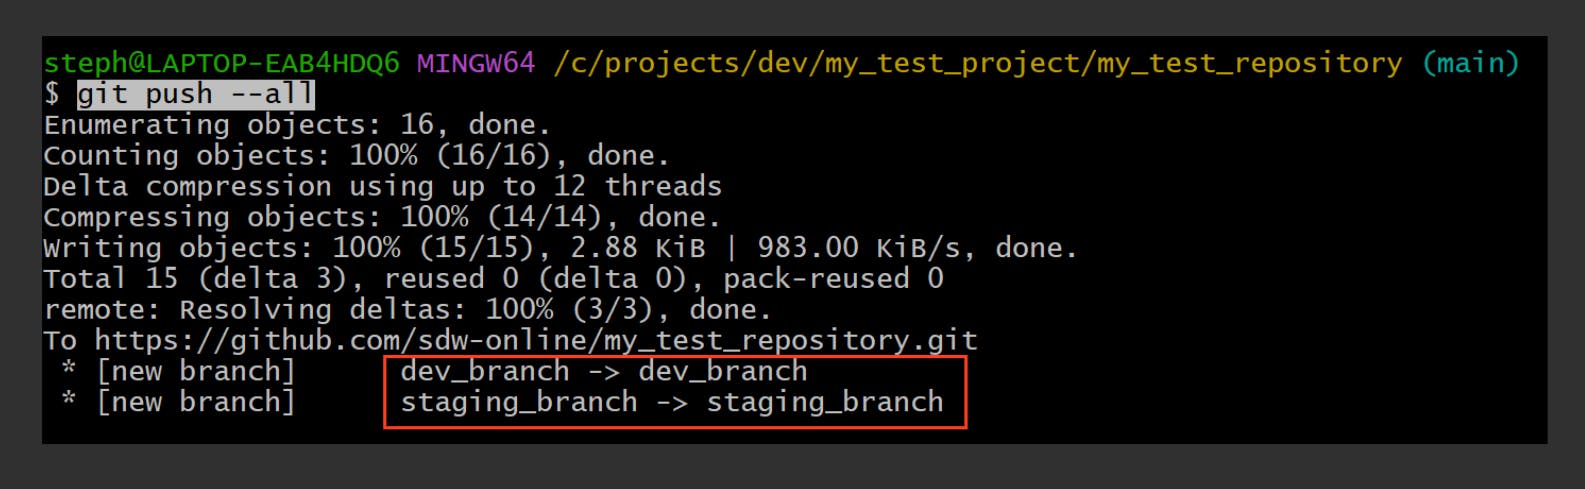
Push all local branches to remote server
git push --all
git pull
For retrieving all the changes from a remote repository AND merging them to the local repository
Here are some of the different ways to use the git pull command:
Pull the commits from the default remote branch to the local branch
git pull
Pull from a specific remote branch to the current local branch
git pull {remote} {branch}
Pull changes from all remote branches
git pull --all
Pull from remote branch WITHOUT merging with local branch
git fetch {remote}
Rebase while pulling
git pull --rebase
git remote
For listing all the remotes for collaborative purposes

git cherry-pick
For picking an individual commit from one branch and pasting it into another
As the name implies, git cherry-pick lets you select specific commits from one branch and apply them to another, without merging the changes from the source branch.
Cherry pick a single commit
# Switch to the branch you want to apply the selected commits to
git checkout {target_branch}

# Apply the commit to the target/child branch
git cherry-pick {commit_hash}

Cherry pick multiple commits
# Switch to the branch you want to apply the selected commits to
git checkout {target_branch}

# Apply the commits to the target/child branch
git cherry-pick {commit_hash_1} {commit_hash_2}
Cherry pick a merge commit from the source branch
# Switch to the branch you want to apply the selected commits to
git checkout {target_branch}

# Apply the commits to the target/child branch
git cherry-pick -m {parent_no} {commit_hash}
5. Reviewing and debugging changes
Sometimes we need to troubleshoot and compare different changes and working branches, here are some of the popular commands that handle that:
git log
Displays the log of commits
Show each logged commit on a single line
git log --oneline

Filter the log commits by
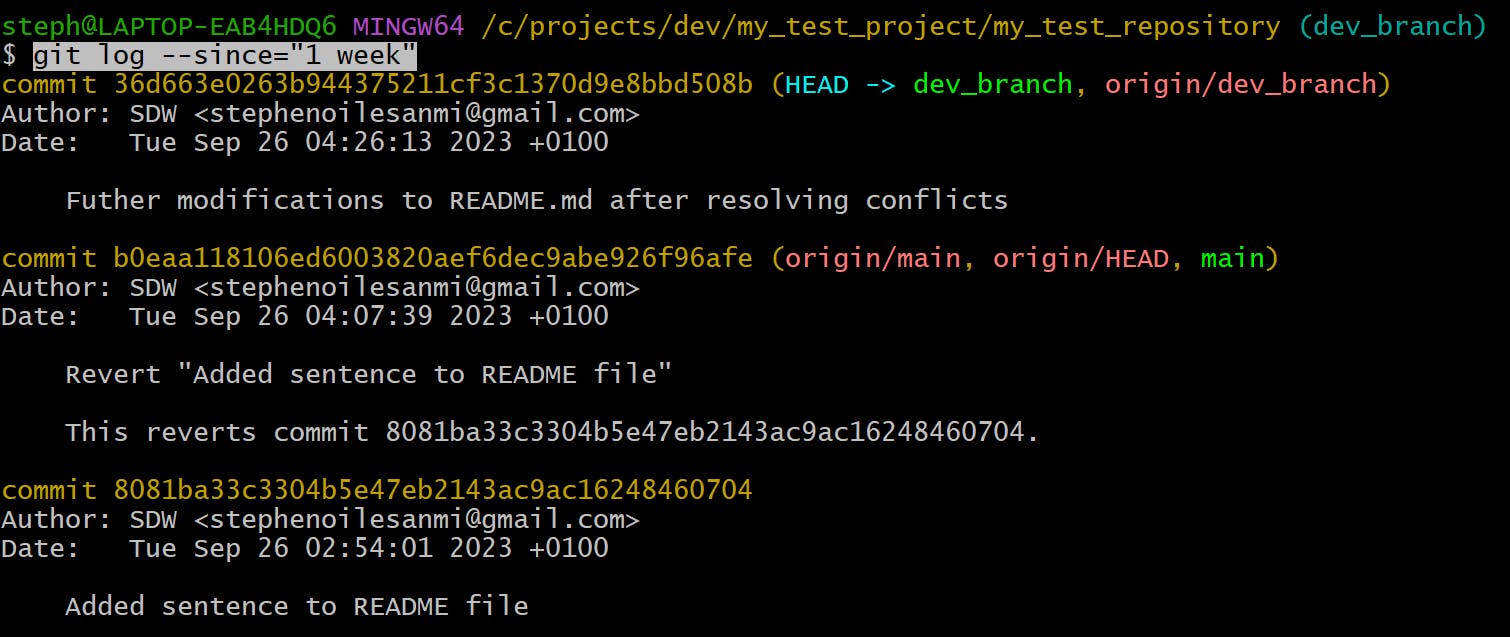
git log --since="time period"
Filter the log commits by date range
git log --since="earlier date" --until="later date"
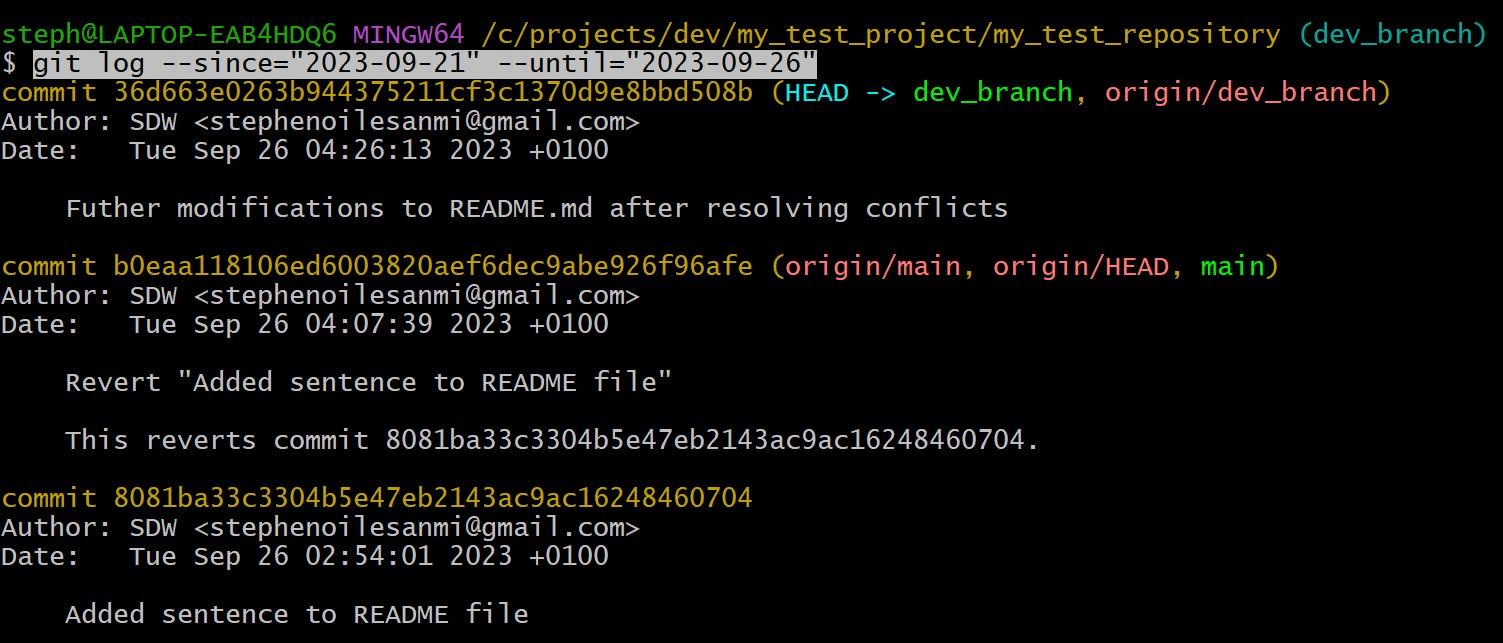
Filter the log commits by one author
git log --author={name_of_user}
Filter the log commits by multiple authors
git log --author="{name_of_user_1}|{name_of_user_2}"
Show the differences between a commit and its parent
git log -p
or
git log --patch
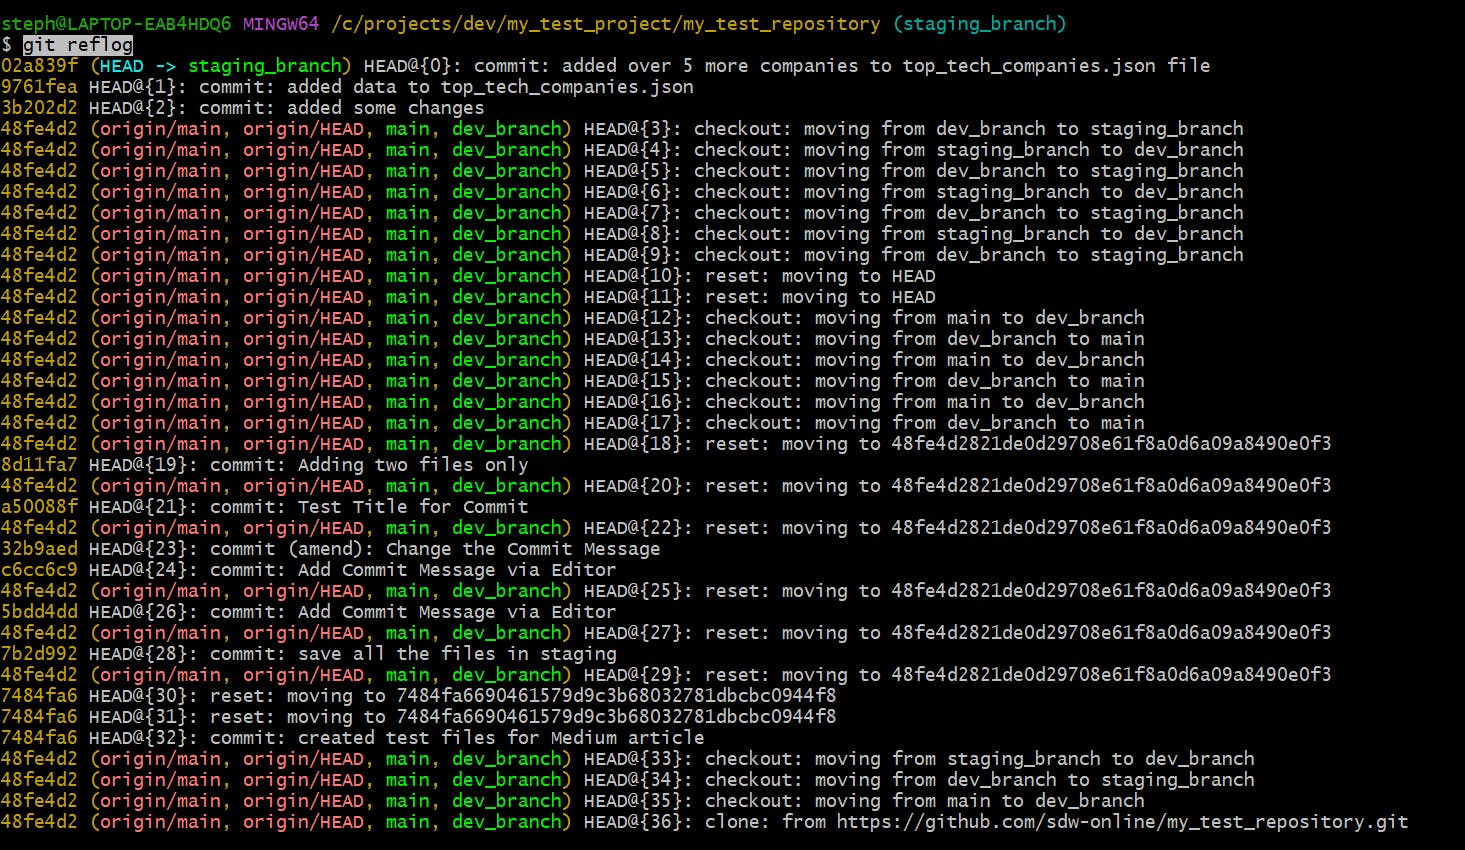
git reflog
Lists the changes made in Git
The git reflog command shows the list of changes made in the Git repository. This command is useful for recovering lost commits caused by merges, rebases and resets, among other actions.
The main difference between the git reflog and git log command is that git reflog shows all the commits and changes of any branch within your repository, including the ones created, modified and deleted. git log only shows the complete commit history of the current (or specified) branch, and therefore doesn’t include commits from other branches or deleted ones.
View the change history of your repo
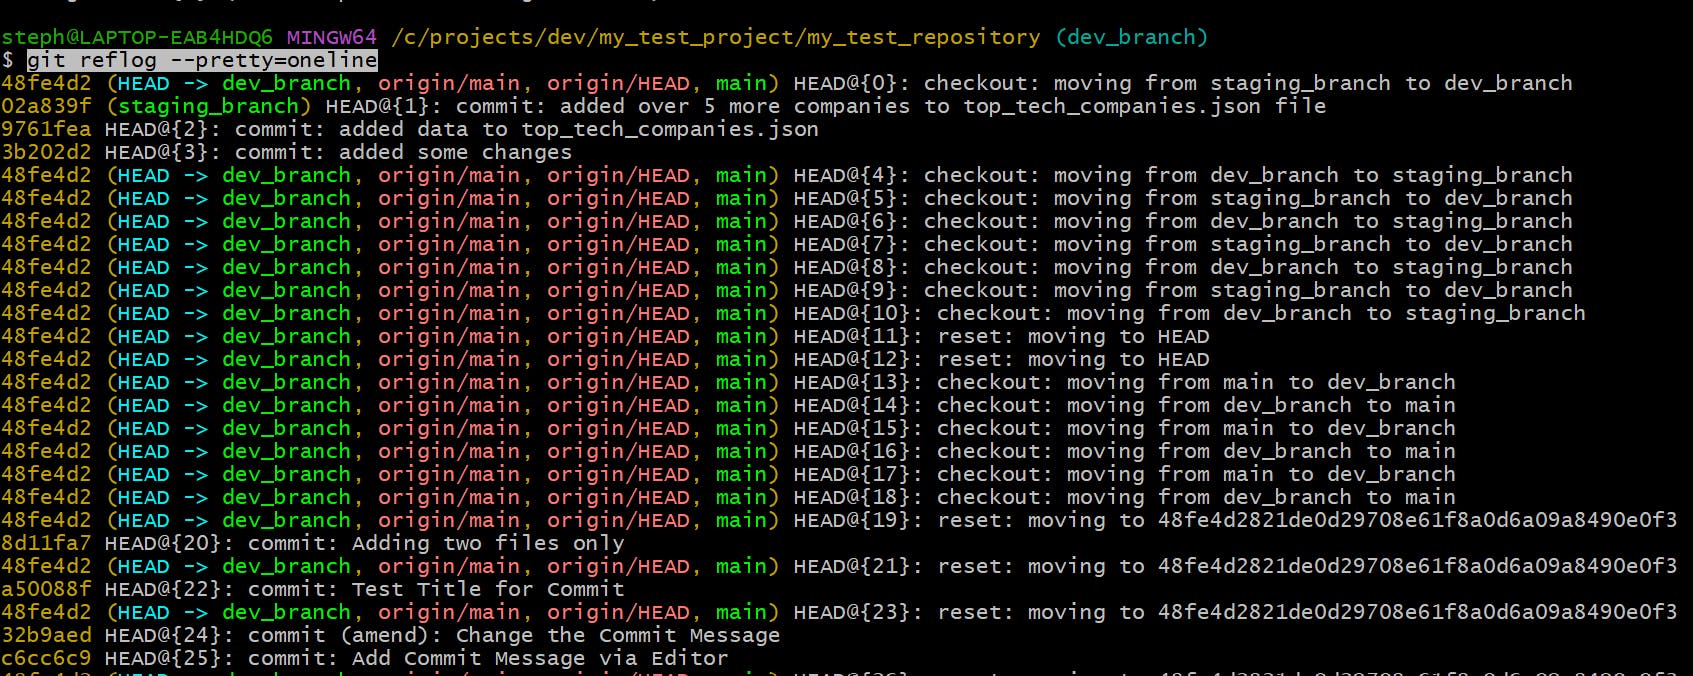
git reflog
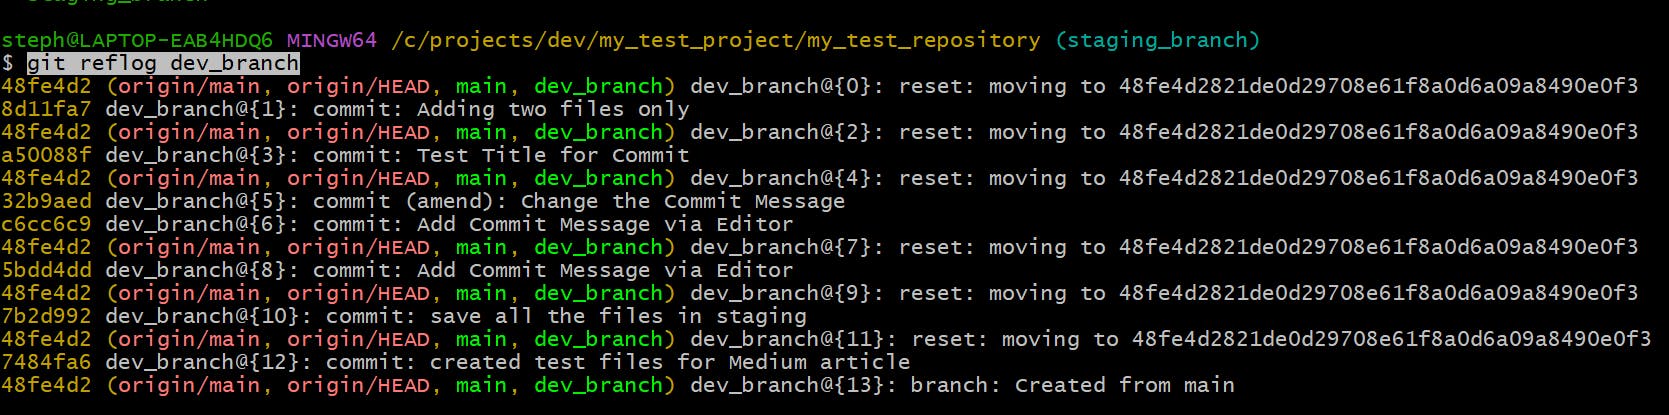
View the change history of a specific branch
git reflog {branch_name}
Limit the changes shown by a specific number
git reflog -n {number_of_entries}
Specify the number of entries to display when viewing the repo’s change history

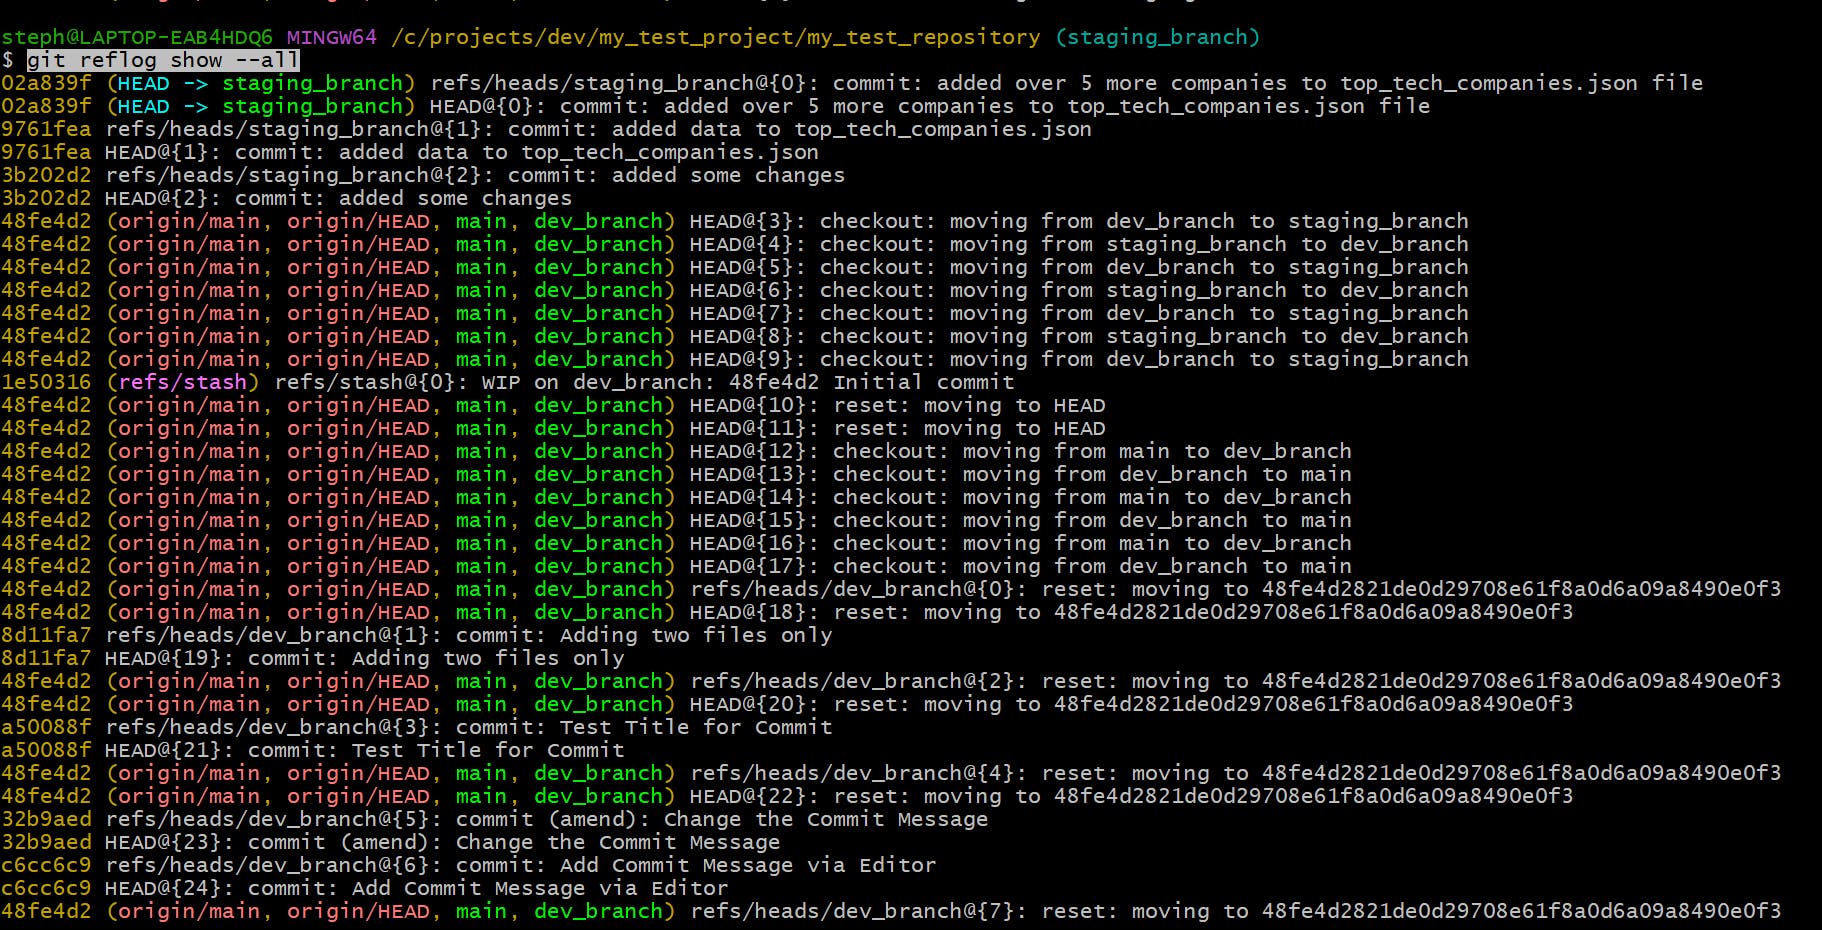
View the change log for all references
git reflog show --all
This will show the change history for every branch and tag within the repo instead of just the HEAD pointer
View each change & commit entry on a single line
git reflog --pretty=oneline
This displays the changes and commits in the changes history in one-line format, which includes the commit hash, commit message and branch name.
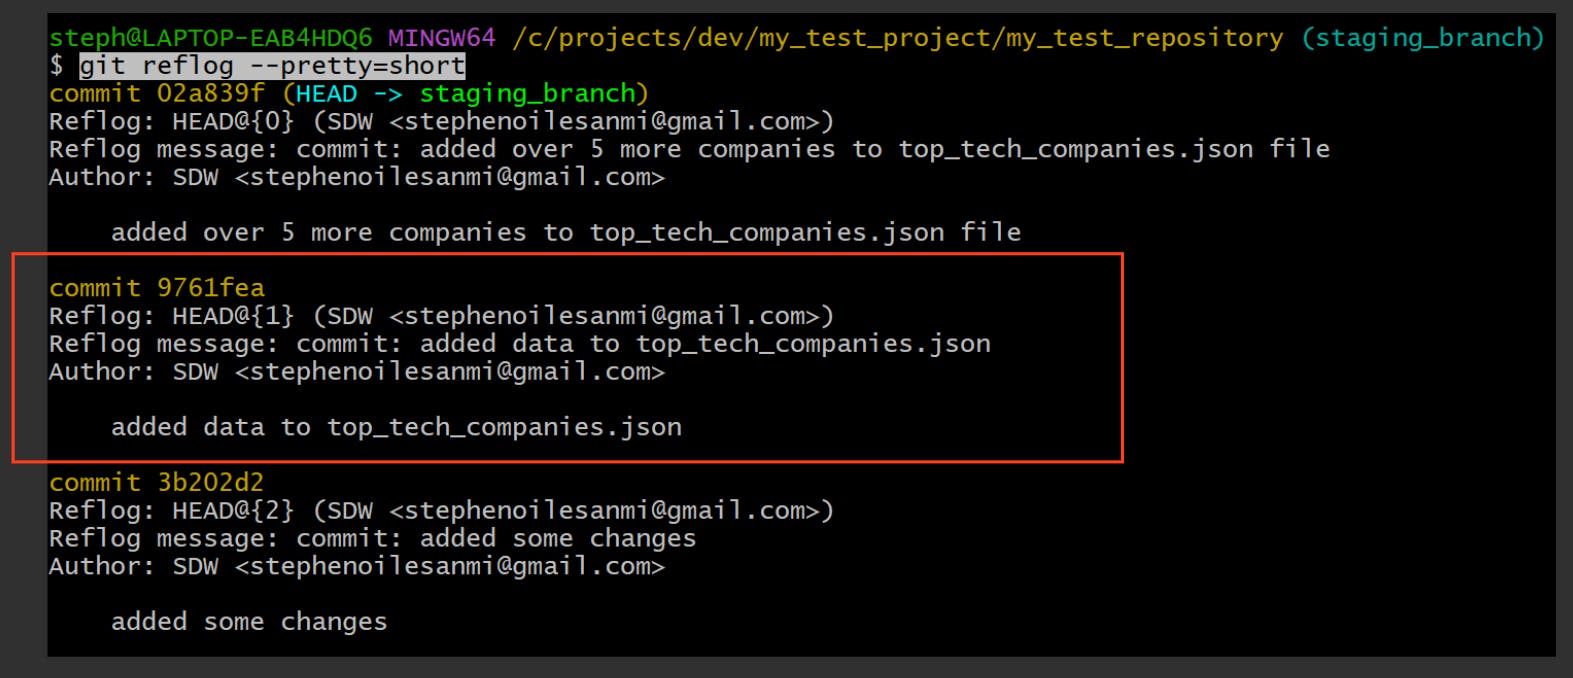
View each change entry in a short format
git reflog --pretty=short
Each change is displayed in a short, condensed format which includes the commit hash, commit message, author etc.
View each change entry in a medium format
git reflog --pretty=medium
This displays the changes in a format similar to git log, as per below:
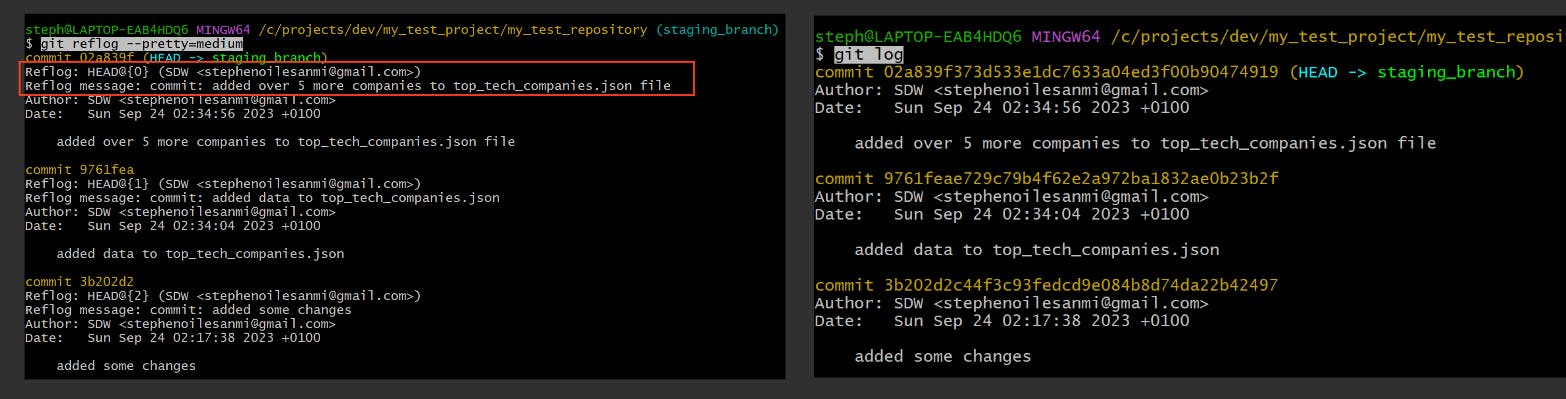
The git reflog (left image) and the git log commands share similar details, but the main difference is that the git reflog version contains the HEAD pointer’s reflog details which the git log one lacks.
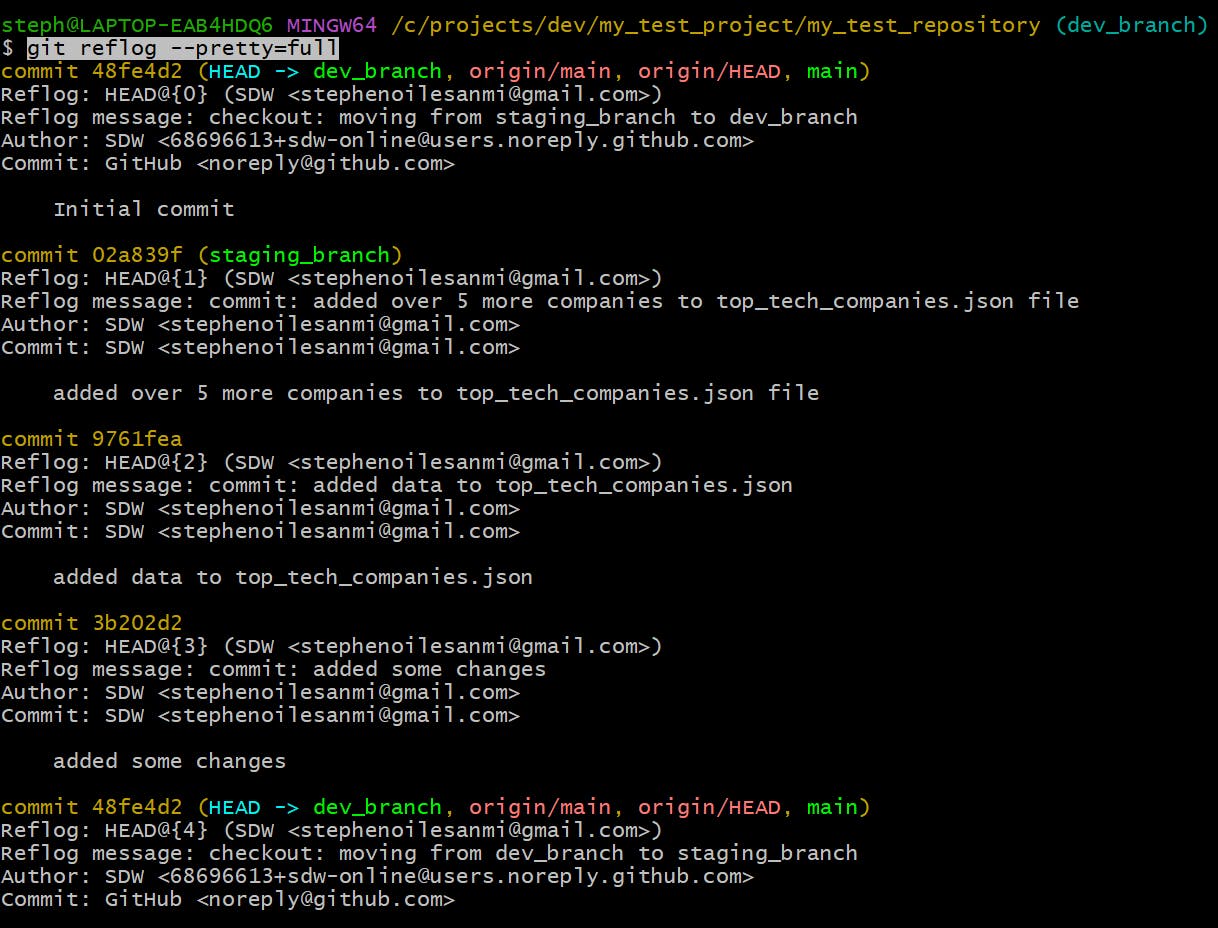
View each change entry in full detail
git reflog --pretty=full
This will display each change with more robust information than the previous git reflog --pretty options mentioned, like below:
git diff
Displays the differences between commits
Show the changes between the modified files
git diff

Show the names of modified files
git diff --name-only

Show the name and statuses of modified files
git diff --name-status

Show useful stats about each modified file
This displays some key statistics about each file that has changed in your repo, like the number of lines added or deleted, the percentage of changes made etc
git diff --stat

Compare different versions of some work
git diff -p {commit_hash_1} {commit_hash_2}
or
git diff -patch {commit_hash_1} {commit_hash_2}

git reset
Rolls back to a previous commit
In Git, the git reset command is used to undo changes made in the working directory and/or staging area. This is achieved by the HEAD pointer moving to a previous commit, which means any changes since that commit will be permanently deleted.
Reset the commit history only (soft reset)🟢
git reset --soft {commit_hash}
This reverts to the commit specified by the user while leaving the changes untouched in the working directory and staging area. In other words, this approach only changes the commit history and not the staging area or working directory.
Reset the commit history and staging area only (mixed reset)🟡
git reset {commit_hash}
or
git reset --mixed {commit_hash}
This undoes any changes to the commit history and the staging area by resetting the HEAD pointer to the previous (or specified) commit, and therefore will permanently wipe out all staged changes that have not been committed.
Reset the commit history, working tree and staging area (hard reset)🔴
git reset --hard {commit_hash}
This approach resets any changes made to the commit history, staging areas and the working directory. This is done by resetting the HEAD pointer to the specified commit.
⚠️Warning: This could impact the work of other colleagues if you’re working on the same repository, so only use this if you know exactly what you’re doing, otherwise consider safer alternatives.
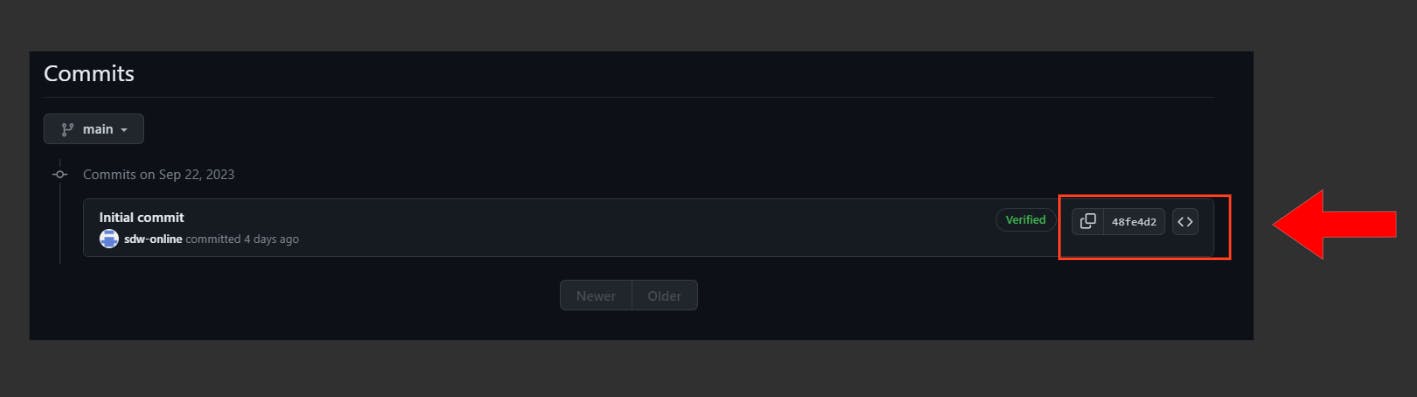
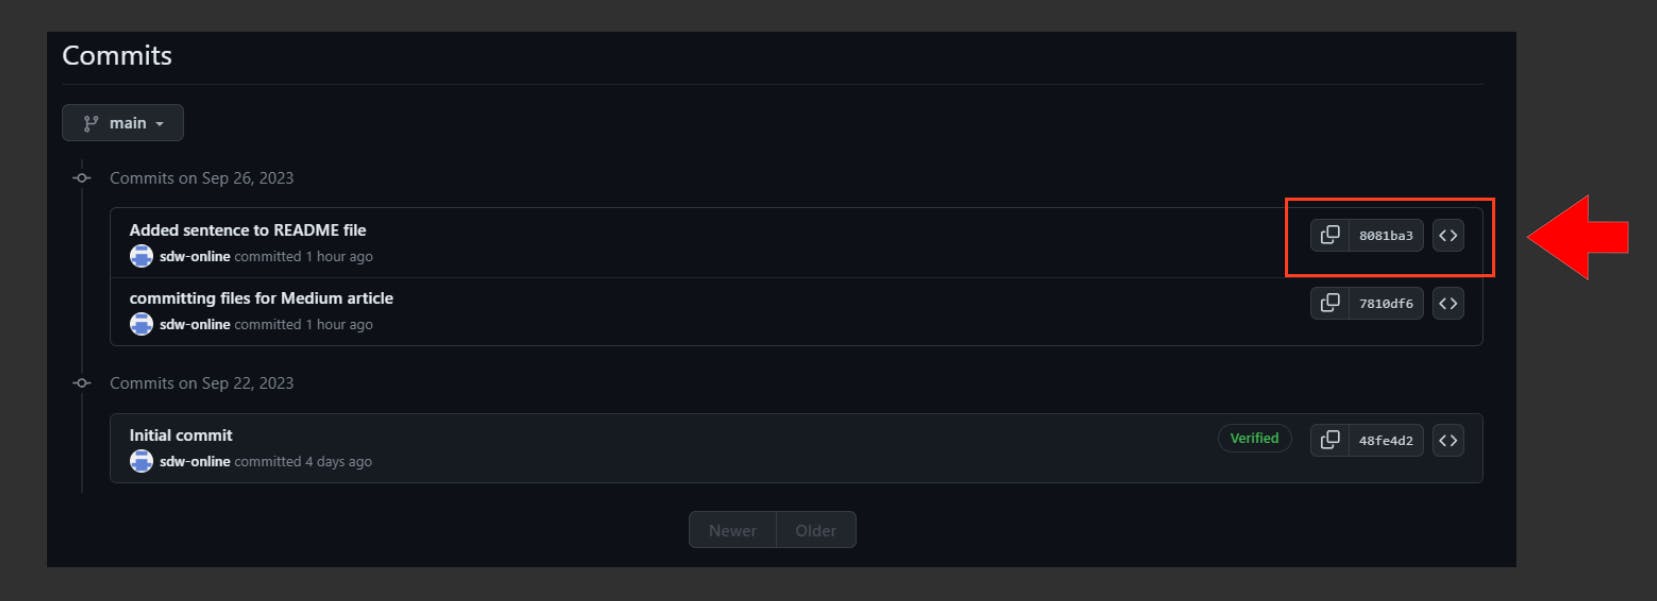
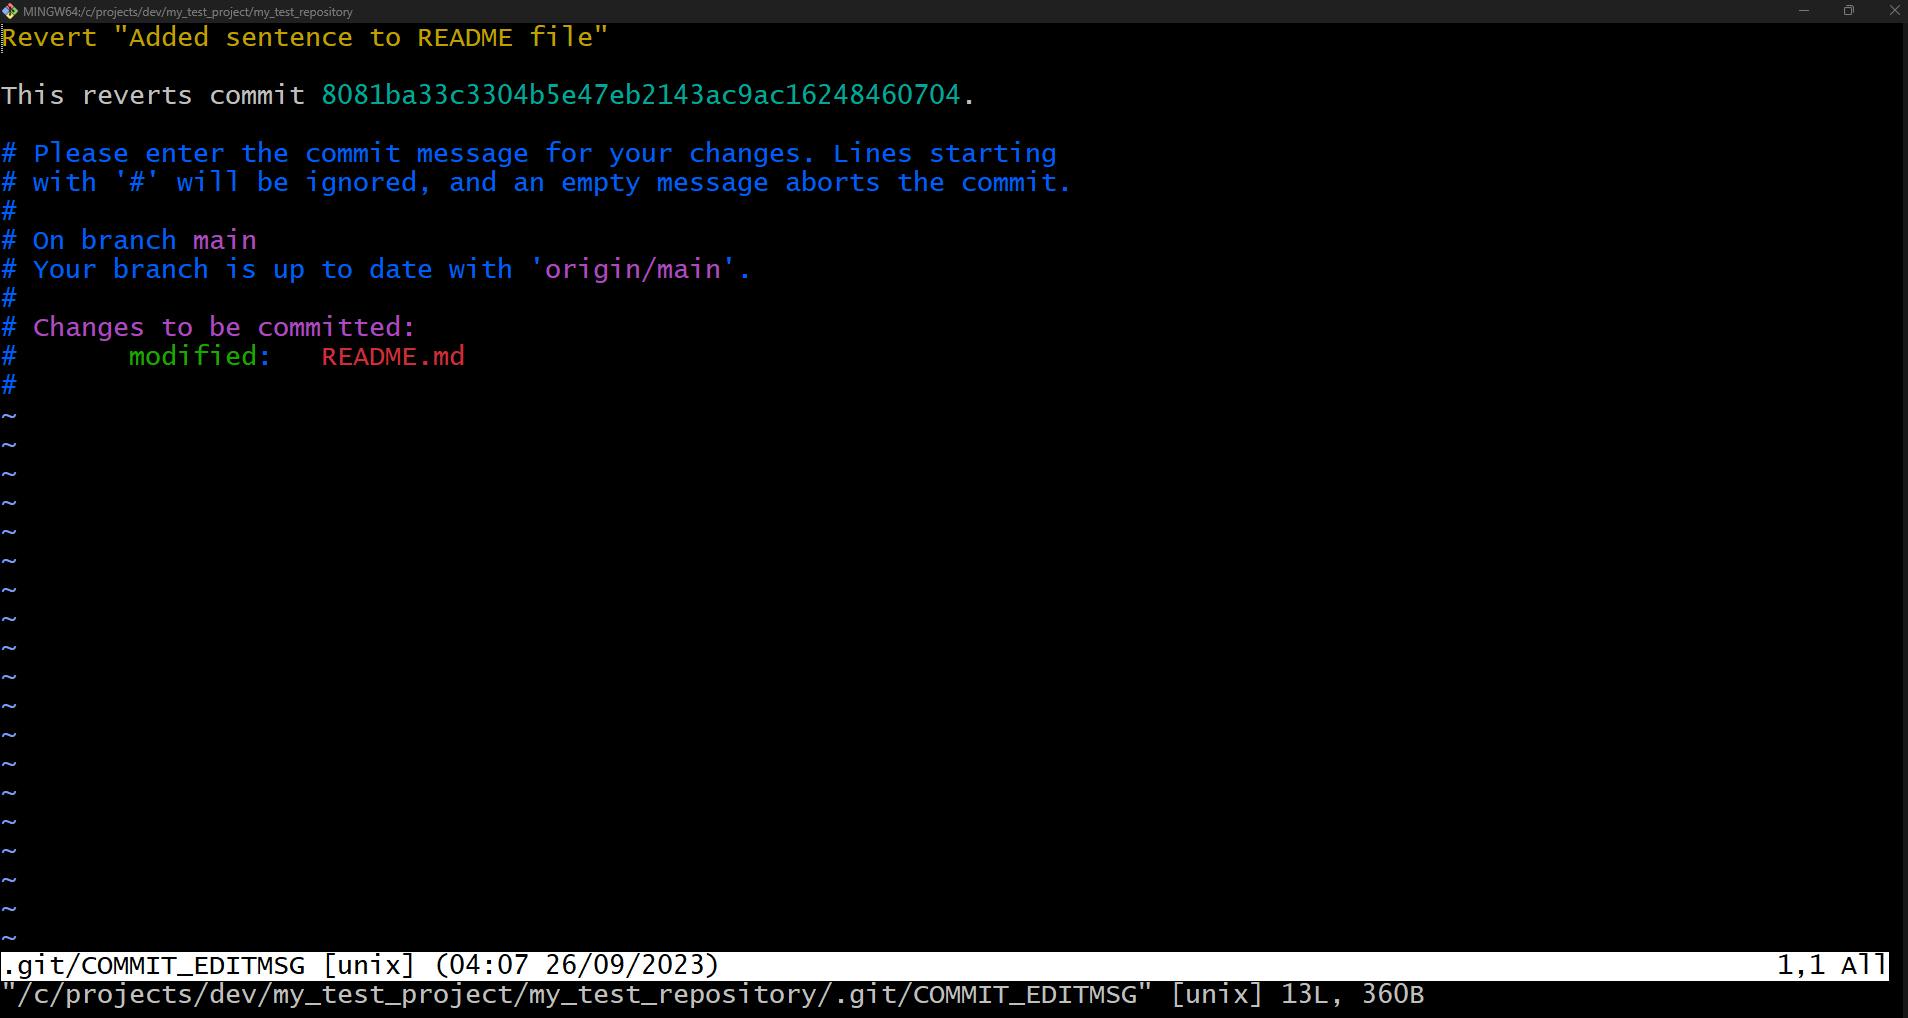
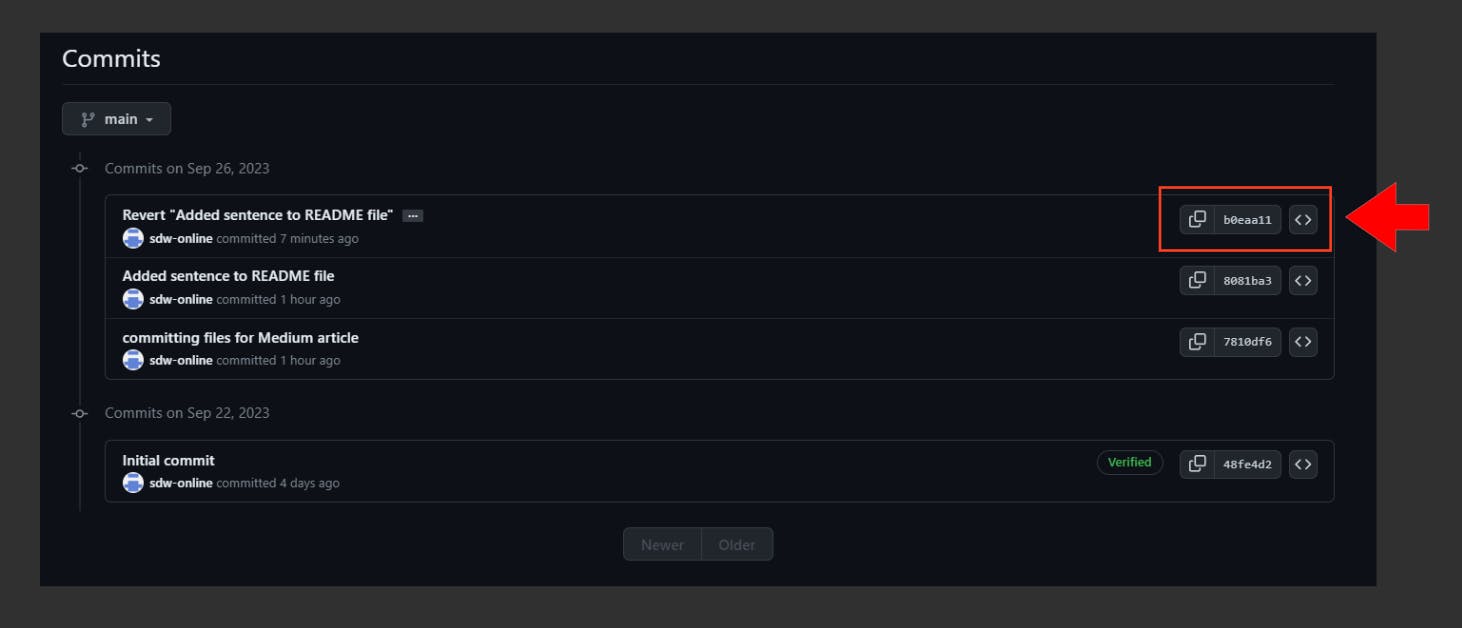
git revert
Creates a new commit that undoes a previous change
The git revert is a command that reverses the changes made in a previous commit within the Git repository by creating a new commit.
Revert the latest commit
git revert HEAD
Revert a specific commit
git revert {commit_hash}
Revert a merge commit
git revert -m {parent_number} {commit_hash}
Revert the last n commits
git revert -i HEAD~n
Change n to the number of your choice
git grep
Searches for keywords in the repository
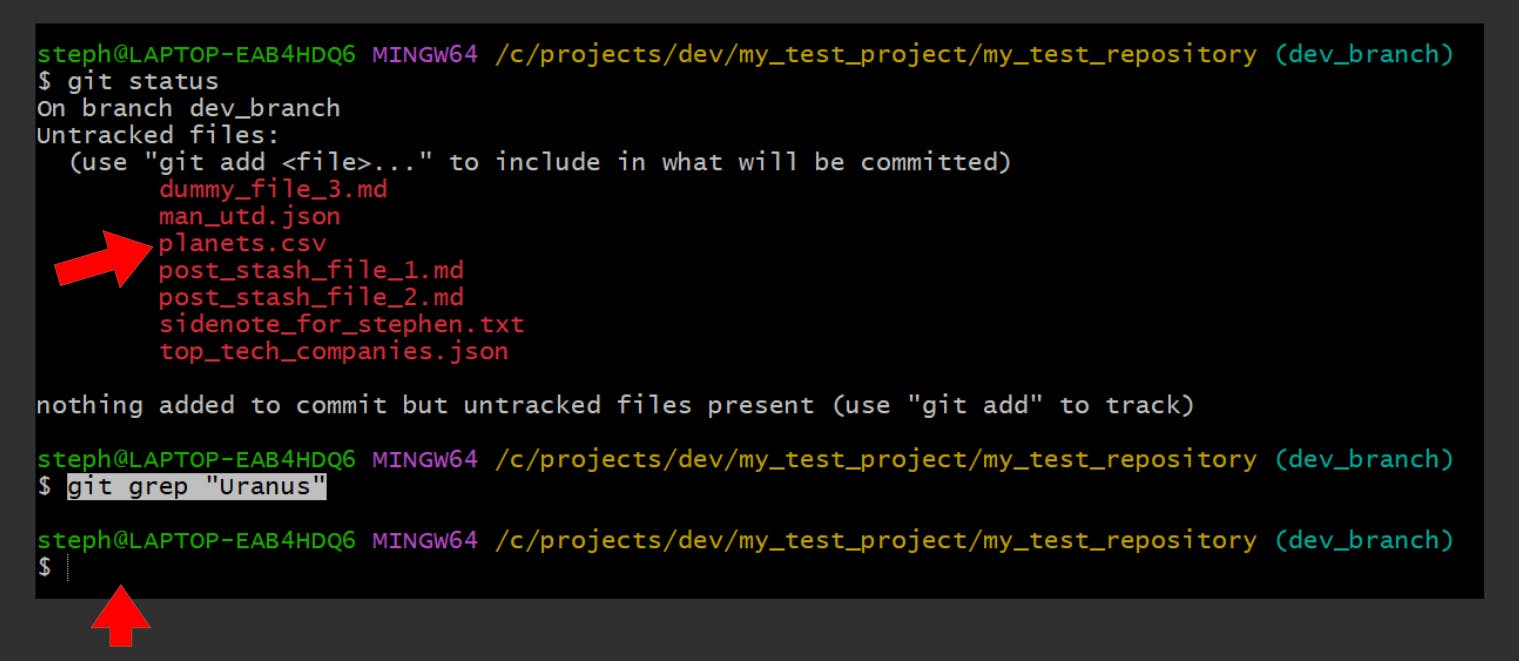
The git grep is used to search for a string of text, characters and patterns within any file of your Git repository (i.e. tracked and untracked files).
Search for a text string in your repo
git grep "{string_of_text}"
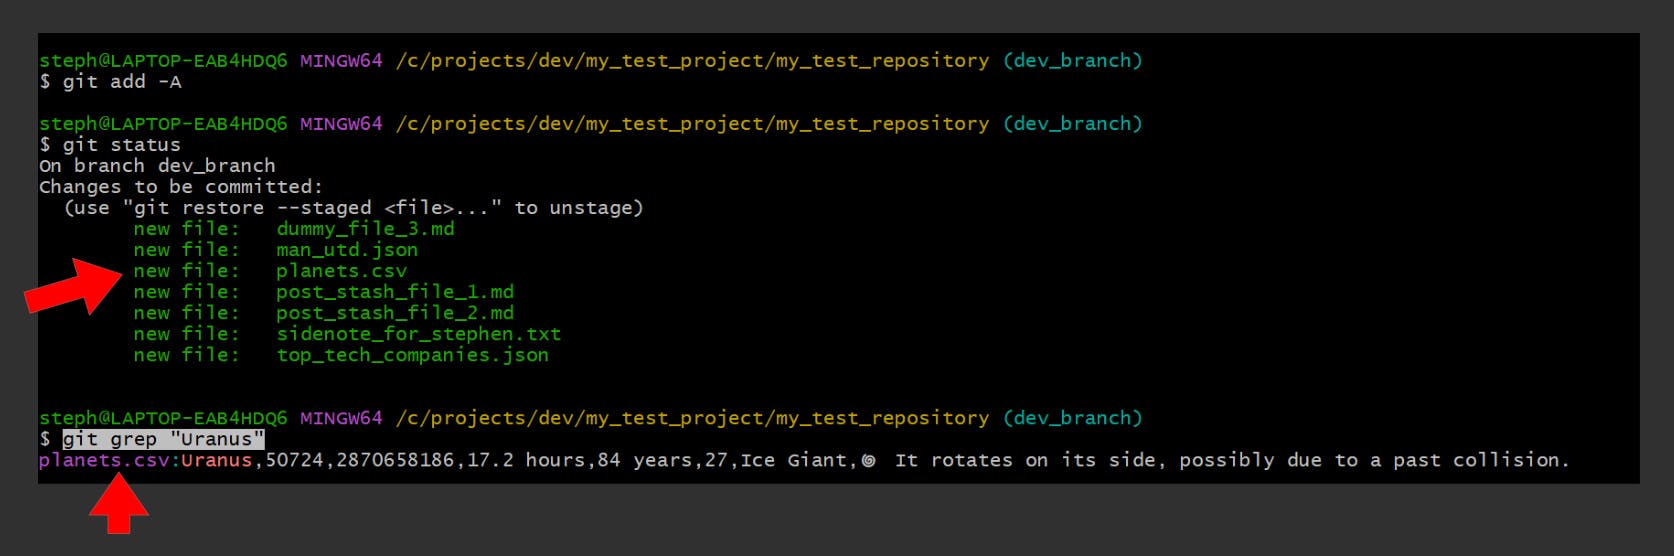
Here we try to find the planet named “Uranus” within the planets.csv file, however it is not currently tracked, so running git grep “Uranus” would return nothing:
Once the files are added to the staging area, we can expect a different result:
Search for a text string within a subdirectory
git grep "{string_of_text}" {sub_directory_path}/
Search for a text string within a specific branch
git grep "{string_of_text}" {branch_name}
Search for a text string within the staging area
git grep --cached "{string_of_text}"

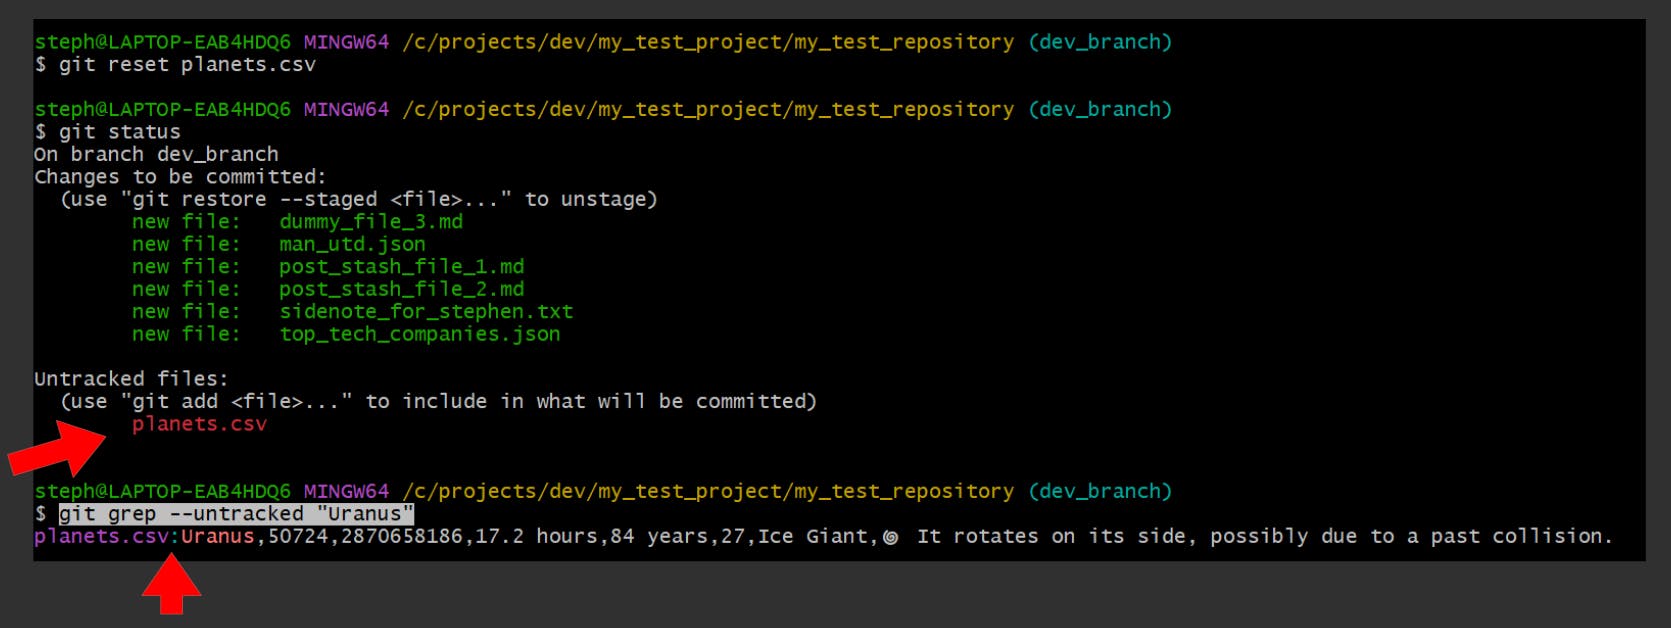
Search for a text string within an untracked file
git grep --untracked "{string_of_text}"
Search for a term with its line number
git grep -n "{string_of_text}"


Search for the number of matches for a term
git grep -c "{string_of_text}"
